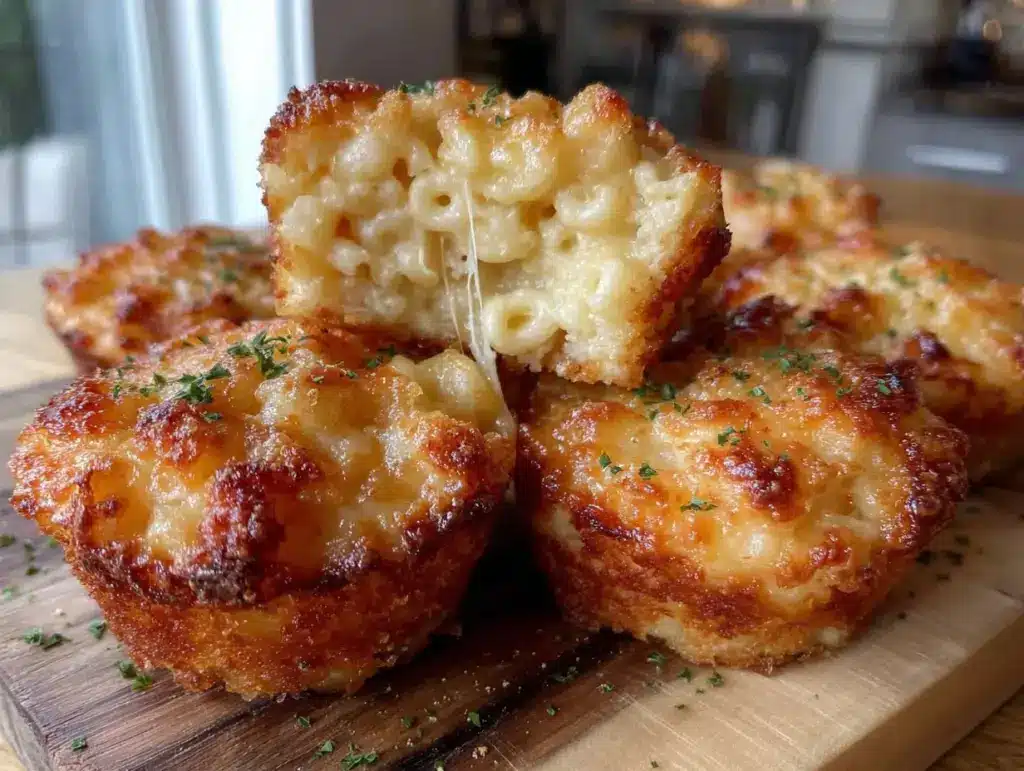
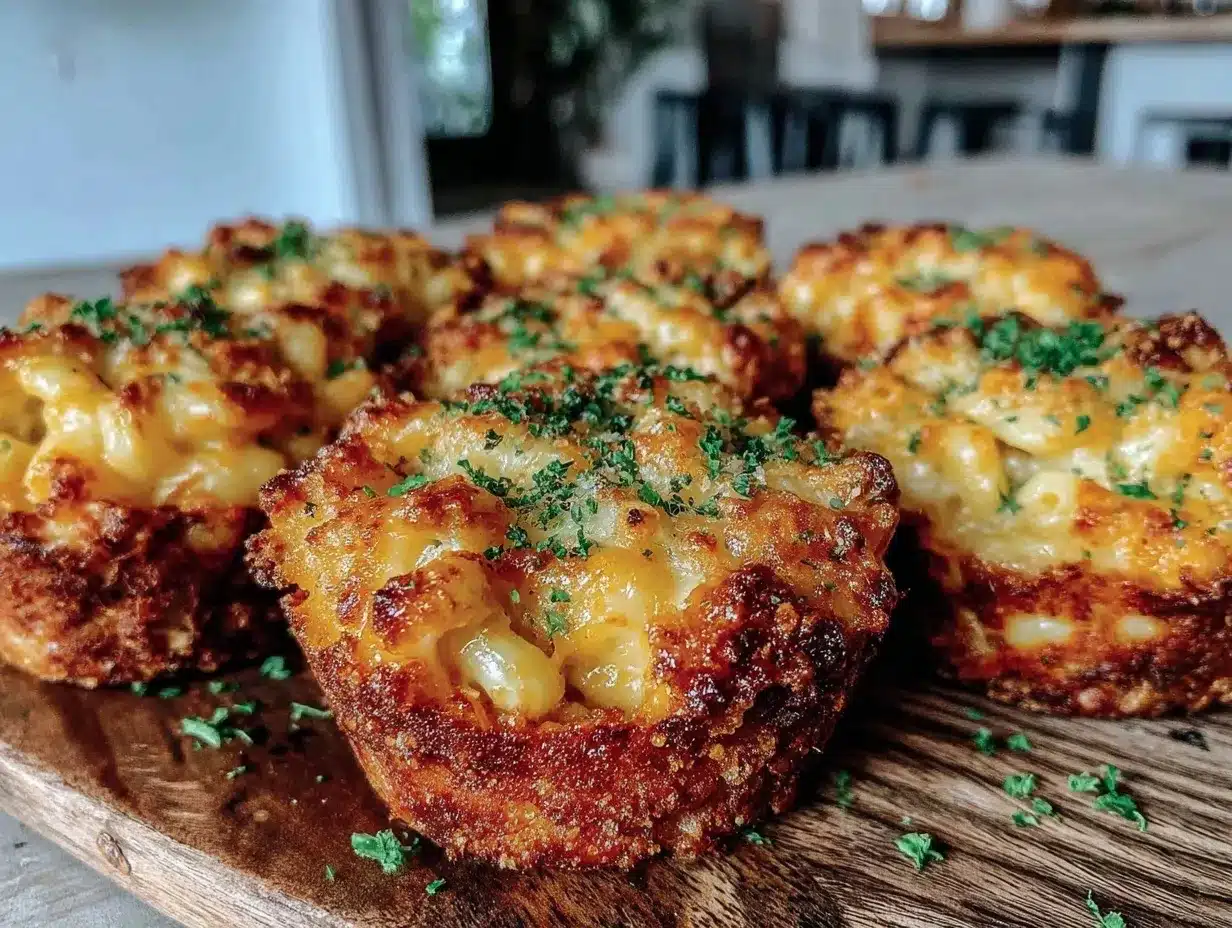
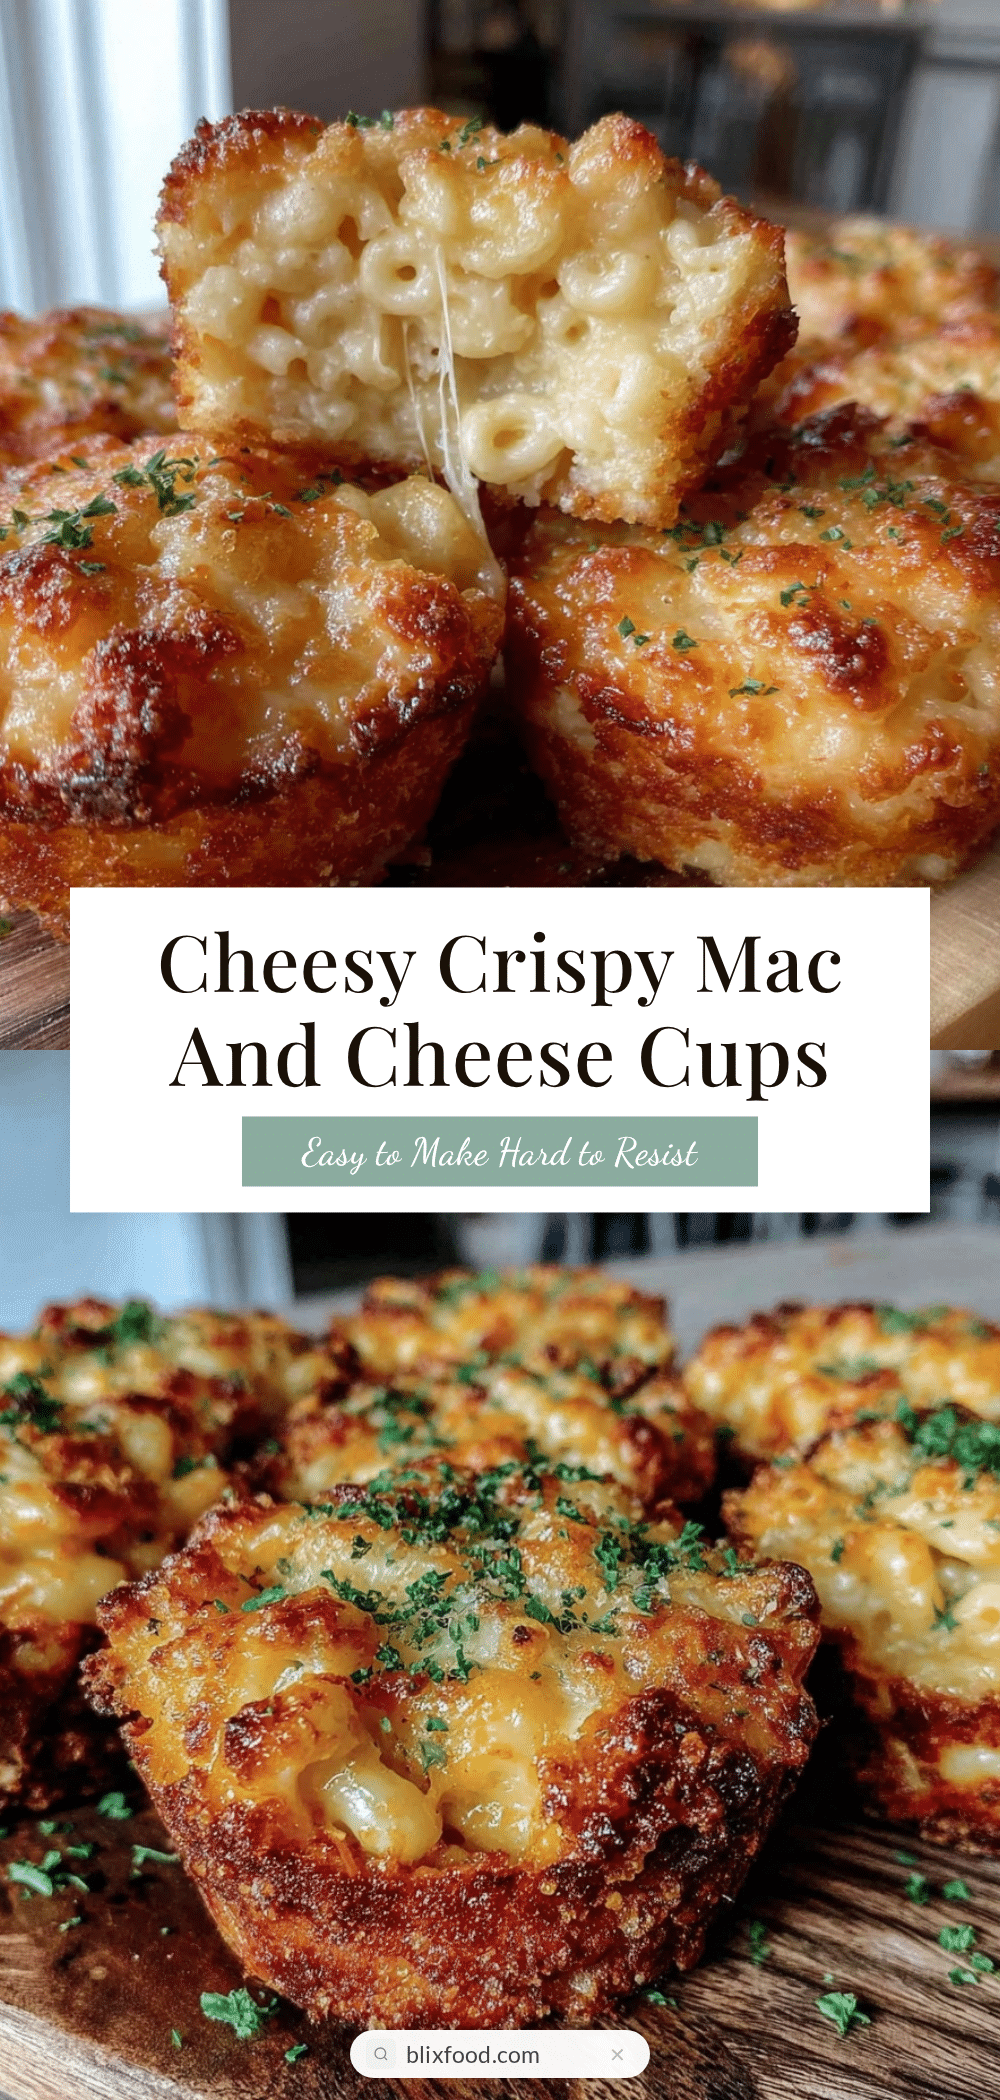
The moment my youngest accidentally dropped a bowl of mac and cheese on the floor, I thought, well, that’s dinner ruined. But instead of frustration, a spark of inspiration hit me while scooping up the mess (with some serious side-eye). What if I made mac and cheese more fun and less messy? That’s how these Crispy Mac and Cheese Cups for Kids came to be—kind of an accident turned little kitchen victory. Honestly, I was skeptical at first. How could baked mac and cheese in a muffin tin capture that gooey, comforting vibe? But the crisp edges and melty cheesy center quickly won me over—and the kids, too. They gobbled these up so fast, I barely had time to grab a cup myself.
There’s something about the crackly crust on each cup that adds a new dimension to the classic comfort dish. Plus, they’re perfectly portioned for little hands, which means less fighting over the last bite. The whole idea stuck because it turns a familiar favorite into an easy, grab-and-go snack that feels special without any extra fuss. I still make a batch whenever I need a quick win on busy evenings or a crowd-pleasing party appetizer that even the pickiest eaters devour. Somehow, these crispy mac and cheese cups always bring that warm fuzzy feeling of home—and yes, they work just as well for grown-ups craving a cheesy snack (no judgment here!).
It’s funny how a tiny kitchen mishap led to a recipe that’s now a staple in our rotation. The best part? They’re customizable, easy to whip up, and packed with cheesy goodness that melts in your mouth. Once you taste the crispy edges paired with the creamy inside, you’ll get why this recipe has a way of sneaking into your heart and your snack list.
Why You’ll Love This Recipe
Making Crispy Mac and Cheese Cups isn’t just about feeding hungry kids—it’s about creating a dish that’s fast, fuss-free, and downright addictive. After testing countless versions, tweaking cheese blends, and fiddling with baking times, I landed on this winner that balances crispy, creamy, and cheesy in every bite. Here’s why it’s become a go-to in our kitchen:
- Quick & Easy: Ready in under 30 minutes, these cups save the day when you need a fast snack or a last-minute party treat.
- Simple Ingredients: No hunting for exotic items—just pantry staples like elbow macaroni, cheddar cheese, and a few kitchen basics.
- Perfect for Kids’ Lunchboxes or Snack Time: Portable, manageable portions that kids can eat with their hands, reducing mess and maximizing smiles.
- Crowd-Pleaser: Whether it’s a birthday party or a cozy family night, these cups always get rave reviews from little food critics and adults alike.
- Unbelievably Delicious: The crispy golden crust gives way to a luscious, cheesy interior that tastes like classic comfort food but in a fun new form.
What sets this recipe apart is the little tricks that make the texture pop—like a light coating of breadcrumbs for crunch and a blend of cheeses that melt smoothly without getting greasy. Plus, I add a subtle hint of mustard powder to punch up the flavor without overpowering the kids’ palates. (If you want to try something a bit different, you can swap in pepper jack or mozzarella for variety.) Honestly, it’s the kind of recipe that makes you close your eyes after the first bite, savoring that perfect cheesy hug. It’s comfort food reimagined for busy families who want something both satisfying and practical.
For a fun twist on appetizers, these mac and cheese cups pair beautifully with lighter bites like the creamy cheese-stuffed cherry tomatoes, adding a fresh balance to a cheesy spread. And if you’re putting together a snack board for a party, these crispy cups fit right in with other handheld treats like mini cheese balls or crispy bacon-wrapped smokies. Just saying—these cups aren’t just for kids; they’re a winner for everyone at the table.
What Ingredients You Will Need
This recipe uses simple, wholesome ingredients to deliver bold flavor and satisfying texture without the fuss. Most of these items are pantry staples, so you can usually pull everything together without a special trip to the store. Here’s what you’ll need:
- Elbow macaroni: About 2 cups (uncooked) or 200 grams. Classic small pasta shape that holds sauce well.
- Cheddar cheese: 2 cups shredded (about 200 grams). Sharp or mild, depending on your kid’s taste. I like Cabot for its creamy melt.
- Milk: 1 cup (240 ml), whole or 2%. You can swap with almond or oat milk if preferred.
- Unsalted butter: 2 tablespoons (30 grams), melted to mix into the sauce.
- All-purpose flour: 2 tablespoons (16 grams) to create the roux base for the cheese sauce.
- Bread crumbs: 1/2 cup (50 grams), preferably panko for extra crunch on top.
- Mustard powder: 1/2 teaspoon for a subtle flavor boost (optional but recommended).
- Salt and pepper: To taste—start with 1/2 teaspoon salt and 1/4 teaspoon black pepper.
- Egg: 1 large, beaten, to bind the mixture so the cups hold their shape well.
Optional add-ins if you want to get creative:
- Cooked bacon bits: For a smoky twist that pairs beautifully with cheese.
- Chopped green onions or chives: Adds a fresh pop of color and mild onion flavor.
- Parmesan cheese: Sprinkle on top of the cups before baking for an extra golden crust.
When I’m in a pinch, I’ve swapped the elbow macaroni for small shells or mini penne, and it works just fine. For gluten-free versions, use gluten-free pasta and breadcrumbs. The key is to keep the pasta well-drained but slightly moist so the cups don’t dry out during baking.
Equipment Needed
- Muffin tin: A standard 12-cup muffin pan works best to shape the mac and cheese cups. Non-stick pans make clean-up easier.
- Mixing bowls: One medium bowl for combining ingredients, and one small bowl for the wet mix.
- Whisk: For making the roux and cheese sauce smoothly without lumps.
- Measuring cups and spoons: Accuracy matters in baking, so keep these handy.
- Spatula or wooden spoon: For mixing the cheese sauce into the pasta gently.
- Colander: To drain the cooked pasta.
If you don’t have a muffin tin, you can use silicone cupcake molds for easy release, or small ramekins, but baking time might vary. I’ve tried metal versus silicone pans, and honestly, the metal ones give a crisper edge, which I prefer for this recipe. For cleanup, a quick spray of cooking oil on the cups before filling them helps avoid sticking issues. If you’re often baking cheesy dishes, investing in a good-quality non-stick muffin pan is worth it—it makes life so much easier!
Preparation Method
- Cook the pasta: Bring a large pot of salted water to a boil. Add 2 cups (200 grams) of elbow macaroni and cook until just al dente, about 7 minutes. Drain well and set aside. (Don’t overcook here, or the cups will get mushy.)
- Make the roux: In a medium saucepan, melt 2 tablespoons (30 grams) of unsalted butter over medium heat. Whisk in 2 tablespoons (16 grams) of all-purpose flour and cook for about 1-2 minutes, stirring constantly until the mixture turns slightly golden and fragrant. This step prevents that raw flour taste.
- Prepare the cheese sauce: Slowly whisk in 1 cup (240 ml) of milk, making sure to blend well to avoid lumps. Keep whisking until the sauce thickens, about 4-5 minutes. Remove from heat and stir in 2 cups (200 grams) shredded cheddar cheese until melted and smooth. Add 1/2 teaspoon mustard powder, salt, and pepper to taste.
- Combine pasta and sauce: Fold the drained macaroni into the cheese sauce until every piece is coated evenly. Let the mixture cool slightly for 5 minutes to avoid scrambling the egg in the next step.
- Add the binder: Stir in 1 beaten large egg to help the cups hold shape. Mix well but gently—don’t overwork it.
- Prepare the muffin tin: Lightly spray or butter each cup. Sprinkle a little panko breadcrumb (about 1 teaspoon) into the bottom of each cup to add extra crunch.
- Fill the cups: Spoon the mac and cheese mixture evenly into each muffin cup, packing lightly but not pressing too hard. Sprinkle the tops with remaining breadcrumbs for a crispy topping.
- Bake: Preheat your oven to 375°F (190°C). Bake the mac and cheese cups for 20-25 minutes, or until the tops are golden brown and crispy, and the edges start to pull away from the pan slightly.
- Cool and serve: Let the cups cool in the pan for 5 minutes before carefully removing with a small spatula or butter knife. Serve warm or at room temperature.
Pro tip: If you notice the tops browning too quickly, tent the pan loosely with foil halfway through baking. When mixing, don’t skip the mustard powder—it brings out the cheese flavor in a subtle but noticeable way. And don’t rush cooling; these cups firm up nicely, making them easier to handle for little fingers.
Cooking Tips & Techniques
Cooking mac and cheese cups that are crispy outside and creamy inside is a bit of an art, and here’s what I’ve learned after several batches:
- Don’t overcook the pasta: Al dente is key. Overcooked pasta turns mushy and won’t hold its shape in the cups.
- Make a smooth cheese sauce: Whisk constantly when adding milk to the roux to avoid lumps. Patience here pays off.
- Use the beaten egg as a binder: It’s a small step but critical for the cups to hold together without falling apart.
- Breadcrumb topping is a must: Panko breadcrumbs give that perfect crunch; regular breadcrumbs work but won’t be as crispy.
- Don’t skip cooling time: Letting the cups rest after baking helps them set and makes removal from the pan easier.
One lesson I stumbled on was rushing to unmold the cups when hot—they tend to break apart. Waiting a few minutes cooled them nicely. Also, I tried mixing cheeses (cheddar and mozzarella) for stretchiness, but too much mozzarella made them too gooey and hard to hold. Sharp cheddar keeps them flavorful and firm. Sometimes I multitask and prep the sauce while the pasta cooks to save time. It’s a simple workflow that keeps the kitchen chaos to a minimum.
Variations & Adaptations
This recipe is flexible enough to fit different tastes, dietary needs, and occasions. Here are some ways I’ve customized these mac and cheese cups:
- Gluten-free: Swap regular pasta for gluten-free elbow macaroni and use gluten-free breadcrumbs. Make sure your roux uses GF flour or cornstarch.
- Veggie boost: Stir in finely chopped steamed broccoli, spinach, or peas before baking to sneak in some greens.
- Spicy twist: Add a pinch of smoked paprika or cayenne pepper to the cheese sauce for a subtle kick.
- Bacon lovers: Toss in cooked, crumbled bacon pieces with the pasta for smoky flavor. (A crowd favorite in our house.)
- Cheese swap: Try mixing cheddar with gouda, mozzarella, or pepper jack to vary texture and heat.
For a fun change, I once baked them in mini muffin tins as bite-sized appetizers at a kid’s party, and they disappeared in seconds. You can also reheat these cups in the air fryer for a few minutes to bring back the crispiness—perfect after a day in the fridge.
Serving & Storage Suggestions
These mac and cheese cups are best enjoyed warm to appreciate the melty cheese and crispy edges. Serve them as a snack, part of a lunchbox, or a side dish with a fresh salad or steamed veggies. For parties, they pair beautifully with light, fresh appetizers like the fresh shrimp salad appetizers, balancing the cheesy richness perfectly.
To store, place cooled cups in an airtight container and refrigerate for up to 3 days. They also freeze well—wrap individually or layer with parchment paper in a freezer-safe container for up to 2 months. To reheat, pop them in a 350°F (175°C) oven for 10-15 minutes or use an air fryer for 5 minutes to regain that crispy texture.
Flavors mellow and meld nicely after a day, so sometimes I make these a day ahead for easy entertaining or quick weekday snacks. Just remember, reheated cups may not be quite as crisp as fresh but still delicious and comforting.
Nutritional Information & Benefits
A serving of these crispy mac and cheese cups (about one cup) contains roughly 250-300 calories, with protein from cheese and eggs, and carbohydrates from pasta and breadcrumbs. They provide calcium from the cheese and butter and a small amount of vitamin D if using fortified milk.
This recipe can be adapted to fit low-sodium or dairy-free diets by choosing appropriate ingredient swaps, such as low-sodium cheese or dairy-free milk and cheese alternatives. Adding veggies boosts fiber and vitamins, making these cups a bit more balanced.
From a practical standpoint, these cups offer a comforting, kid-friendly way to get some calcium and protein into little bodies without the fuss of a sit-down meal. I’ve found that the crispy bite encourages even reluctant eaters to take seconds, which is always a win.
Conclusion
These Crispy Mac and Cheese Cups for Kids are more than just a snack—they’re a reliable, delicious little miracle when you need comfort food without the mess. Whether you’re packing lunches, feeding hungry kids after school, or looking for a crowd-pleasing appetizer, this recipe is a keeper. It’s flexible, simple, and hits that perfect balance of crispy edges with creamy, cheesy filling every time.
Personally, I love that this recipe started from a kitchen mishap and became a family favorite, showing that sometimes the best dishes come from happy accidents. Feel free to make it your own by swapping cheeses, adding veggies, or even turning it into mini bites for parties. I’d love to hear how you customize these cups in your kitchen!
Don’t hesitate to share your versions and questions in the comments below—let’s keep the cheesy comfort food love going strong.
Frequently Asked Questions
Can I make these mac and cheese cups ahead of time?
Yes! You can prepare and bake them a day in advance, store in the fridge, and reheat in the oven or air fryer before serving. They also freeze well for longer storage.
What’s the best cheese to use for mac and cheese cups?
Sharp cheddar is classic and melts well, but you can mix in mozzarella, gouda, or pepper jack for different flavors and textures.
Can I make these cups gluten-free?
Absolutely. Just use gluten-free pasta, gluten-free flour or cornstarch for the roux, and gluten-free breadcrumbs.
How do I keep the cups from sticking to the pan?
Lightly grease or butter your muffin tin and sprinkle a bit of breadcrumbs on the bottom of each cup before filling. Letting the cups cool a few minutes after baking also helps with easy removal.
Can I add veggies to this recipe?
Definitely. Finely chopped steamed broccoli, spinach, or peas mix in well and add a boost of nutrition without overpowering the cheesy flavor.
Pin This Recipe!
Crispy Mac and Cheese Cups

These crispy mac and cheese cups are a fun, kid-friendly twist on classic comfort food, featuring a crunchy exterior and a creamy, cheesy center. Perfect as a snack, lunchbox treat, or party appetizer.
- Prep Time: 15 minutes
- Cook Time: 25 minutes
- Total Time: 40 minutes
- Yield: 12 cups 1x
- Category: Snack
- Cuisine: American
Ingredients
- 2 cups (200 grams) elbow macaroni, uncooked
- 2 cups (200 grams) shredded cheddar cheese
- 1 cup (240 ml) milk (whole or 2%)
- 2 tablespoons (30 grams) unsalted butter, melted
- 2 tablespoons (16 grams) all-purpose flour
- 1/2 cup (50 grams) panko bread crumbs
- 1/2 teaspoon mustard powder
- 1/2 teaspoon salt
- 1/4 teaspoon black pepper
- 1 large egg, beaten
- Optional: cooked bacon bits
- Optional: chopped green onions or chives
- Optional: Parmesan cheese for topping
Instructions
- Bring a large pot of salted water to a boil. Add 2 cups (200 grams) of elbow macaroni and cook until just al dente, about 7 minutes. Drain well and set aside.
- In a medium saucepan, melt 2 tablespoons (30 grams) of unsalted butter over medium heat. Whisk in 2 tablespoons (16 grams) of all-purpose flour and cook for 1-2 minutes, stirring constantly until slightly golden and fragrant.
- Slowly whisk in 1 cup (240 ml) of milk, blending well to avoid lumps. Continue whisking until the sauce thickens, about 4-5 minutes. Remove from heat and stir in 2 cups (200 grams) shredded cheddar cheese until melted and smooth. Add 1/2 teaspoon mustard powder, salt, and pepper to taste.
- Fold the drained macaroni into the cheese sauce until evenly coated. Let the mixture cool slightly for 5 minutes.
- Stir in 1 beaten large egg to help the cups hold their shape. Mix gently.
- Lightly spray or butter each cup of a 12-cup muffin tin. Sprinkle about 1 teaspoon of panko breadcrumbs into the bottom of each cup.
- Spoon the mac and cheese mixture evenly into each muffin cup, packing lightly but not pressing too hard. Sprinkle the tops with remaining breadcrumbs.
- Preheat oven to 375°F (190°C). Bake the cups for 20-25 minutes, until tops are golden brown and crispy and edges start to pull away from the pan.
- Let the cups cool in the pan for 5 minutes before carefully removing with a spatula or butter knife. Serve warm or at room temperature.
Notes
Do not overcook the pasta; al dente is key to prevent mushy cups. Use panko breadcrumbs for extra crunch. Let cups cool before removing to avoid breaking. Tent with foil if tops brown too quickly. Mustard powder enhances cheese flavor subtly. For gluten-free, use gluten-free pasta, flour, and breadcrumbs. Reheat in oven or air fryer to restore crispiness.
Nutrition
- Serving Size: About 1 mac and chee
- Calories: 275
- Sugar: 3
- Sodium: 400
- Fat: 14
- Saturated Fat: 8
- Carbohydrates: 25
- Fiber: 1
- Protein: 12
Keywords: mac and cheese, crispy mac and cheese cups, kids snack, cheesy snack, party appetizer, comfort food, easy mac and cheese