Introduction
The aroma of buttery shortbread mingling with caramel and chocolate wafting through my kitchen during December—well, it’s just pure magic. You know that moment when the oven timer dings, and you sneak a peek at those golden rounds topped with gooey caramel and glossy chocolate? That’s when you realize you’ve stumbled upon something truly special. The first time I made these Twix Cookies, I was instantly hooked. I remember standing in my kitchen, snow falling softly outside, and thinking, “This is the kind of moment where you pause, take a deep breath, and just smile because you know you’re onto something truly special.”
These cookies are inspired by my childhood love for Twix bars (let’s face it, there was always a stash in my Christmas stocking). Years ago, when I was knee-high to a grasshopper, my grandma would make buttery shortbread cookies for holiday parties. I wanted to capture that nostalgic vibe but with a twist—layering on creamy caramel and silky chocolate. That first batch? My family couldn’t stop sneaking them off the cooling rack (and I can’t really blame them!). Every time I bake these Twix Cookies, someone asks for the recipe, and soon enough, they become the talk of any Christmas cookie exchange.
Honestly, these are dangerously easy to whip up, yet they deliver pure, nostalgic comfort with every bite. Whether you’re brightening up your Pinterest cookie board or searching for the perfect sweet treat for your kids, these Twix Cookies have proven themselves as a staple for family gatherings, gifting, and—yes—in the name of research, I’ve tested them more times than I can count. Let me tell you, they never disappoint. If you’re craving a cookie that feels like a warm holiday hug, you’re going to want to bookmark this one.
Why You’ll Love This Recipe
After years of baking and tweaking, I can say with confidence that these Twix Cookies are the real deal—authentic, irresistible, and totally foolproof. Here’s why you’ll love making (and eating) them:
- Quick & Easy: Comes together in under an hour, so you won’t be stuck in the kitchen all day. Perfect for busy holiday schedules or last-minute cookie exchange invites.
- Simple Ingredients: No fancy grocery trips or specialty stores needed—most ingredients are pantry staples you probably already have.
- Perfect for Christmas Cookie Exchanges: These cookies are bite-sized, portable, and sturdy enough for gifting. They really stand out on any cookie tray and are guaranteed to spark conversation.
- Crowd-Pleaser: Kids and adults alike rave about the combination of buttery base, creamy caramel, and rich chocolate. They disappear in a flash—trust me, I’ve seen it happen!
- Unbelievably Delicious: The texture is spot-on. Crisp shortbread, soft caramel, and smooth chocolate create a layered bite that’s totally addictive.
What makes my Twix Cookies recipe stand out? For starters, I use a special trick: rolling chilled dough for perfect shape, then layering store-bought caramels melted with a splash of cream for silky-smooth topping—no grainy caramel here! And the chocolate? A simple blend of high-quality milk and dark chocolate chips for that classic Twix flavor. It’s not just another copycat—this is my best version, with tweaks learned from years of baking and cookie swaps. These cookies are comfort food reimagined—faster, easier, but with all the soul-soothing satisfaction you expect at Christmas.
Whether you’re looking to impress guests without breaking a sweat, or simply want to make a batch that’ll become “the one everyone asks for,” these Twix Cookies are it. After the first bite, you’ll know why I keep coming back to this recipe year after year.
What Ingredients You Will Need
This Twix Cookies recipe uses simple, wholesome ingredients to deliver bold flavor and satisfying texture without any fuss. Most are pantry staples, and you’ll find it easy to swap things out if needed. Here’s your shopping list:
- For the Shortbread Base:
- 1 cup (226 g) unsalted butter, softened (adds richness and gives that classic buttery flavor)
- 1/2 cup (100 g) granulated sugar (just enough for a tender crumb)
- 1 teaspoon vanilla extract (I love Nielsen-Massey for best flavor)
- 2 cups (240 g) all-purpose flour (King Arthur or Bob’s Red Mill are my go-tos)
- 1/4 teaspoon salt (balances the sweetness)
- For the Caramel Layer:
- 30 soft caramel candies (about 250 g, such as Werther’s or Kraft)
- 2 tablespoons (30 ml) heavy cream (helps the caramel stay silky, not chewy)
- For the Chocolate Topping:
- 1 cup (170 g) milk chocolate chips (use Ghirardelli or Guittard for meltiness)
- 1/2 cup (85 g) semi-sweet chocolate chips (adds depth)
- 1 tablespoon (14 g) coconut oil or vegetable shortening (for glossy finish)
Ingredient Tips & Substitutions:
- Butter: You can use salted butter—just reduce added salt to a pinch.
- Flour: Gluten-free 1:1 baking flour works well for those with sensitivities.
- Caramel: If you prefer homemade caramel, use your favorite recipe (just keep it thick enough to spread).
- Chocolate: Swap in dark chocolate chips for a bolder flavor or use dairy-free chocolate to keep things vegan.
- Cream: Sub with coconut cream for a dairy-free option.
Honestly, if you’ve got butter, sugar, flour, and a pack of caramels, you’re halfway there. These ingredients come together for a cookie that’s equal parts festive, nostalgic, and perfectly Pinterest-worthy.
Equipment Needed
You don’t need fancy gadgets for this Twix Cookies recipe—just a few trusty tools from your kitchen drawers. Here’s what I use:
- Mixing Bowl: A medium-sized bowl for creaming the butter and sugar. Glass or metal works best.
- Hand Mixer or Stand Mixer: For fluffing up the butter (a spoon works in a pinch, but mixers save your arms!).
- Baking Sheet: Heavy-duty sheets prevent burning. I’ve used everything from Wilton to Nordic Ware.
- Parchment Paper: Keeps cookies from sticking and makes cleanup a breeze.
- Rolling Pin: For rolling out the shortbread. If you don’t have one, a clean glass bottle works.
- Round Cookie Cutter (about 2-inch/5 cm): For classic shape. Try a drinking glass if you’re in a pinch.
- Small Saucepan: To melt the caramel with cream. Nonstick is easiest for cleanup.
- Microwave-Safe Bowl: For melting chocolate. You can also use a double boiler.
- Offset Spatula or Butter Knife: For spreading the caramel and chocolate layers smoothly.
- Wire Rack: For cooling (if you don’t have one, a clean oven rack works).
I’ve tried both budget and high-end equipment—really, as long as you’ve got the basics, you’re golden. Keep your cookie cutters dry to avoid sticking, and store your baking sheets lined with parchment to prevent warping. These little tricks make the whole process smoother!
Preparation Method
- Prepare the Shortbread Dough:
In a mixing bowl, cream together 1 cup (226 g) unsalted butter and 1/2 cup (100 g) granulated sugar using a hand mixer on medium speed for 2-3 minutes, until light and fluffy. Add 1 teaspoon vanilla extract and mix for another 30 seconds. Sift in 2 cups (240 g) all-purpose flour and 1/4 teaspoon salt, mixing on low just until the dough starts to come together—don’t overwork! The dough should be soft but not sticky. If it’s too dry, add 1 teaspoon milk. - Chill the Dough:
Form the dough into a disk, wrap tightly in plastic wrap, and chill in the refrigerator for 30 minutes. This step is key for cookies that hold their shape (skipping it makes cookies spread too much—learned that the hard way!). - Roll & Cut:
Preheat your oven to 350°F (175°C) and line a baking sheet with parchment. On a lightly floured surface, roll the chilled dough to about 1/4-inch (6 mm) thickness. Cut out rounds using a 2-inch (5 cm) cutter. Gather scraps, reroll, and keep cutting until all dough is used. You should get about 24 cookies. - Bake:
Place cookies 1 inch (2.5 cm) apart on the prepared sheet. Bake for 12-14 minutes, until edges are just golden. Cookies should look pale in the center (they’ll finish setting as they cool). Transfer to a wire rack and cool completely—about 15 minutes. If you move them too soon, they might crumble. - Prepare Caramel Layer:
In a small saucepan over medium-low heat, melt 30 caramel candies (about 250 g) with 2 tablespoons (30 ml) heavy cream, stirring constantly. When the caramel is smooth and flows easily off the spoon, remove from heat. If it’s too thick, add another teaspoon of cream. If it scorches, lower the heat and keep stirring (trust me, burnt caramel is no fun to clean). - Top Cookies with Caramel:
Spoon about 1 teaspoon of warm caramel onto each cooled cookie, gently spreading it to the edges with an offset spatula or butter knife. Work quickly—the caramel sets as it cools. If it gets too thick, rewarm gently. - Melt Chocolate:
In a microwave-safe bowl, combine 1 cup (170 g) milk chocolate chips, 1/2 cup (85 g) semi-sweet chips, and 1 tablespoon (14 g) coconut oil. Microwave in 20-second bursts, stirring after each, until smooth and glossy. Alternatively, use a double boiler. The coconut oil helps the chocolate set with a pretty shine. - Finish with Chocolate Topping:
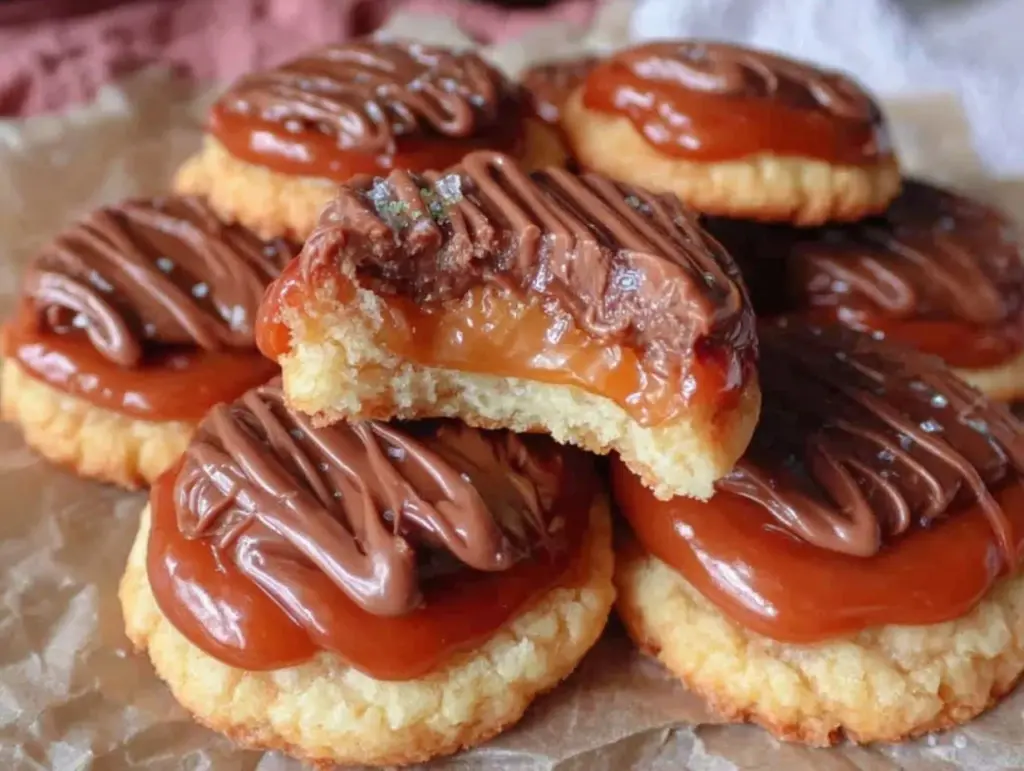
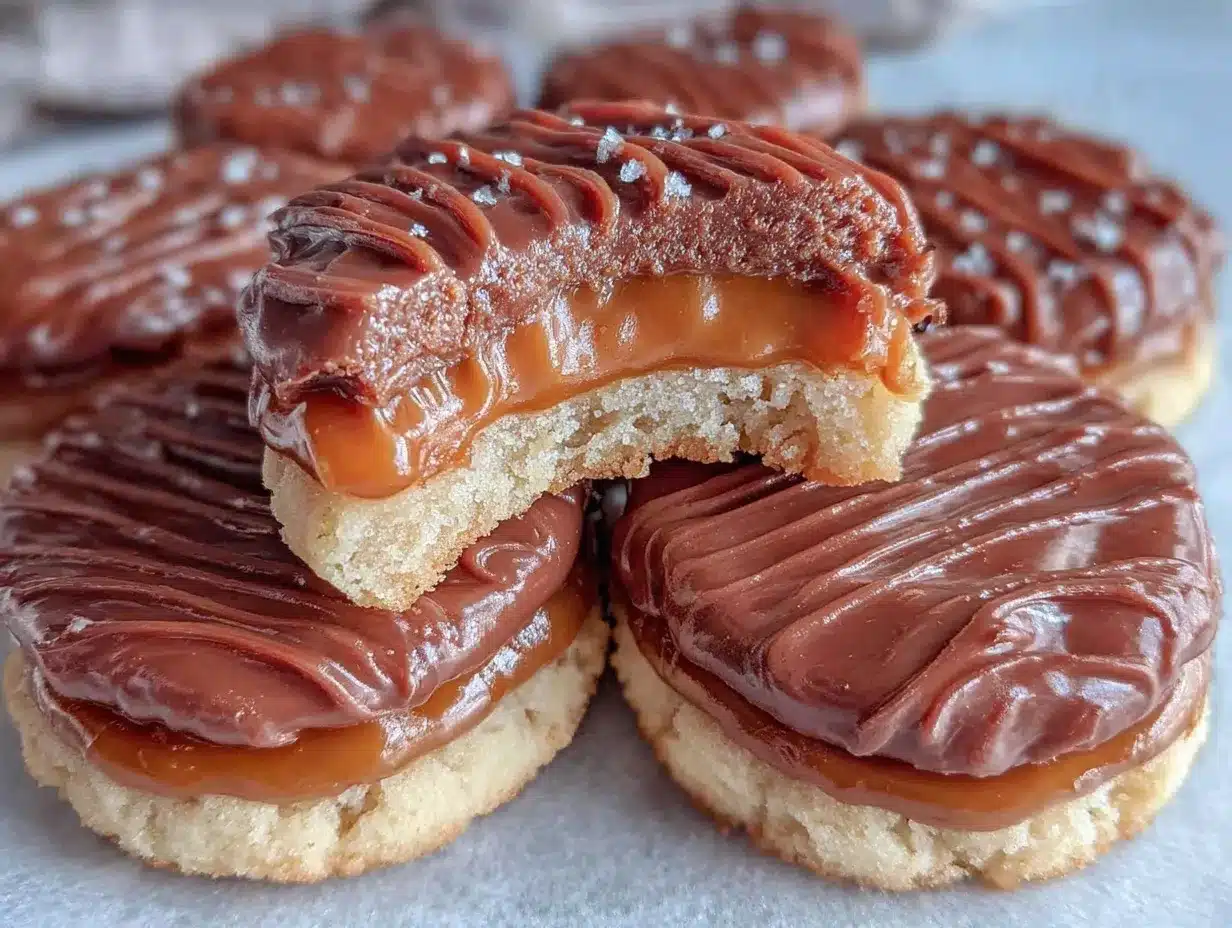
Spoon or pipe about 1 teaspoon melted chocolate onto cooled caramel layer, spreading gently. If you want those classic Twix stripes, drizzle extra chocolate in zig-zags. Let cookies set on the rack until chocolate firms up—about 30 minutes at room temp, or 10 minutes in the fridge. - Serve & Enjoy:
Once the chocolate is set, your Twix Cookies are ready for the cookie tray! Store in an airtight container to keep them fresh.
Prep Notes: If your dough feels sticky, chill it a bit longer. For extra efficiency, batch your caramel and chocolate steps so you’re not running between stove and microwave. Sensory cues are key: shortbread should smell buttery, caramel should be silky and smell sweet, and chocolate should be glossy—not grainy.
Cooking Tips & Techniques
After making these Twix Cookies for years, I’ve picked up a few tricks (and learned from a couple cookie fails, too):
- Chill the Dough: Don’t skip chilling! If you do, cookies spread and lose shape. (I forgot once—had Twix cookie puddles instead.)
- Caramel Consistency: Caramel should be thick enough to spread but not runny. If it’s too hard, microwave for 10 seconds or stir in a splash of cream.
- Chocolate Shine: Adding coconut oil or shortening makes the chocolate set glossy. Skip it, and you might get dull, streaky tops.
- Batch Baking: Bake cookies in batches for even browning. Crowding the pan steams them—no one wants soggy shortbread.
- Multitasking: While cookies bake, unwrap caramels and prep chocolate. Saves time and keeps you ahead of the game.
- Consistency: Weigh ingredients for best results—especially flour and butter. Measuring cups can be wonky.
- Personal Lessons: Once, I tried a homemade caramel sauce that was too runny. Now I stick to store-bought for reliability or cook my caramel until it’s thick and slow-pouring.
Honestly, small tweaks make a big difference. With these tips, your Twix Cookies will be crisp, gooey, and picture-perfect every single time.
Variations & Adaptations
Twix Cookies are super versatile—here are some fun ways to switch things up:
- Gluten-Free Version: Use a 1:1 gluten-free flour blend (like Cup4Cup or Bob’s Red Mill). Texture stays tender, and no one will notice the swap.
- Vegan Adaptation: Use dairy-free butter, coconut cream, and plant-based chocolate chips. Caramel candies can be swapped for vegan caramel (try Cocomels or make your own).
- Seasonal Twist: Add a pinch of cinnamon or nutmeg to the shortbread for a warm, holiday vibe. I’ve even mixed in orange zest for a citrusy lift.
- Flavor Customizations: Try dark chocolate for a bittersweet finish, or sprinkle flaky sea salt over the chocolate for that “gourmet” touch.
- Different Shapes: Use star or tree-shaped cookie cutters for a festive look—just watch bake times as shapes may vary.
- Cooking Method: Air fryers work for small batches; just reduce bake time to 8-10 minutes and check for golden edges.
My personal favorite? Swapping half the caramel candies with dulce de leche. The cookies get an extra creamy, caramel punch—so good, it’s hard to stop at one!
Serving & Storage Suggestions
Serve Twix Cookies at room temperature for the best texture—shortbread stays crisp, caramel is soft, and chocolate doesn’t smear. For a Pinterest-worthy cookie tray, stack cookies in neat rows, or nestle them in festive muffin liners.
These cookies pair beautifully with hot chocolate, coffee, or a glass of milk. If you’re hosting a holiday brunch, add them to a dessert board alongside fruit and nuts.
Storage: Place cookies in an airtight container, layering parchment between each row. Store at room temp for up to 5 days or in the fridge for up to 2 weeks. Freeze for up to 2 months—just thaw at room temp before serving. Reheat briefly in the microwave (10 seconds) if you want the caramel a bit softer.
Flavor Note: Cookies taste even better the second day—flavors meld and the caramel softens. If you love a chewier bite, keep them chilled. Honestly, they never last long enough to test the limits!
Nutritional Information & Benefits
Here’s a quick look at the nutrition for one Twix Cookie (estimate):
- Calories: ~120
- Fat: 6 g
- Carbs: 16 g
- Protein: 1 g
- Sugar: 10 g
Health Benefits: While these cookies are a treat, the shortbread base uses simple, real ingredients like butter and flour. You can opt for dark chocolate for extra antioxidants, and swap in gluten-free or vegan options to fit dietary needs. Major allergens include wheat, dairy, and soy (from chocolate)—always check ingredient labels if gifting. My personal take? Enjoy these in moderation as part of your holiday traditions—sometimes, a little indulgence is good for the soul.
Conclusion
If you’re searching for a Christmas cookie that’s easy, festive, and always a hit, these Twix Cookies are worth baking. They combine familiar flavors—chocolate, caramel, shortbread—in a way that feels both nostalgic and new. Whether you’re swapping at a holiday exchange or just treating your family, these cookies deliver on taste, texture, and visual appeal.
Go ahead—customize the recipe to suit your preferences. Add a sprinkle of sea salt, swap in vegan options, or shape them into stars. That’s the fun of baking at home! Personally, I love these cookies for the memories they spark and the joy they bring to every holiday table. I’d love to hear how your batch turns out—leave a comment, share your twist, or tag me on social with your creations.
Here’s to cookies that taste like a warm hug—happy baking and happy holidays!
FAQs About Twix Cookies Recipe
Can I make Twix Cookies ahead of time for my cookie exchange?
Absolutely! Bake the cookies up to three days before your event and store in an airtight container. They hold up well and taste even better as the flavors meld.
What can I use if I don’t have caramel candies?
You can make homemade caramel or use dulce de leche for a creamy, spreadable layer. Just be sure it’s thick enough so it doesn’t run off the cookies.
How do I keep my shortbread from spreading too much?
Chill your dough before rolling and baking. If your kitchen’s warm, pop cut cookies in the fridge for 10 minutes before baking to help them hold their shape.
Can I freeze Twix Cookies?
Yes! Freeze baked and cooled cookies in layers separated by parchment for up to 2 months. Thaw at room temperature or in the fridge before serving.
Is it possible to make these cookies gluten-free?
Definitely—just swap all-purpose flour for a 1:1 gluten-free blend. The cookies will still be buttery and crisp, perfect for any holiday tray.
Pin This Recipe!

Twix Cookies Recipe: Easy Christmas Cookie Exchange Treats

These Twix Cookies feature a buttery shortbread base topped with silky caramel and glossy chocolate, making them the perfect festive treat for holiday cookie exchanges. Quick to prepare and irresistibly delicious, they combine nostalgic flavors with a modern twist.
- Prep Time: 20 minutes
- Cook Time: 14 minutes
- Total Time: 1 hour
- Yield: 24 cookies 1x
- Category: Dessert
- Cuisine: American
Ingredients
- 1 cup unsalted butter, softened
- 1/2 cup granulated sugar
- 1 teaspoon vanilla extract
- 2 cups all-purpose flour
- 1/4 teaspoon salt
- 30 soft caramel candies (about 9 oz)
- 2 tablespoons heavy cream
- 1 cup milk chocolate chips
- 1/2 cup semi-sweet chocolate chips
- 1 tablespoon coconut oil or vegetable shortening
Instructions
- In a mixing bowl, cream together butter and sugar using a hand mixer on medium speed for 2-3 minutes until light and fluffy.
- Add vanilla extract and mix for another 30 seconds.
- Sift in flour and salt, mixing on low just until the dough starts to come together. If too dry, add 1 teaspoon milk.
- Form dough into a disk, wrap tightly in plastic wrap, and chill in the refrigerator for 30 minutes.
- Preheat oven to 350°F and line a baking sheet with parchment paper.
- On a lightly floured surface, roll chilled dough to about 1/4-inch thickness. Cut out rounds using a 2-inch cutter. Gather scraps, reroll, and cut until all dough is used (about 24 cookies).
- Place cookies 1 inch apart on prepared sheet. Bake for 12-14 minutes, until edges are just golden. Transfer to a wire rack and cool completely (about 15 minutes).
- In a small saucepan over medium-low heat, melt caramel candies with heavy cream, stirring constantly until smooth. If too thick, add another teaspoon of cream.
- Spoon about 1 teaspoon of warm caramel onto each cooled cookie, gently spreading to the edges. Work quickly as caramel sets as it cools.
- In a microwave-safe bowl, combine milk chocolate chips, semi-sweet chips, and coconut oil. Microwave in 20-second bursts, stirring after each, until smooth and glossy. Alternatively, use a double boiler.
- Spoon or pipe about 1 teaspoon melted chocolate onto cooled caramel layer, spreading gently. For classic Twix stripes, drizzle extra chocolate in zig-zags.
- Let cookies set on the rack until chocolate firms up—about 30 minutes at room temp, or 10 minutes in the fridge.
- Once chocolate is set, serve and enjoy. Store in an airtight container.
Notes
Chill dough for best shape and texture. For gluten-free, use a 1:1 baking flour blend. Vegan adaptations are possible with dairy-free butter, coconut cream, and vegan chocolate/caramel. Add a sprinkle of sea salt or orange zest for extra flavor. Cookies taste even better the second day as flavors meld.
Nutrition
- Serving Size: 1 cookie
- Calories: 120
- Sugar: 10
- Sodium: 40
- Fat: 6
- Saturated Fat: 4
- Carbohydrates: 16
- Protein: 1
Keywords: Twix cookies, Christmas cookies, holiday cookie exchange, shortbread, caramel, chocolate, easy cookies, festive treats