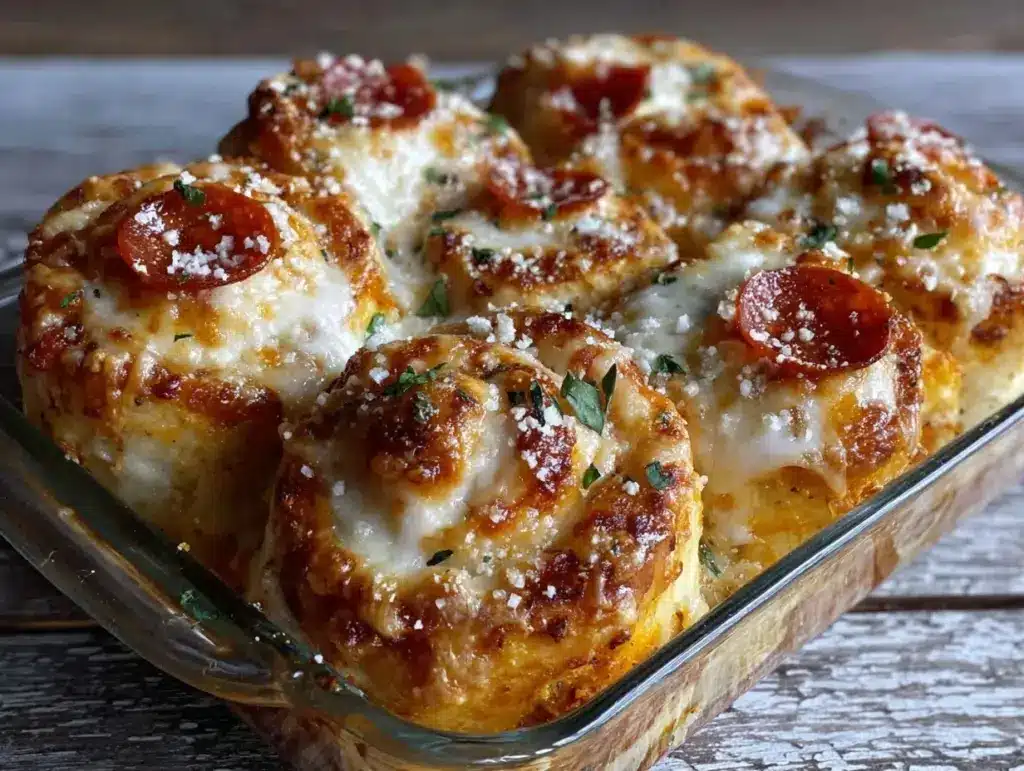
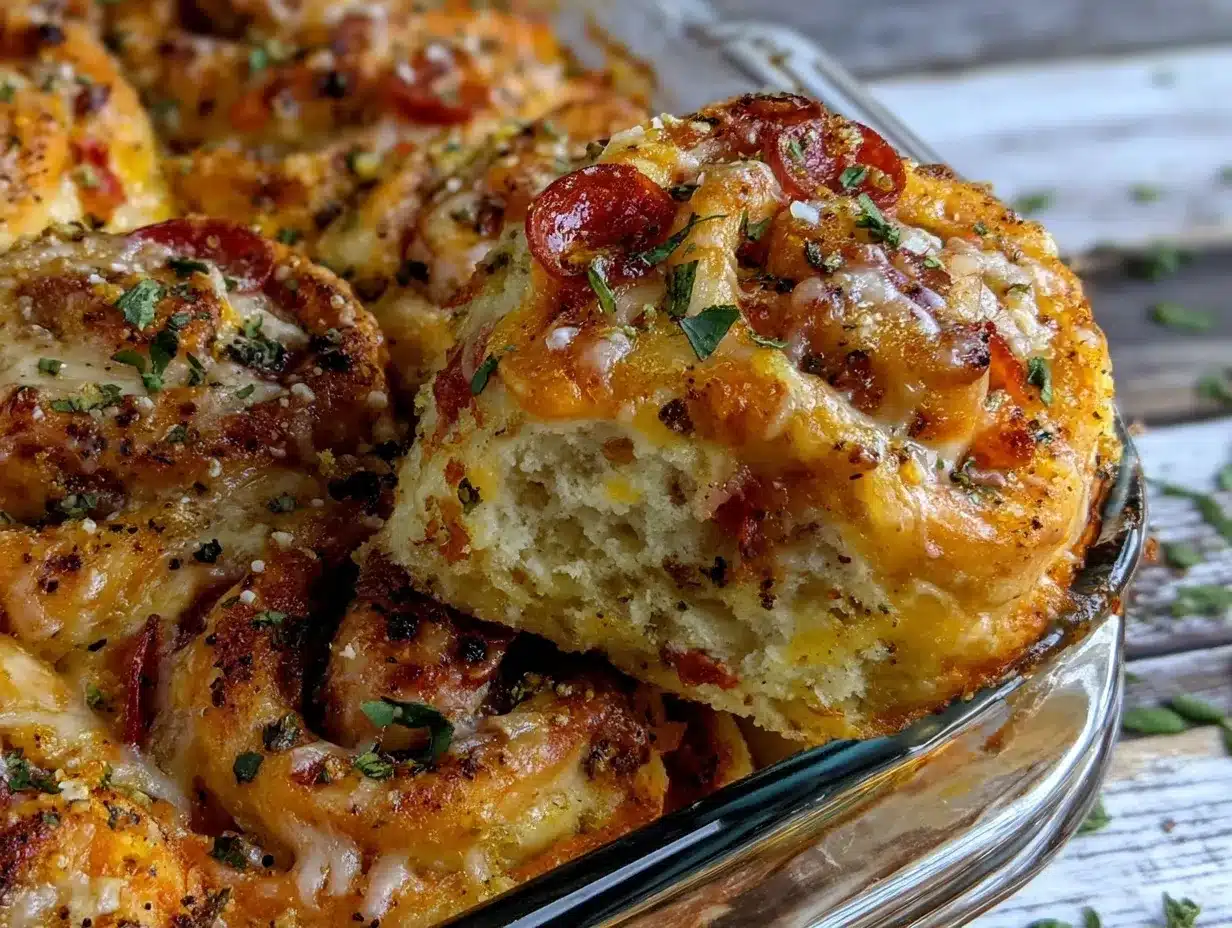
Let me set the scene: the scent of bubbling cheese, warm pizza sauce, and golden, fluffy dough swirling around the kitchen, making everyone’s stomach rumble. That’s what hits you the second these Easy Pizza Roll Ups come out of the oven—honestly, it’s a little dangerous how good they smell. The first time I made these, it was one of those frantic weekday mornings (you know, shoes missing, lunchboxes open, and kids asking for something “not boring”). I rolled up pizza goodness, popped them in the oven, and hoped for the best. When I sliced into the first roll up and saw that perfect swirl of cheese and pepperoni, I knew I had stumbled onto something special—the kind of moment where you pause, take a deep breath, and just smile because, wow, that’s going to make someone’s day.
These pizza roll ups have quickly become a classic in our house—right up there with PB&J and banana muffins. I can still remember my son’s face lighting up as he peeked into his lunchbox at school (his friends immediately asked for the recipe, and I heard about it for days). My husband isn’t immune either; he sneaks them straight off the rack, grinning like a kid. There’s something about the familiar pizza flavors—gooey cheese, zippy sauce, and that satisfying soft bite—that feels like pure, nostalgic comfort. They’re dangerously easy to make, too—no fancy dough skills required, and you can whip them up with pantry staples. If only I’d thought of these when I was knee-high to a grasshopper, my lunch game would’ve been legendary!
Honestly, these Easy Pizza Roll Ups are my secret weapon for potlucks, after-school snacks, or road trips. They look adorable on a platter, brighten up your Pinterest board, and best of all, they’re totally customizable. I’ve tested and retested the recipe (in the name of research, of course), and it always comes through. They’ve become a staple for family gatherings, gifting, and those “I need something fun, fast” moments. If you crave a warm hug in lunchbox form, you’re going to want to bookmark this one.
Why You’ll Love This Recipe
If there’s one thing I’ve learned as a recipe developer and a mom, it’s that a truly great lunchbox recipe needs to check a LOT of boxes. I’ve tested these Easy Pizza Roll Ups on picky eaters, busy grown-ups, and even at a few birthday parties. Here’s why you’ll love them (and keep making them):
- Quick & Easy: Ready in under 30 minutes. When the morning scramble hits, you can still send the kids out the door with something homemade—and you’ll actually have time for coffee!
- Simple Ingredients: No specialty store runs required. You probably have everything in your fridge and pantry right now (refrigerated dough, jarred sauce, shredded cheese, and your favorite pizza toppings).
- Perfect for Any Occasion: Not just a lunchbox hero—these pizza roll ups are awesome for after-school snacks, road trips, party platters, or quick dinners when you just can’t even. They freeze beautifully, too.
- Crowd-Pleaser: Trust me, I’ve seen these disappear from lunchboxes and party trays faster than you can say “pizza!” Kids and adults both go nuts for them.
- Unbelievably Delicious: You get that classic pizza flavor in every bite, but with a soft, fluffy, hand-held twist. The swirl bakes up golden and melty—total comfort food vibes.
What sets my Easy Pizza Roll Ups apart? Unlike some recipes that skimp on cheese or get soggy, I use just the right amount of sauce and a layering technique to keep them soft but never mushy. You can use store-bought dough for speed or make your own if you’re feeling ambitious (I’ve done both, and honestly, both work great). The best part? You control the toppings—go classic with pepperoni, or toss in veggies, cooked sausage, or even pineapple if your crew likes it.
This isn’t just another pizza snack—it’s one you’ll want to come back to, week after week. These roll ups are the kind of comfort food you can feel good about packing for school or serving to guests. They’re simple, reliable, and always a hit. The look on my kids’ faces when they see these in their lunchbox? That’s why I keep making them. Food should make people happy, and these definitely do!
What Ingredients You Will Need
These Easy Pizza Roll Ups rely on a handful of kitchen staples to deliver big pizza flavor in a kid-friendly, portable package. You don’t need anything fancy—just practical, reliable ingredients you probably already have on hand. Here’s what you need for the best lunchbox recipe for kids and busy days:
- For the Dough:
- Refrigerated pizza dough (1 tube, about 13.8 oz / 390g) – Pillsbury or store brand works well; you can also use crescent roll dough for a slightly sweeter twist
- OR homemade pizza dough (about 390g), if you prefer from scratch
- For the Sauce & Filling:
- Pizza sauce (1/2 cup / 120ml) – I love using Rao’s or Muir Glen for great flavor, but any favorite jarred sauce works. For a bolder kick, add a sprinkle of Italian seasoning!
- Shredded mozzarella cheese (1 cup / 100g) – Pre-shredded is fine, but if you want that extra gooey stretch, shred your own from a block.
- Pepperoni slices (about 20 pieces) – Regular or turkey pepperoni both work. For a vegetarian version, just skip these or use sliced black olives, bell peppers, or mushrooms.
- For the Topping (optional, but recommended):
- 1 tbsp (15g) melted butter – for brushing, adds flavor and a golden finish
- 1/2 tsp dried Italian herbs or oregano – sprinkle on top for that classic pizzeria aroma
- Grated parmesan cheese (2 tbsp / 12g) – gives a salty, savory kick
- Optional Extras:
- Diced bell peppers, onions, or black olives (for extra veggie power)
- Crushed red pepper flakes (for a little heat—my husband’s favorite!)
- Swap in provolone or cheddar if mozzarella isn’t your thing
If you need gluten-free, use a certified gluten-free dough (I’ve had good luck with the Simple Mills mix). Dairy-free? Try a vegan cheese alternative and dairy-free margarine for brushing. Honestly, these pizza roll ups are flexible—just use what you have, and they’ll turn out great. Don’t forget, the secret to the best result is not overloading with sauce—too much, and you’ll get soggy bottoms (yep, learned that the hard way).
Equipment Needed
You really don’t need a kitchen full of gadgets for these Easy Pizza Roll Ups. Here’s what gets the job done:
- Baking sheet – Any sturdy, rimmed sheet will work. I use my old trusty USA Pan; parchment paper is a lifesaver for easy clean-up.
- Rolling pin – Helpful for stretching the dough evenly, but a clean glass bottle works in a pinch.
- Sharp knife or pizza cutter – For slicing your roll ups before baking. If you don’t have a pizza cutter, a serrated bread knife does the trick nicely.
- Small bowl & pastry brush – For melted butter and herbs (optional, but makes things easier). A spoon works if you don’t have a brush.
- Measuring cups & spoons – For accuracy, especially with the sauce and cheese.
- Cutting board – To roll out and assemble your dough. I’ve used my kitchen table before in a pinch—just flour it well.
If you’re working with kids, I recommend getting them a kid-friendly knife for helping slice the rolls. Clean-up is a breeze—just rinse everything right after baking so the cheese doesn’t stick. And if you’re on a budget, honestly, you can get by with just a baking sheet, knife, and a rolling pin (or even your hands!).
Preparation Method
- Preheat and Prep: Heat your oven to 400°F (200°C). Line a baking sheet with parchment paper for easy clean-up. (If you forget, a greased pan works too, but parchment makes life easier!)
- Roll Out the Dough: Unroll your refrigerated pizza dough onto a lightly floured surface or cutting board. If it’s sticky, sprinkle a little flour on top. Roll it into a rectangle about 12 x 8 inches (30 x 20 cm). You want it even, but don’t stress—rustic is fine!
- Add the Sauce: Spread 1/2 cup (120ml) pizza sauce evenly over the dough, leaving a 1/2-inch (1.25cm) border all around. Use the back of a spoon for this—don’t overload, or the rolls might get soggy.
- Sprinkle the Cheese: Evenly scatter 1 cup (100g) shredded mozzarella over the sauce. Make sure you get cheese all the way to the edges for those irresistible cheesy ends.
- Add Toppings: Place pepperoni slices (or your choice of toppings) over the cheese. Don’t pile them too high—one layer is perfect for rolling up without making a mess.
- Roll It Up: Starting from the long side, carefully roll the dough into a tight log, like a jelly roll. Go slowly and use both hands. Pinch the seam closed at the end. (If the dough feels sticky, dust your hands with flour.)
- Slice Into Rolls: With a sharp knife or pizza cutter, slice the log into 8 even pieces. (Tip: Score the log in half, then each half in half again, for even pieces.) If the dough squishes, pop it in the fridge for 5 minutes to firm up.
- Arrange and Top: Place the rolls spiral-side up on your baking sheet, leaving a little space between each. Brush the tops with melted butter (1 tbsp / 15g) and sprinkle with Italian herbs and grated parmesan (if using). This step gives them a golden, flavorful finish—don’t skip it!
- Bake: Bake for 15–18 minutes, or until the rolls are puffed, golden brown, and the cheese is bubbling. (If they brown too fast, tent with foil for the last 3 minutes.) The kitchen will smell like your favorite pizzeria!
- Cool and Serve: Let the rolls cool on the sheet for 5 minutes before moving. This helps the cheese set a bit and keeps the swirl intact. Serve warm, room temp, or pack right into lunchboxes.
Troubleshooting: If the rolls fall apart, the dough was probably too warm—chill the log before slicing next time. If you see cheese leaking out, that’s normal (and honestly, those crispy cheese bits are the best part!). If you want crispier bottoms, bake directly on the sheet for the last 2 minutes.
Efficiency Tips: Prep everything (dough, cheese, sauce) ahead of time and let little hands help with assembly. For batch cooking, double the recipe and freeze half for later. These are so forgiving, you really can’t mess them up. Enjoy the process—it’s fun to get a little messy sometimes!
Cooking Tips & Techniques
Making the best Easy Pizza Roll Ups is all about a few little tricks I’ve picked up over the years (sometimes the hard way!). Here’s what makes a difference:
- Don’t Overload with Sauce or Cheese: Extra sauce sounds good, but it’ll make your rolls soggy and harder to slice. Stick to the measurements, even if you’re tempted to go wild.
- Chill the Dough If Needed: If your kitchen is warm or the dough gets sticky, chill it in the fridge for 5–10 minutes before rolling or slicing. This keeps the swirl neat and reduces sticking.
- Roll Tightly, But Not Too Tight: If you roll too loosely, the swirl will unravel. Too tight and the fillings squish out. Aim for a gentle but firm roll—think “hug,” not “bear hug.”
- Use Parchment Paper: It helps with sticking and makes clean-up a breeze. I’ve forgotten before, and scraping melted cheese off a pan is not fun—trust me.
- Let Them Cool Slightly: Right out of the oven, the cheese is molten. Wait just a few minutes for the swirl to set. They’ll be easier to pack and won’t burn your fingers.
Common mistakes? Overstuffing (guilty!), using too much sauce, or not sealing the dough seam. If your rolls open up, just press them closed gently before baking. For crispier edges, brush with a little extra butter halfway through baking. And if you’re multitasking, these are super forgiving—just don’t wander off for too long. You’ll know they’re done when the tops are golden and you smell that signature pizza aroma wafting through the house.
One last tip: when making big batches, freeze the unbaked roll ups on a tray, then transfer to a freezer bag. Pop them in the oven straight from the freezer—just add a couple extra minutes to the bake time. Easy peasy, and you always have a homemade snack ready to go!
Variations & Adaptations
One of the best things about Easy Pizza Roll Ups is how endlessly customizable they are. Here’s how you can make them your own (and what’s worked for us!):
- Dietary Variations:
- Gluten-Free: Use your favorite gluten-free pizza dough (Simple Mills or Schär have good options). Be gentle with rolling, as GF dough can be stickier.
- Dairy-Free: Substitute vegan mozzarella and butter alternatives like Earth Balance. They melt beautifully and still give that pizza vibe.
- Vegetarian: Skip the meat and load up with sliced mushrooms, bell peppers, spinach, or black olives. My daughter loves a combo of spinach and feta!
- Seasonal & Flavor Twists:
- Swap the sauce for pesto and use mozzarella plus sun-dried tomatoes for a Mediterranean twist.
- Make “Breakfast Roll Ups” with scrambled eggs, sausage, and cheddar instead of pizza sauce and toppings—so good for mornings on the go.
- Try BBQ chicken: use BBQ sauce, cooked chicken, and red onion with mozzarella for a tangy, smoky flavor.
- Cooking Methods: Air fryer fans, rejoice! Place the rolls in the basket at 350°F (175°C) for 7–8 minutes. They puff up perfectly and get crisp edges. If you love crispier rolls, finish under the broiler for 1–2 minutes (just watch carefully—burnt cheese happens fast!).
I’ve even made these “mini” for party appetizers—just slice the log into 12 smaller pieces and reduce the baking time by a couple minutes. Kids love picking their own fillings, and it’s a great way to use up leftovers. Don’t be afraid to get creative—pizza roll ups are a blank canvas!
Serving & Storage Suggestions
These Easy Pizza Roll Ups can be served in so many ways. Right out of the oven, they’re gooey and irresistible—perfect for a family movie night or after-school snack. For lunchboxes, I usually let them cool to room temp before packing in a bento box (they hold up well and don’t get soggy). A side of fruit and a little dipping sauce (like ranch or extra pizza sauce) makes a complete meal.
For parties, arrange them in a circle on a big platter with a bowl of sauce for dipping—always a hit! If you’re prepping ahead, store cooled roll ups in an airtight container in the fridge. They’ll stay fresh for up to 3 days. To reheat, pop in the microwave for 20–30 seconds or in a 350°F (175°C) oven for 5 minutes. If you like them crispier, use a toaster oven for a couple minutes. They freeze beautifully, too—just wrap individually and thaw overnight in the fridge or bake from frozen, adding a few extra minutes to the cook time.
Honestly, the flavors get even better by day two. The bread softens a bit, and the herbs have time to meld. If you’re making these for a road trip or picnic, just pack them up and go—they’re sturdy, don’t leak, and taste great at any temperature.
Nutritional Information & Benefits
Here’s the scoop (approximate per roll up, based on standard ingredients):
- Calories: 150
- Protein: 6g
- Carbs: 18g
- Fat: 6g
- Calcium: 10% DV
Pizza roll ups offer protein from cheese and meats, plus energy from the dough. If you go heavy on veggies, you’ll sneak in some extra fiber and vitamins. For lower-carb needs, use a low-carb tortilla instead of dough (it works—just reduce baking time by a couple minutes). Allergens? These contain wheat and dairy by default, but see the adaptation section for alternatives. Personally, I love that you can adjust the nutrition for your family’s needs—whole wheat dough, turkey pepperoni, or pile on the veggies. It’s comfort food, but you’re in control.
Conclusion
Easy Pizza Roll Ups are the kind of recipe that makes life (and lunchboxes) so much happier. They’re fast, flexible, and deliver all the classic pizza flavor in a fun, hand-held bite. Whether you’re feeding picky kids, prepping for a busy week, or just craving a simple snack, these are a win every time. I love how easy they are to customize—make a batch your way, and you’ll never get bored.
This recipe has become a staple for our family, and I hope it brings the same smiles to your table as it does to ours. Try different fillings, let the kids help, and don’t be afraid to get a little messy. If you make these Easy Pizza Roll Ups, I’d love to hear how they turned out—leave a comment below with your favorite variation, or tag me on social media so I can see your creations!
Happy baking, and remember—great food doesn’t have to be complicated. Sometimes, all you need is a good swirl of cheese, a warm oven, and a little creativity. Enjoy every bite!
FAQs
Can I make Easy Pizza Roll Ups ahead of time?
Absolutely! Assemble and slice the rolls, then refrigerate (covered) overnight. Bake them fresh in the morning or bake ahead and reheat—either way, they’re delicious.
What’s the best way to keep pizza roll ups crisp for lunchboxes?
Let them cool completely before packing. Use a paper towel in the lunchbox to absorb moisture. For extra crispness, reheat briefly in a toaster oven before packing.
Can I freeze pizza roll ups?
Yes! Freeze baked or unbaked roll ups in a single layer, then transfer to a zip-top bag. Bake from frozen, adding 3–4 extra minutes, or thaw and reheat as needed.
What other fillings work besides pepperoni?
Try cooked sausage, ham, sautéed veggies, or even cooked chicken. Pesto and mozzarella is a great alternative for a nutty, herby twist.
How do I make these gluten- or dairy-free?
Use a gluten-free pizza dough and your favorite dairy-free cheese and butter substitutes. There are lots of good options on the market now—just follow the same assembly and baking instructions.
Pin This Recipe!
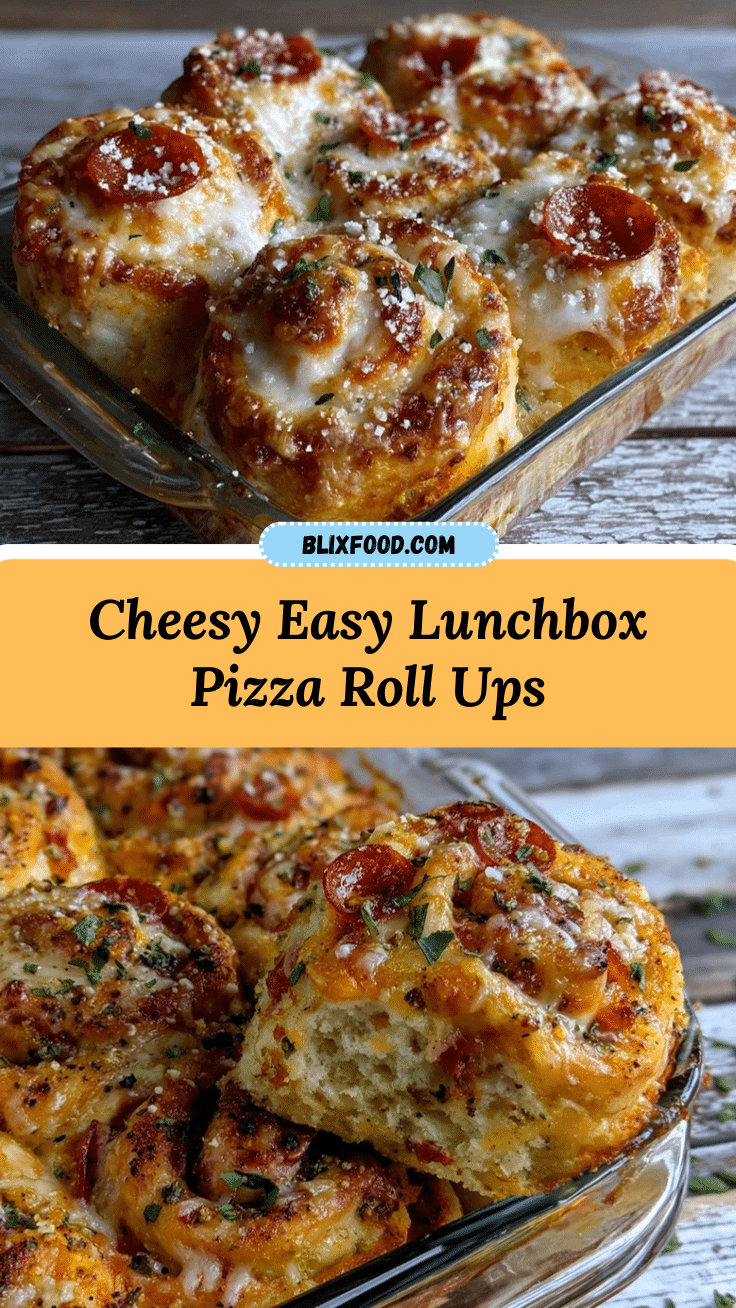
Easy Pizza Roll Ups

Easy Pizza Roll Ups are a quick, kid-friendly lunchbox recipe packed with classic pizza flavors in a portable, hand-held swirl. They’re customizable, crowd-pleasing, and perfect for busy days or fun snacks.
- Prep Time: 10 minutes
- Cook Time: 18 minutes
- Total Time: 28 minutes
- Yield: 8 roll ups 1x
- Category: Snack
- Cuisine: American
Ingredients
- 1 tube refrigerated pizza dough (about 13.8 oz)
- 1/2 cup pizza sauce
- 1 cup shredded mozzarella cheese
- 20 pepperoni slices (or substitute with veggies for vegetarian)
- 1 tbsp melted butter (for brushing, optional)
- 1/2 tsp dried Italian herbs or oregano (optional)
- 2 tbsp grated parmesan cheese (optional)
- Optional: diced bell peppers, onions, black olives, crushed red pepper flakes, provolone or cheddar cheese
Instructions
- Preheat oven to 400°F (200°C). Line a baking sheet with parchment paper.
- Unroll pizza dough onto a lightly floured surface and roll into a 12 x 8 inch rectangle.
- Spread pizza sauce evenly over the dough, leaving a 1/2-inch border.
- Sprinkle shredded mozzarella cheese evenly over the sauce.
- Add pepperoni slices or desired toppings in a single layer.
- Starting from the long side, roll the dough into a tight log and pinch the seam closed.
- Slice the log into 8 even pieces using a sharp knife or pizza cutter.
- Arrange rolls spiral-side up on the baking sheet, leaving space between each.
- Brush tops with melted butter and sprinkle with Italian herbs and parmesan cheese, if using.
- Bake for 15–18 minutes until golden brown and cheese is bubbling.
- Let cool on the sheet for 5 minutes before serving or packing.
Notes
Don’t overload with sauce or cheese to avoid soggy rolls. Chill dough if sticky for easier slicing. Rolls can be made ahead, frozen, and baked from frozen. Use gluten-free or dairy-free substitutes as needed. For crispier bottoms, bake directly on the sheet for the last 2 minutes.
Nutrition
- Serving Size: 1 roll up
- Calories: 150
- Sugar: 2
- Sodium: 350
- Fat: 6
- Saturated Fat: 3
- Carbohydrates: 18
- Fiber: 1
- Protein: 6
Keywords: pizza roll ups, lunchbox recipe, kid-friendly, easy snack, pepperoni, mozzarella, party food, freezer-friendly, quick lunch, portable pizza