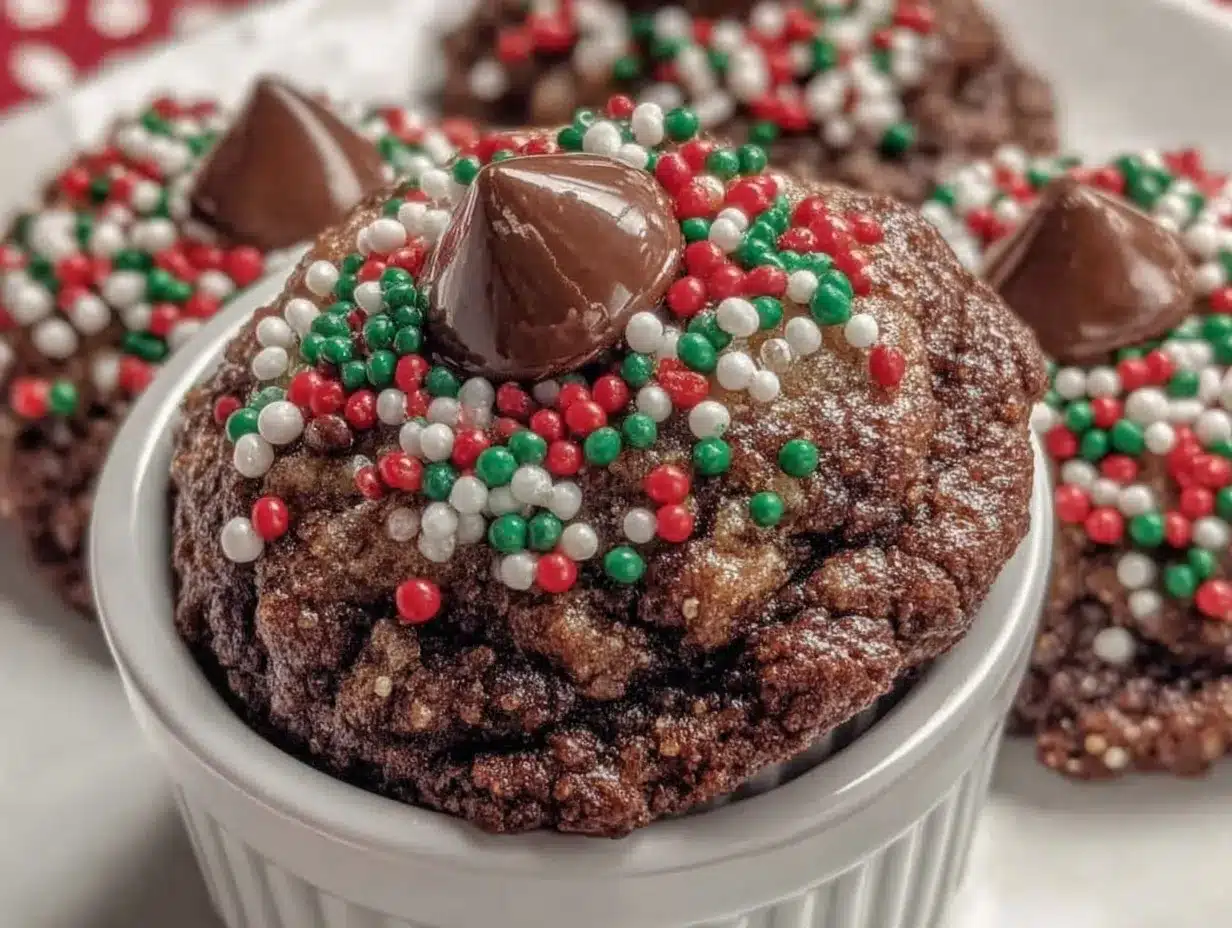
Let me tell you, the scent of buttery sugar cookies mingling with the rich aroma of melting chocolate kisses wafting from my oven is enough to make anyone’s mouth water. The first time I baked these festive favorite Chocolate Kiss Cookies for Christmas, I was instantly hooked—the kind of moment where you pause, take a deep breath, and just smile because you know you’re onto something truly special. Years ago, when I was knee-high to a grasshopper, my grandma used to make these cookies every holiday season, filling the kitchen with warmth and nostalgia. I still remember sneaking a few off the cooling rack and feeling that sweet joy only freshly baked cookies can bring.
Honestly, my family couldn’t stop sneaking them off the cooling rack (and I can’t really blame them). These chocolate kiss cookies are dangerously easy and bring pure, nostalgic comfort perfect for brightening up your Pinterest cookie board or sharing at potlucks. Whether you’re making them as a sweet treat for your kids or gifting a batch to friends, this recipe feels like a warm hug in cookie form. After testing this recipe multiple times in the name of research, of course, it’s become a staple for holiday gatherings and cozy winter evenings. You’re going to want to bookmark this one for your Christmas baking list!
Why You’ll Love This Recipe
When it comes to festive treats, this Chocolate Kiss Cookies recipe has earned its spot in my holiday lineup for many reasons. I’ve tested it over and over (and over) to get that perfect melt-in-your-mouth texture combined with the iconic chocolate kiss center. Here’s why this recipe stands out:
- Quick & Easy: Comes together in under 30 minutes, perfect for busy holiday prep or last-minute cookie cravings.
- Simple Ingredients: You likely already have everything in your pantry—no fancy trips needed.
- Perfect for Christmas: These cookies scream holiday cheer and make an eye-catching addition to any cookie tray.
- Crowd-Pleaser: Kids, adults, grandparents—they all rave about these cookies every year.
- Unbelievably Delicious: The tender cookie base paired with the gooey chocolate kiss is next-level comfort food.
This isn’t just another sugar cookie with a chocolate on top. The key is in the right dough consistency—soft but sturdy enough to hold that iconic chocolate kiss without sinking or cracking. Plus, the sprinkle of colored sugar before baking adds that festive sparkle that feels like holiday magic. Honestly, this recipe isn’t just good—it’s the kind that makes you close your eyes after the first bite and appreciate the simple joy of Christmas baking. It’s comfort food reimagined for the holidays—fast, fuss-free, but with all the soul-soothing satisfaction you want.
What Ingredients You Will Need
This recipe uses simple, wholesome ingredients to deliver bold flavor and that satisfying soft texture without any fuss. Most of these are pantry staples, so you probably won’t need to make a special trip to the store.
- All-purpose flour (2 1/4 cups / 280g) – the base for the cookie, choose a trusted brand like King Arthur for best texture.
- Baking soda (1/2 teaspoon) – helps cookies rise just right.
- Salt (1/4 teaspoon) – balances sweetness.
- Unsalted butter (3/4 cup / 170g), softened – adds richness and tenderness.
- Granulated sugar (1 cup / 200g) – for sweetness and that classic cookie crunch.
- Egg (1 large, room temperature) – brings everything together.
- Vanilla extract (1 teaspoon) – imparts warm, cozy flavor.
- Chocolate kisses (about 36, individually wrapped, unwrapped before baking) – the star of the show! Hershey’s Kisses are the classic choice.
- Colored sanding sugar (optional, about 1/4 cup) – for that festive sparkle on top.
If you want to switch things up, you can use salted butter but reduce the added salt to 1/8 teaspoon. For a dairy-free option, swap the butter with coconut oil and use dairy-free chocolate kisses. In summer, you might try adding a sprinkle of cinnamon sugar instead of colored sugar for a cozy twist.
Equipment Needed
- Mixing bowls: A large bowl for the dough and a smaller one for dry ingredients makes the process smoother.
- Electric mixer or hand mixer: Helps cream butter and sugar quickly, but you can also use a sturdy wooden spoon if you prefer.
- Baking sheets: Two standard-sized sheets with rimmed edges work best to keep cookies in place.
- Parchment paper or silicone baking mats: Prevents sticking and makes cleanup a breeze.
- Measuring cups and spoons: For precise ingredient amounts.
- Cooling rack: Essential for letting cookies cool evenly without sogginess.
If you don’t have an electric mixer, don’t sweat it—just be ready for a little elbow grease! Parchment paper is my personal fave over silicone mats because it’s disposable and still eco-friendly. Plus, it’s easy to line multiple pans at once and get baking right away. For budget-friendly baking sheets, look for non-stick coated aluminum pans—they heat evenly and last for years.
Preparation Method
- Preheat your oven to 375°F (190°C). Line two baking sheets with parchment paper or silicone mats. This prep sets you up for smooth baking.
- Combine dry ingredients: In a medium bowl, whisk together 2 1/4 cups (280g) all-purpose flour, 1/2 teaspoon baking soda, and 1/4 teaspoon salt. Set aside.
- Cream butter and sugar: In a large bowl, beat 3/4 cup (170g) softened unsalted butter with 1 cup (200g) granulated sugar until light and fluffy—about 3-4 minutes with an electric mixer. You’ll notice the mixture turning pale and airy, which is exactly what you want for tender cookies.
- Add egg and vanilla: Beat in 1 large egg (room temperature) and 1 teaspoon vanilla extract until fully combined. The dough will start to look glossy and smooth.
- Incorporate dry ingredients: Gradually add the dry flour mixture to the wet ingredients, mixing on low speed or folding gently with a spatula until just combined. Be careful not to overmix—the dough should be soft and a bit sticky but hold together well.
- Form dough balls: Using a teaspoon or small cookie scoop, roll dough into 1-inch (2.5 cm) balls. Place them 2 inches (5 cm) apart on the prepared baking sheets to allow spreading.
- Add colored sugar (optional): Lightly press each dough ball into a small bowl of colored sanding sugar, then place back on the sheet. This adds that holiday sparkle you want.
- Bake briefly: Bake the cookies for 8-10 minutes. They should be set around the edges but still soft in the centers—watch closely so they don’t overbake!
- Add the chocolate kisses: Immediately after removing from the oven, press one unwrapped chocolate kiss gently into the center of each cookie. The warmth will soften the cookie just enough to hold the kiss in place without melting it completely.
- Cool completely: Transfer cookies with a spatula to a wire cooling rack. Let them cool fully, about 15-20 minutes, so the chocolate sets and the cookie firms up just right.
Pro tip: If your dough feels too sticky to roll, pop it in the fridge for 10-15 minutes. Also, if your kisses start to melt too much, lower your oven temperature by 10 degrees next time to keep them looking perfect. These little tweaks have saved me more than once during busy holiday baking marathons!
Cooking Tips & Techniques
Making Chocolate Kiss Cookies isn’t rocket science, but a few insider tips can make your batch shine. First, don’t skip softening the butter. Room temperature butter creams better with sugar, creating tiny air pockets that give the cookies their tender crumb. Honestly, trying to mix cold butter is a pain and often leads to denser cookies.
When mixing in flour, stop as soon as you see no more dry streaks. Overworking the dough can develop gluten, resulting in tougher cookies—definitely not what you want for these soft treats.
Timing is key. Bake just until edges turn golden but centers still look soft. The cookies will firm up as they cool, so resist the urge to bake longer “just in case.” I’ve learned this the hard way after many batches of overbaked cookies that turned out too crisp.
Placing the chocolate kiss right after baking while the cookie is still warm takes practice. Press too hard, and you’ll flatten the cookie; too light, and the kiss won’t stick. Gently nestling the candy in place is the trick.
Lastly, use parchment paper or silicone mats to prevent sticking and help cookies bake evenly. Regularly rotate your baking sheets halfway through for uniform color and texture. Multitasking during baking is a must if you’re making large batches—prep dough balls while the first sheet cools to keep things moving.
Variations & Adaptations
You can easily switch up this recipe to suit your taste or dietary needs. Here are my favorite variations I’ve tried:
- Peanut Butter Kiss Cookies: Swap half the butter for creamy peanut butter. The salty-sweet combo with the chocolate kiss is irresistible!
- Gluten-Free Version: Use a 1:1 gluten-free flour blend. Be sure it contains xanthan gum for structure. These cookies come out just as tender.
- Mint Chocolate Kiss Cookies: Use mint-flavored chocolate kisses and add 1/2 teaspoon peppermint extract to the dough for a refreshing holiday twist.
- Vegan Adaptation: Replace butter with coconut oil, use a flax egg (1 tablespoon ground flaxseed + 3 tablespoons water), and pick dairy-free chocolate kisses. The texture is a bit different but still delicious.
For different cooking methods, you can try mini muffin tins to keep cookies perfectly round or even refrigerate dough overnight for deeper flavor development. Personal favorite? Adding a sprinkle of flaky sea salt on top right before baking to balance the sweetness.
Serving & Storage Suggestions
Serve these Chocolate Kiss Cookies at room temperature for the best texture and flavor. They look fantastic arranged on a festive platter with a dusting of powdered sugar or paired with a warm cup of cocoa or coffee.
To store, keep cookies in an airtight container at room temperature for up to 5 days. They stay soft and fresh, but the chocolate kiss might dull a bit – which is when you know it’s time for another batch! For longer storage, freeze unbaked dough balls or baked cookies wrapped tightly in plastic wrap and then in a freezer-safe bag for up to 3 months.
Reheat frozen cookies briefly in a 300°F (150°C) oven for 5 minutes to revive that fresh-baked warmth. Over time, these cookies develop a richer flavor as the ingredients meld, making them even more delightful the next day.
Nutritional Information & Benefits
A typical serving of one Chocolate Kiss Cookie contains approximately 120-140 calories, with about 6 grams of fat, 18 grams of carbohydrates, and 1 gram of protein. While these cookies are definitely a treat, the use of real butter and quality chocolate means you’re enjoying wholesome ingredients without artificial fillers.
The butter provides a source of fat-soluble vitamins, and the chocolate kisses offer antioxidants from cocoa. For dietary considerations, you can adapt the recipe to be gluten-free or vegan as mentioned earlier. Just be mindful that these cookies contain common allergens like eggs, dairy, and wheat unless substituted.
From my wellness perspective, enjoying these cookies in moderation within a balanced diet brings joy without guilt—especially when baking becomes a fun family tradition.
Conclusion
These festive favorite Chocolate Kiss Cookies for Christmas are truly one of those recipes worth keeping in your holiday arsenal. They’re simple, sweet, and just the right amount of special to make your Christmas baking feel effortless and joyful. I love how easy it is to customize them for different tastes and how they bring a little sparkle to every gathering.
Give these cookies a try, and don’t be afraid to tweak the flavors or add your own twist. I’d love to hear about your variations or how this recipe became part of your holiday tradition. Drop a comment, share your photos, and spread the cookie cheer!
Remember, the best treats are those made with love—and these cookies have plenty of it baked right in. Happy baking and Merry Christmas!
FAQs
Can I make these cookies ahead of time?
Absolutely! You can prepare the dough up to 24 hours in advance and keep it refrigerated. Just roll into balls and bake when ready.
What’s the best way to prevent the chocolate kiss from melting too much?
Remove cookies from the oven as soon as edges set and immediately press the kiss on top. Avoid pressing too hard and don’t bake after placing the kiss.
Can I freeze these cookies?
Yes, both baked cookies and unbaked dough balls freeze well. Wrap them tightly and freeze for up to 3 months.
What if I don’t have colored sanding sugar?
No worries! You can skip it or use regular granulated sugar or even a sprinkle of cinnamon sugar for a different twist.
How do I make these cookies vegan?
Swap butter with coconut oil, use a flax egg instead of regular egg, and choose dairy-free chocolate kisses. The texture will be slightly different but still tasty.
Pin This Recipe!

Chocolate Kiss Cookies

These festive Chocolate Kiss Cookies combine a tender sugar cookie base with a gooey chocolate kiss center, perfect for Christmas treats and holiday gatherings.
- Prep Time: 15 minutes
- Cook Time: 10 minutes
- Total Time: 25 minutes
- Yield: 36 cookies 1x
- Category: Dessert
- Cuisine: American
Ingredients
- 2 1/4 cups (280g) all-purpose flour
- 1/2 teaspoon baking soda
- 1/4 teaspoon salt
- 3/4 cup (170g) unsalted butter, softened
- 1 cup (200g) granulated sugar
- 1 large egg, room temperature
- 1 teaspoon vanilla extract
- About 36 chocolate kisses, unwrapped
- About 1/4 cup colored sanding sugar (optional)
Instructions
- Preheat your oven to 375°F (190°C). Line two baking sheets with parchment paper or silicone mats.
- In a medium bowl, whisk together the flour, baking soda, and salt. Set aside.
- In a large bowl, beat the softened butter and granulated sugar until light and fluffy, about 3-4 minutes with an electric mixer.
- Beat in the egg and vanilla extract until fully combined and the dough looks glossy and smooth.
- Gradually add the dry flour mixture to the wet ingredients, mixing on low speed or folding gently until just combined. Do not overmix.
- Roll dough into 1-inch balls using a teaspoon or small cookie scoop and place them 2 inches apart on the prepared baking sheets.
- Optional: Lightly press each dough ball into colored sanding sugar, then place back on the sheet.
- Bake for 8-10 minutes until edges are set but centers are still soft. Watch closely to avoid overbaking.
- Immediately after removing from the oven, press one unwrapped chocolate kiss gently into the center of each cookie.
- Transfer cookies to a wire cooling rack and let cool completely, about 15-20 minutes, so the chocolate sets and cookies firm up.
Notes
If dough is too sticky to roll, chill in the fridge for 10-15 minutes. Press chocolate kisses gently after baking to avoid flattening cookies. Use parchment paper for easy cleanup and even baking. Rotate baking sheets halfway through baking for uniform color. For dairy-free, substitute butter with coconut oil and use dairy-free chocolate kisses. For gluten-free, use a 1:1 gluten-free flour blend with xanthan gum.
Nutrition
- Serving Size: 1 cookie
- Calories: 130
- Sugar: 12
- Sodium: 90
- Fat: 6
- Saturated Fat: 3.5
- Carbohydrates: 18
- Fiber: 1
- Protein: 1
Keywords: Chocolate Kiss Cookies, Christmas cookies, holiday treats, sugar cookies, easy cookie recipe, festive cookies