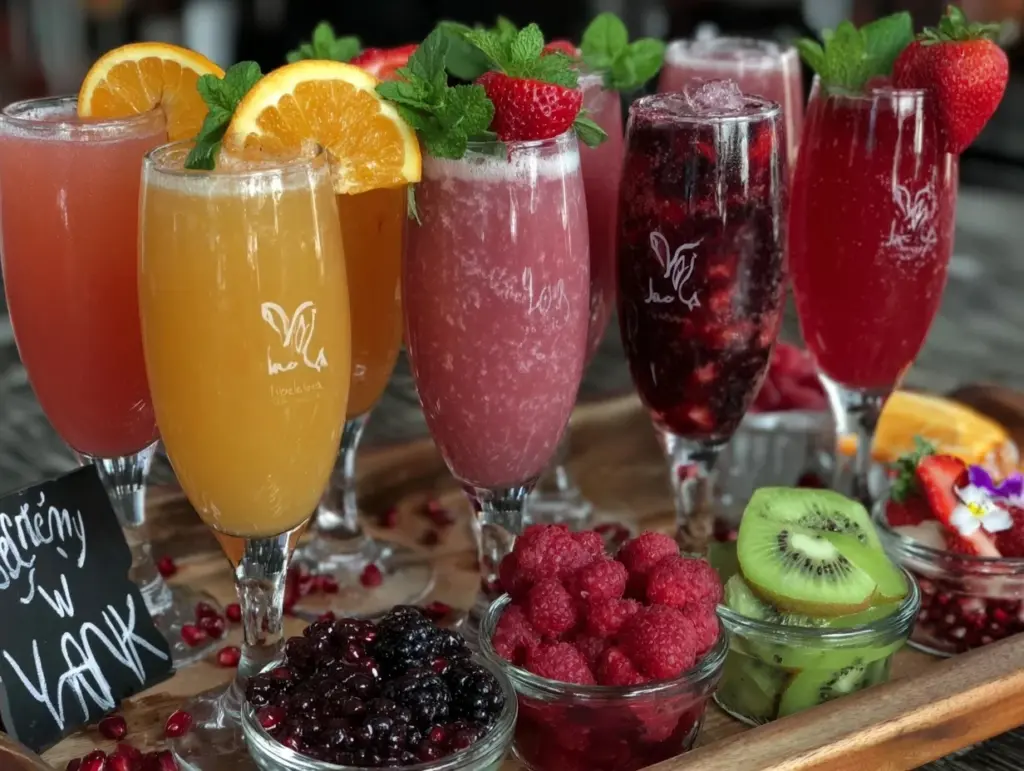
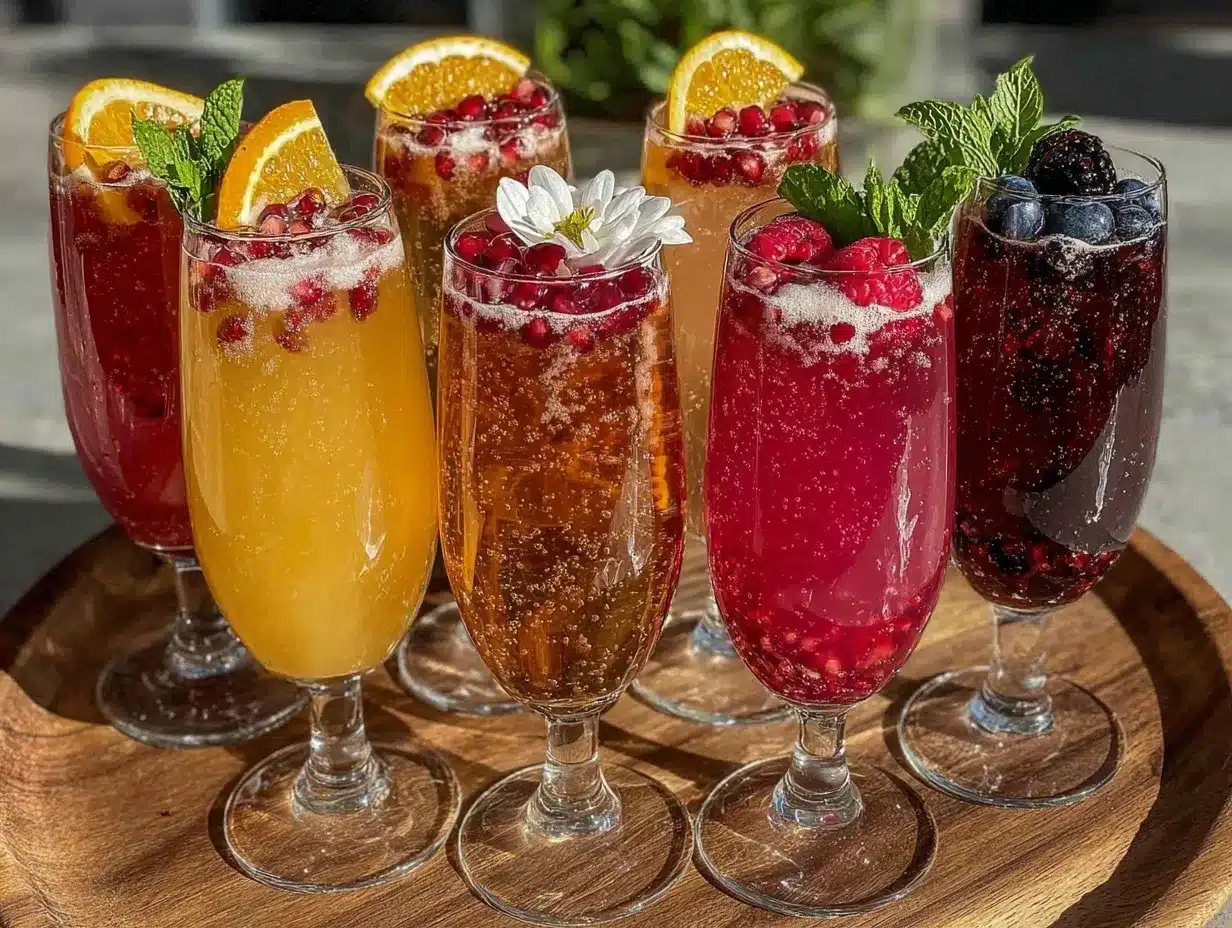
Let me tell you, the sight of a sparkling mimosa bar set up on a sunny morning, with bubbles fizzing and vibrant fruit colors bursting from every glass, is enough to make anyone’s heart skip a beat. The first time I put together my own mimosa bar, it was for a lazy Sunday brunch with friends. I was instantly hooked—the kind of moment where you pause, take a deep breath, and just smile because you know you’re onto something truly special. It wasn’t just about the drinks; it was the whole experience—the laughter, the clinking glasses, and the endless possibilities of flavor combinations.
Years ago, when I was knee-high to a grasshopper, brunches meant simple orange juice and champagne, but this mimosa bar idea has changed the game completely. Honestly, I wish I’d discovered it years ago because my family couldn’t stop sneaking those colorful concoctions off the bar (and I can’t really blame them). Whether you’re planning a bridal shower, a birthday party, or just a chill weekend with your best pals, this perfect build your own mimosa bar is dangerously easy and brings pure, nostalgic comfort to any celebration.
You know what makes this even better? It brightens up your Pinterest cookie board with style and joy, and it’s the perfect sweet treat for your kids’ grown-up celebrations (with mocktail options, of course). After testing this recipe multiple times—in the name of research, of course—it’s become a staple for family gatherings and gifting. You’re going to want to bookmark this one.
Why You’ll Love This Recipe
Honestly, setting up a mimosa bar feels like giving your guests a little liquid happiness. Over the years, I’ve perfected this idea through trial and error, and here’s why you’ll love it:
- Quick & Easy: Comes together in under 30 minutes, perfect for busy mornings or last-minute celebrations.
- Simple Ingredients: No fancy grocery trips needed; you likely already have most of these in your kitchen.
- Perfect for Any Occasion: Whether it’s brunch, baby showers, or New Year’s Eve, this mimosa bar is a crowd-pleaser.
- Crowd-Pleaser: Kids and adults alike adore the customizable options—everyone gets their perfect sip.
- Unbelievably Delicious: The combo of fresh fruit, bubbly champagne, and sweet juices hits that spot every time.
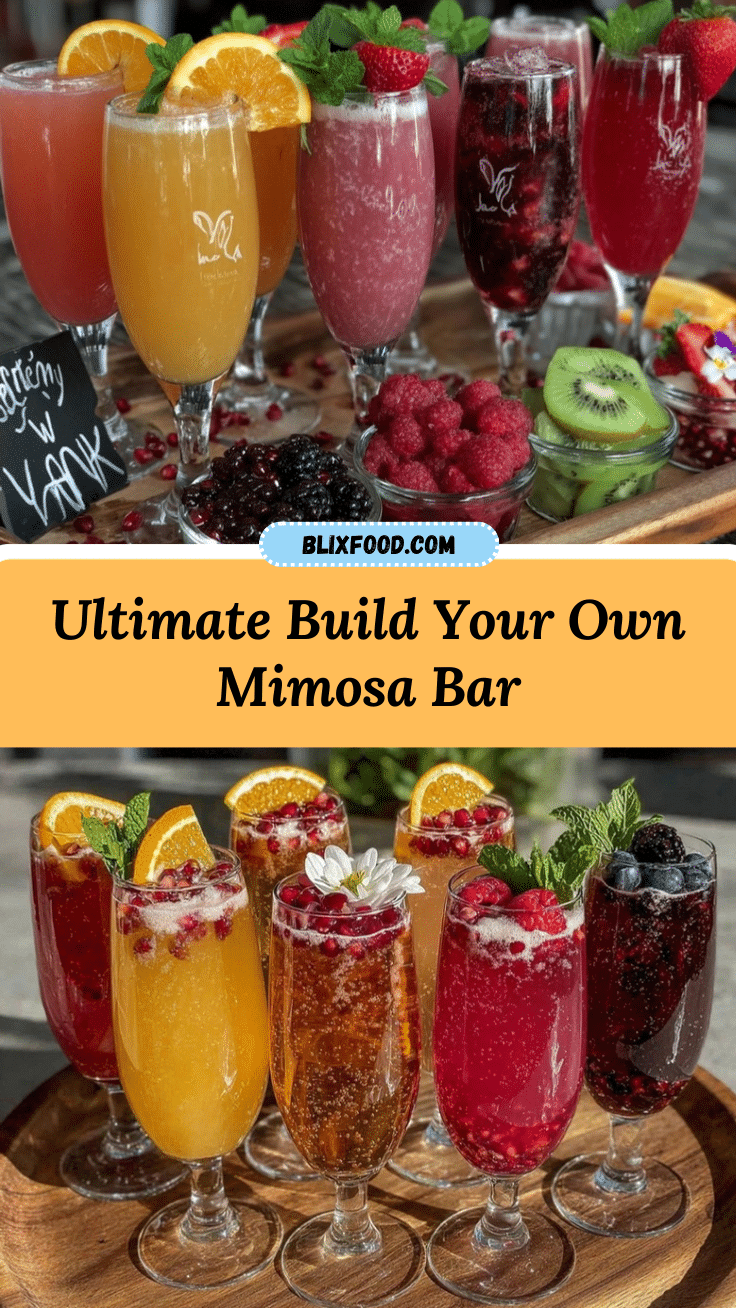
What really sets this mimosa bar apart is the freedom it gives you. Instead of sticking with the usual OJ, I’ve brought in everything from fresh berries to exotic juices and even herbs for a twist. Plus, blending some fresh fruit purees makes the texture ultra-smooth and luxurious. This isn’t just another cocktail setup—it’s your best version of a celebration starter that gets you closing your eyes after the first sip. It’s comfort food, but bubbly and bright.
Perfect for impressing guests without breaking a sweat or turning a simple brunch into a memorable event, this mimosa bar idea is a total game changer.
What Ingredients You Will Need
This mimosa bar uses simple, wholesome ingredients to deliver bold flavor and satisfying texture without the fuss. Most are pantry staples or fresh produce you can easily swap depending on the season.
- Base Alcohol:
– Champagne or sparkling wine (Brut works best for balance, but Prosecco or Cava are great budget-friendly options)
– Non-alcoholic sparkling wine or sparkling water (for mocktails or designated drivers) - Juices & Purees:
– Freshly squeezed orange juice (the classic)
– Pineapple juice (adds tropical sweetness)
– Cranberry juice (for a tart kick)
– Pomegranate juice (rich color and antioxidants)
– Peach or mango puree (for creamy, fruity texture)
– Fresh lemon or lime juice (to brighten flavors) - Fresh Fruit Toppings:
– Strawberries, sliced (adds sweetness and color)
– Blueberries (bursting with flavor)
– Raspberries (tart and vibrant)
– Pineapple chunks (juicy and tropical)
– Kiwi slices (for that tangy twist)
– Orange or blood orange slices (classic citrus look) - Herbs & Extras:
– Fresh mint leaves (adds freshness)
– Basil leaves (surprisingly delicious)
– Edible flowers (for a fancy touch)
– Sugar or colored sugar rims (for fun and sweetness)
– Cinnamon sticks or star anise (for subtle spice)
For best results, I recommend looking for a sparkling wine with a crisp, clean finish—[Veuve Clicquot] or [La Marca] are personal favorites. If you want to keep it gluten-free, all sparkling wines are naturally gluten-free, so no worries there. For fresh juices, squeezing your own orange juice makes a world of difference, but high-quality bottled juice works fine in a pinch. In summer, swapping frozen berries for fresh picks straight from the farmers market makes the bar pop with color and flavor. If you need to keep it dairy-free or vegan, all the ingredients here fit the bill perfectly.
Equipment Needed
Setting up your mimosa bar is all about ease and style, so here’s what you’ll want on hand:
- Champagne Flutes or Tall Glasses: Classic flutes are ideal for bubbles, but tall glasses work fine too.
- Pitchers or Carafes: To hold your different juices and purees, clear glass pitchers look beautiful and let guests see their options.
- Mixing Spoons or Stirrers: For guests to blend their own drinks.
- Cutting Board and Sharp Knife: For prepping fresh fruit garnishes.
- Small Bowls or Dishes: To display herbs, fruit slices, and extras.
- Ice Bucket or Cooler: To keep your champagne chilled and ready to pour.
If you don’t have champagne flutes, no worries—wine glasses or even mason jars add a casual, fun vibe. For a budget-friendly option, dollar stores often carry glassware perfect for parties. I’ve found that a good, sharp paring knife makes all the difference when prepping fruit quickly and safely. Also, keeping a corkscrew handy (even if your sparkling wine has a twist-off cap) never hurts!
Preparation Method
- Chill Your Ingredients: Start by placing your champagne or sparkling wine bottles in the fridge or an ice bucket for at least 2 hours before your celebration. Cold bubbles taste best, and trust me, you don’t want lukewarm fizz.
Tip: If you’re short on time, wrap the bottle in a damp towel and freeze for 15 minutes. - Prep Fruit and Herbs: Wash and slice all your fresh fruit—strawberries, kiwi, oranges, etc.—and place them in small bowls or platters. Tear fresh mint or basil leaves gently to release their aroma.
Note: Avoid slicing fruit too far ahead to keep it fresh-looking and juicy. - Prepare Juices and Purees: Pour your various juices into glass pitchers or carafes. If using fruit purees like peach or mango, blend fresh or frozen fruit with a splash of juice for smoothness.
Warning: Stir purees well before serving; they tend to settle. - Set Up Your Mimosa Bar: Arrange your glasses, pitchers, fruit bowls, and herbs neatly on a table or counter, ensuring everything is easy to reach.
Tip: Place small signs or labels next to each juice or garnish to help guests pick their favorites. - Rim the Glasses (Optional): For a bit of fun, dip glass rims in lemon juice and then sugar or colored sugar crystals. This adds a sweet crunch and a pop of color.
Note: This step is optional but definitely adds flair. - Pour and Assemble: Invite guests to fill their glasses about halfway with chilled sparkling wine, then top off with their choice of juice or puree. Garnish with fresh fruit and herbs.
Tip: Encourage gentle stirring to blend flavors without losing bubbles. - Enjoy Responsibly: Remind everyone to sip slowly and savor the moment—after all, it’s about fun and connection.
From my experience, pacing the setup so everything looks inviting and fresh is key. Keep extra bottles chilled nearby, and don’t forget to have a trash bin or compost close for easy cleanup. This method guarantees a smooth, festive flow without last-minute scrambling.
Cooking Tips & Techniques
While a mimosa bar might seem straightforward, a few tricks learned over time make all the difference.
- Keep It Cold: Honestly, warm champagne is a party killer. Always chill your bottles well in advance, and use an ice bucket for refills.
- Fresh Is Best: Fresh-squeezed juices taste brighter and less sweet than store-bought versions. If you can, squeeze oranges or lemons right before serving.
- Don’t Overfill Glasses: Leave room for the juice to mix with the sparkling wine. Too much liquid and you lose the fizz and balance.
- Layer Flavors: Adding herbs like mint or basil isn’t just pretty; it adds a subtle aromatic lift that surprises and delights.
- Prep Ahead: Slice fruit and make purees the day before to save time, but keep garnishes fresh for best presentation.
- Watch for Clumping: Purees can settle or clump—stir before serving and offer a straw or small spoon for mixing.
- Mixing Order: Pour sparkling wine first, then add juice. This keeps the fizz lively and avoids flat drinks.
I once learned the hard way to avoid shaking sparkling wine—it’s a recipe for bubbles everywhere and soggy clothes! Also, multitasking by prepping fruit while bottles chill helps save precious party prep time. Keeping a small towel handy for drips is just plain smart.
Variations & Adaptations
This mimosa bar is wonderfully flexible, letting you tailor it to your taste or dietary needs.
- Mocktail Version: Swap champagne with sparkling water or non-alcoholic sparkling wine. Add fresh juices and fruit for a festive, booze-free celebration.
- Seasonal Spins: Use seasonal fruits like fresh peaches in summer, or pomegranate seeds and cranberry juice in winter for holiday flair.
- Flavor Twists: Try adding a splash of elderflower syrup or ginger juice for interesting flavor layers.
- Dietary Needs: Use organic juices to avoid added sugars. For low-sugar options, dilute juices with sparkling water.
- Personal Favorite: I love tossing in fresh basil with peach puree—sounds unusual but creates a lovely herbal note that surprises guests every time.
Changing up the juice combinations and garnishes lets you keep the mimosa bar fresh and exciting for every party. You can even do a themed mimosa bar—think tropical, berry blast, or citrus sunshine—to match your event vibe.
Serving & Storage Suggestions
Serve your mimosas chilled and fresh for the best experience. Presentation counts here—adding colorful fruit and herbs to each glass makes them look party-ready and tempting.
Pair your mimosa bar with light brunch dishes like avocado toast, fresh pastries, or a cheese platter to keep things balanced. For beverages, iced coffee or herbal teas make great companions.
If you have leftovers, store unopened bottles of sparkling wine in the fridge for up to 2 days. For opened bottles, use a champagne stopper to preserve bubbles for up to 24 hours. Juices and purees can be refrigerated in airtight containers for 2-3 days, but fresh fruit is best used within the day.
To reheat leftover mimosas (if you must), gently warm juice but never heat sparkling wine—heat kills the bubbles and flavor. Interestingly, some flavors deepen overnight, so prepping parts of your bar a day ahead can build lovely layers of taste.
Nutritional Information & Benefits
A classic mimosa is relatively light, with approximately 120-150 calories per glass depending on the juice and champagne used. Using fresh juices boosts vitamin C content, which supports your immune system and adds an antioxidant punch.
Choosing natural, unsweetened juices helps keep sugar levels moderate. The fresh fruit garnishes add fiber and nutrients, making this more than just a pretty drink. For gluten-free or low-carb diets, mimosas are naturally friendly, especially with sugar-free juice options.
From a wellness perspective, this mimosa bar feels indulgent without tipping into over-the-top territory—perfect for savoring with friends without regrets. Just remember, moderation is key, and hydration is your friend!
Conclusion
Setting up the perfect build your own mimosa bar is one of those ideas that makes celebrations effortless and joyful. It’s customizable, approachable, and downright fun to put together—and your guests will thank you for it. Whether you stick with the classic orange juice or go wild with exotic purees and herbs, this recipe invites you to get creative and make it your own.
Personally, this mimosa bar has become my go-to for stress-free entertaining that still feels special. I love how it brings folks together over something simple yet festive, turning ordinary mornings into memorable moments. So go ahead—mix, match, and make magic at your next brunch or celebration. Don’t forget to share your variations or favorite combos in the comments—I’d love to hear what you come up with!
Here’s to bubbles, bright flavors, and plenty of laughter!
FAQs
What type of champagne is best for a mimosa bar?
Brut champagne is ideal because it’s dry and balances the sweetness of juices well. Prosecco and Cava are excellent budget-friendly alternatives that still offer great bubbles.
Can I make a mimosa bar for a non-alcoholic crowd?
Absolutely! Use non-alcoholic sparkling wines or sparkling water as your base and keep the fresh juices and fruit for a festive mocktail experience.
How far in advance can I prep the mimosa bar?
Prepare juices, purees, and fruit the day before if needed, but keep fresh fruit garnishes for the day of to ensure the best taste and appearance.
What are some creative juice options for a mimosa bar?
Besides orange juice, try pineapple, cranberry, pomegranate, peach, mango purees, or even a splash of ginger or elderflower syrup for unique flavors.
How do I keep the champagne bubbly longer?
Keep bottles chilled in an ice bucket and use champagne stoppers to preserve bubbles after opening. Pour champagne first before adding juice to maintain fizz.
Pin This Recipe!
Perfect Build Your Own Mimosa Bar Ideas for Easy Celebration Fun
Create a customizable mimosa bar with sparkling wine, fresh juices, purees, and fruit garnishes for a fun and festive celebration. Perfect for brunches, parties, and special occasions.
- Prep Time: 15 minutes
- Cook Time: 0 minutes
- Total Time: 15 minutes
- Yield: Varies (serves multiple guests)
- Category: Beverage
- Cuisine: American
Ingredients
- Champagne or sparkling wine (Brut preferred, Prosecco or Cava as alternatives)
- Non-alcoholic sparkling wine or sparkling water (for mocktails)
- Freshly squeezed orange juice
- Pineapple juice
- Cranberry juice
- Pomegranate juice
- Peach or mango puree
- Fresh lemon or lime juice
- Strawberries, sliced
- Blueberries
- Raspberries
- Pineapple chunks
- Kiwi slices
- Orange or blood orange slices
- Fresh mint leaves
- Basil leaves
- Edible flowers
- Sugar or colored sugar rims
- Cinnamon sticks or star anise
Instructions
- Chill your champagne or sparkling wine bottles in the fridge or an ice bucket for at least 2 hours before serving. If short on time, wrap the bottle in a damp towel and freeze for 15 minutes.
- Wash and slice all fresh fruit (strawberries, kiwi, oranges, etc.) and place them in small bowls or platters. Tear fresh mint or basil leaves gently to release aroma.
- Pour various juices into glass pitchers or carafes. Blend fresh or frozen fruit with a splash of juice to make purees smooth. Stir purees well before serving.
- Arrange glasses, pitchers, fruit bowls, and herbs neatly on a table or counter for easy access. Place small signs or labels next to each juice or garnish.
- Optional: Dip glass rims in lemon juice and then sugar or colored sugar crystals for a sweet, colorful rim.
- Invite guests to fill their glasses halfway with chilled sparkling wine, then top off with their choice of juice or puree. Garnish with fresh fruit and herbs. Encourage gentle stirring to blend flavors without losing bubbles.
- Enjoy responsibly by sipping slowly and savoring the moment.
Notes
[‘Chill bottles well in advance for best fizz.’, ‘Use fresh-squeezed juices for brighter flavor.’, ‘Avoid overfilling glasses to maintain bubbles.’, ‘Add herbs like mint or basil for aromatic lift.’, ‘Prep fruit and purees the day before but keep garnishes fresh.’, ‘Stir purees before serving to avoid clumping.’, ‘Pour sparkling wine first, then juice to keep fizz.’, ‘Use champagne stoppers to preserve bubbles after opening.’, ‘Mocktail version uses sparkling water or non-alcoholic sparkling wine.’]
Nutrition
- Serving Size: One glass (about 6-8
- Calories: 120150
- Sugar: 812
- Sodium: 510
- Carbohydrates: 1015
- Fiber: 12
Keywords: mimosa bar, brunch drinks, sparkling wine cocktails, build your own mimosa, celebration drinks, mocktail options, fresh fruit cocktails