“You know, I never thought a plumber would give me baking advice,” I started telling my friend last weekend. It was just one of those lazy Saturday afternoons when my kitchen was a mess and I’d already forgotten half the ingredients I needed. The funny thing is, while he was fixing my leaky faucet, my plumber casually mentioned his grandma’s secret for pink velvet crinkle cookies. I was skeptical at first—pink cookies? Crinkly and tender? Honestly, it sounded too whimsical to be true.
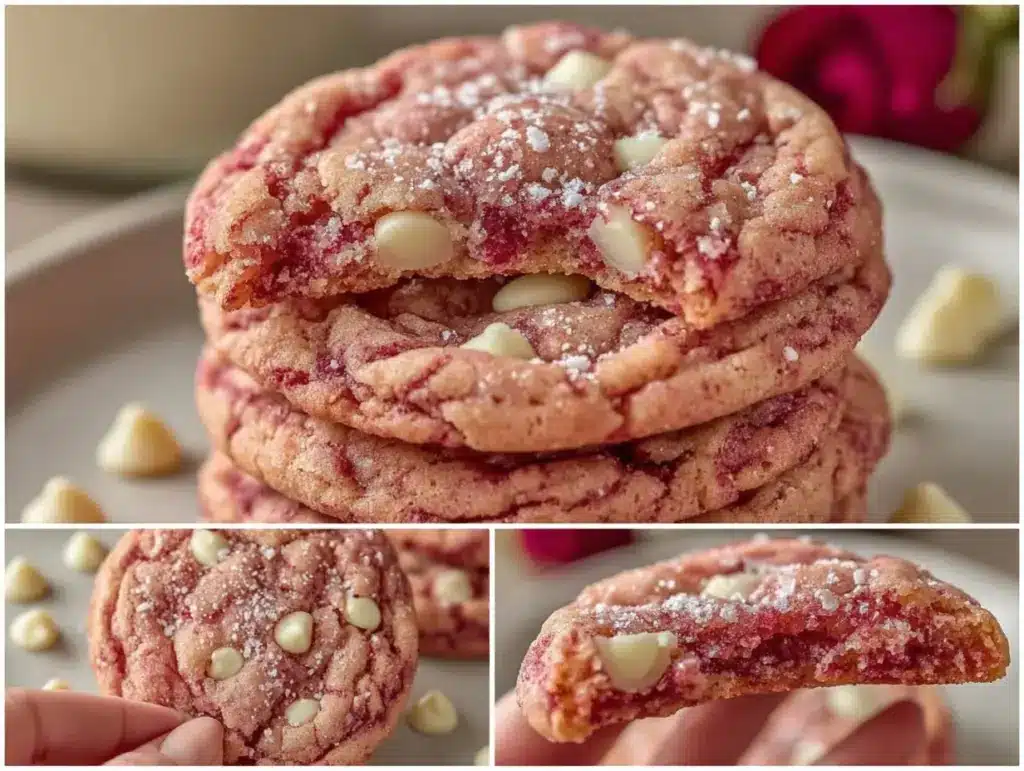
But that afternoon, after a few tweaks and a bit of chaos (including a cracked mixing bowl and a toddler demanding attention), I ended up pulling a batch from the oven that smelled like a bakery dream. The cookies were tender, crinkly on top with those irresistible white chocolate chips melting into every bite. Maybe you’ve been there, chasing a recipe that feels just out of reach, but this one stuck with me. I keep making it because it’s that perfect balance of playful color, melt-in-your-mouth texture, and just the right amount of sweetness.
What really surprised me was how approachable this recipe is. It’s not a fuss; it’s more like a little slice of fun that brightens any day. And if you’re like me, juggling a busy kitchen and a million distractions, this pink velvet crinkle cookie recipe is a welcome treat that’s as delightful to bake as it is to eat.
Why You’ll Love This Recipe
Let me share why these tender pink velvet crinkle cookies with white chocolate chips have become a staple in my baking routine. This isn’t just any cookie recipe—it’s one I’ve tested multiple times, tweaked for tenderness, and perfected for that gorgeous pink hue that makes each bite feel special.
- Quick & Easy: Comes together in under 30 minutes—ideal for last-minute sweet cravings or a simple weekend project.
- Simple Ingredients: Pantry staples like flour, cocoa powder, and white chocolate chips—you probably have most on hand already.
- Perfect for Celebrations: Whether it’s Valentine’s Day, a baby shower, or just a fun afternoon with friends, these cookies add a pop of color and charm.
- Crowd-Pleaser: Kids and adults alike rave about the soft texture paired with the sweet white chocolate bursts.
- Unbelievably Delicious: The tender crumb with a slight crinkle on top creates a texture combo that’s surprisingly addictive.
What sets this recipe apart is the way it balances the subtle cocoa flavor with just enough pink tint to feel festive but not overpowering. The white chocolate chips add a creamy contrast that makes each cookie feel like a little celebration. Honestly, after the first bite, you might find yourself closing your eyes and savoring the moment—which is exactly why I keep coming back to this simple yet delightful recipe.
What Ingredients You Will Need
This recipe uses simple, wholesome ingredients to deliver bold flavor and satisfying texture without the fuss. Most items are pantry staples, and substitutions are easy if needed.
- All-purpose flour: 2 ½ cups (310 g) – for structure and tenderness.
- Cocoa powder: 2 tablespoons (unsweetened) – adds that subtle chocolate depth.
- Baking powder: 1 teaspoon – helps the cookies rise and create those signature crinkles.
- Salt: ½ teaspoon – balances sweetness.
- Unsalted butter: ¾ cup (170 g), softened – for richness and that melt-in-your-mouth texture. I like using Kerrygold for its creamy flavor.
- Granulated sugar: 1 ½ cups (300 g) – sweetens and tenderizes.
- Large eggs: 2, room temperature – bind everything together.
- Vanilla extract: 2 teaspoons – adds warmth and depth.
- Red food coloring: 1 teaspoon (gel recommended) – gives the perfect pink color without watering down the dough.
- White chocolate chips: 1 ½ cups (270 g) – the star of the show adding creamy sweetness. I recommend Ghirardelli for best melt and flavor.
- Powdered sugar: For coating the cookies before baking (about ½ cup / 60 g) – creates the classic crinkle effect.
Substitution tip: For a dairy-free option, swap butter for coconut oil and choose dairy-free white chocolate chips. You can also use almond flour for a gluten-free twist, but expect a slightly different texture.
Equipment Needed
For these tender pink velvet crinkle cookies with white chocolate chips, you don’t need anything fancy, but here’s what I used and recommend:
- Mixing bowls: A large bowl for dry ingredients and a separate bowl for wet ingredients keeps things tidy.
- Electric mixer or stand mixer: Helps cream butter and sugar thoroughly—though a sturdy whisk and some elbow grease work fine too.
- Measuring cups and spoons: For accurate ingredient amounts, especially the cocoa and baking powder.
- Rubber spatula: Great for folding in white chocolate chips without breaking them.
- Baking sheet: Lined with parchment paper or silicone mats to prevent sticking.
- Sifter or fine mesh strainer: For coating cookies evenly in powdered sugar.
- Cookie scoop (optional): Makes portioning uniform and speeds up the process. I use a 2-tablespoon scoop.
If you don’t have a mixer, no worries—just mix by hand! Also, parchment paper is a budget-friendly alternative to silicone mats and makes cleanup easier. I learned the hard way that skipping this step leads to a sticky mess!
Preparation Method

- Preheat your oven to 350°F (175°C) and line two baking sheets with parchment paper or silicone mats. This usually takes about 10 minutes, so get this going first.
- Mix dry ingredients: In a large bowl, sift together 2 ½ cups (310 g) all-purpose flour, 2 tablespoons (unsweetened) cocoa powder, 1 teaspoon baking powder, and ½ teaspoon salt. Whisk to combine evenly. This ensures your cookies bake uniformly.
- Cream butter and sugar: In another bowl, beat ¾ cup (170 g) softened unsalted butter with 1 ½ cups (300 g) granulated sugar using an electric mixer on medium speed until light and fluffy—about 3 minutes. The texture should look pale and smooth. This step is key for tender cookies.
- Add eggs and flavor: Beat in 2 large room-temp eggs, one at a time, mixing well after each addition. Then stir in 2 teaspoons vanilla extract and 1 teaspoon gel red food coloring until the dough turns a vibrant pink.
- Combine wet and dry: Gradually add the dry ingredients to the wet mixture, mixing on low speed or folding gently with a spatula. Stop mixing once just combined to avoid tough cookies—curious, I once over-mixed and ended up with cakey texture instead of tender!
- Fold in white chocolate chips: Gently fold 1 ½ cups (270 g) white chocolate chips into the dough. This keeps the chips intact and evenly distributed.
- Chill the dough: Cover the bowl with plastic wrap and refrigerate for at least 30 minutes. This step helps the dough firm up, making it easier to handle and resulting in better crinkles. I sometimes forget this and the cookies spread too much!
- Form and coat cookies: Using a cookie scoop or spoon, form 1 ½-inch (about 3.8 cm) balls. Roll each ball generously in powdered sugar (about ½ cup / 60 g) until fully coated. This creates the classic crinkle crackle as they bake.
- Bake: Place the coated dough balls 2 inches (5 cm) apart on the prepared baking sheets. Bake for 10-12 minutes or until the tops are set but still soft to the touch. They’ll look slightly cracked and the edges will be delicate. Avoid overbaking to keep them tender.
- Cool: Let the cookies cool on the baking sheet for 5 minutes before transferring to a wire rack to cool completely. This helps them firm up without drying out.
Pro tip: Don’t skip chilling the dough. I once tried baking immediately, and the cookies spread flat, losing that beautiful crinkle texture. Also, using gel food coloring gives more vibrant pinks without adding extra liquid.
Cooking Tips & Techniques
Making tender pink velvet crinkle cookies with white chocolate chips isn’t rocket science, but a few techniques can make a big difference:
- Softened butter matters: Butter should be soft but not melted. Too warm, and your dough will be greasy; too cold, and it won’t cream properly.
- Don’t overmix: Once you add the dry ingredients, mix just until combined. Overworking gluten leads to tougher cookies.
- Chill dough for better shape: Chilling firms the dough, preventing excessive spreading and helping crinkles form beautifully.
- Coat generously with powdered sugar: The thick layer of sugar cracks as the cookies bake, creating that signature textured look.
- Watch your oven temperature: Every oven bakes differently—start checking at 10 minutes to avoid overbaking.
- Use gel food coloring: It’s more concentrated, so you get vibrant color without thinning the dough.
I learned from experience that using white chocolate chips instead of chunks makes the melting just right—too big, and they don’t melt evenly. Also, multitasking helps: while the dough chills, clean up or prepare your baking sheets so you’re ready to go.
Variations & Adaptations
If you want to mix things up or accommodate dietary needs, here are some ideas:
- Chocolate chip swap: Use dark or milk chocolate chips instead of white chocolate for a richer flavor contrast.
- Fruit twist: Add ½ cup finely chopped freeze-dried raspberries for a tart pop and an extra punch of color.
- Gluten-free version: Substitute all-purpose flour with a 1-to-1 gluten-free baking flour blend. Note that texture may be slightly different but still delicious.
- Vegan adaptation: Replace butter with coconut oil, use flax eggs (2 tbsp flaxseed meal + 6 tbsp water), and opt for dairy-free white chocolate chips.
- Festive toppings: Sprinkle a pinch of edible glitter or colored sugar over the powdered sugar before baking for a party-ready touch.
Personally, I once added a teaspoon of orange zest to the dough, which gave the cookies a subtle citrus hint that paired wonderfully with the creamy white chocolate. Experimenting with mix-ins is half the fun!
Serving & Storage Suggestions
These tender pink velvet crinkle cookies are best served at room temperature to savor the soft texture and melty chocolate chips. They look adorable stacked on a pastel plate or wrapped in a cellophane bag with a ribbon for gifting.
Pair them with a cold glass of milk, a cup of chai tea, or even a sparkling rosé for grown-up gatherings. The sweetness balances beautifully with something slightly bitter or creamy.
For storage, keep the cookies in an airtight container at room temperature for up to 4 days. If you want to keep them longer, freeze the baked cookies in a sealed bag for up to 3 months. To reheat, pop them in a 300°F (150°C) oven for 5 minutes or microwave briefly (15-20 seconds) to revive softness.
Interestingly, these cookies develop a bit more depth in flavor after a day, so if you can wait, they taste even better the next day. Just don’t blame me if you end up sneaking bites while waiting!
Nutritional Information & Benefits
Here’s a rough estimate per cookie (assuming 24 cookies):
| Calories | ~150 kcal |
|---|---|
| Fat | 8 g |
| Carbohydrates | 18 g |
| Protein | 2 g |
| Sugar | 12 g |
While these cookies are a treat, the use of unsweetened cocoa powder adds antioxidants, and white chocolate chips bring a creamy texture without overwhelming sweetness. Using real butter adds richness but also nutrients like vitamin A. This recipe can be adapted for gluten-free or vegan diets, making it inclusive for various dietary needs.
From a wellness perspective, I like that it’s a recipe you can make at home with control over ingredients and portion size, making it a mindful indulgence rather than a guilt trip.
Conclusion
These tender pink velvet crinkle cookies with white chocolate chips are a charming way to brighten your baking and your day. They’re approachable enough for a casual kitchen experiment yet special enough to share with loved ones or at festive gatherings. I love how this recipe combines playful color with cozy, melt-in-your-mouth texture that feels both nostalgic and fresh.
Feel free to tweak the flavors, add your favorite mix-ins, or adjust sweetness to your liking. I’d love to hear how you make this recipe your own! Leave a comment below sharing your twists or questions, and don’t forget to share this little pink delight with friends who appreciate a homemade treat.
Happy baking and enjoy every crinkly, tender bite!
FAQs
Can I use regular food coloring instead of gel for the pink color?
You can, but gel food coloring is best because it’s more concentrated and won’t thin the dough. If using liquid, add less and be mindful of dough consistency.
Why are my cookies not crinkling?
Make sure to coat the dough balls generously in powdered sugar and chill the dough before baking. Also, don’t overmix the dough, as that affects texture.
Can I make the dough ahead and freeze it?
Absolutely! Form and coat the dough balls, then freeze on a tray before transferring to a freezer bag. Bake straight from frozen, adding a couple of extra minutes to the baking time.
What’s the best way to store these cookies to keep them soft?
Store in an airtight container at room temperature. Adding a slice of bread to the container helps keep cookies soft by absorbing excess moisture.
Can I substitute white chocolate chips with chunks or other mix-ins?
Yes, but chips melt more evenly than chunks. You can also try dried fruit, nuts, or dark chocolate chips for variation.
Pin This Recipe!
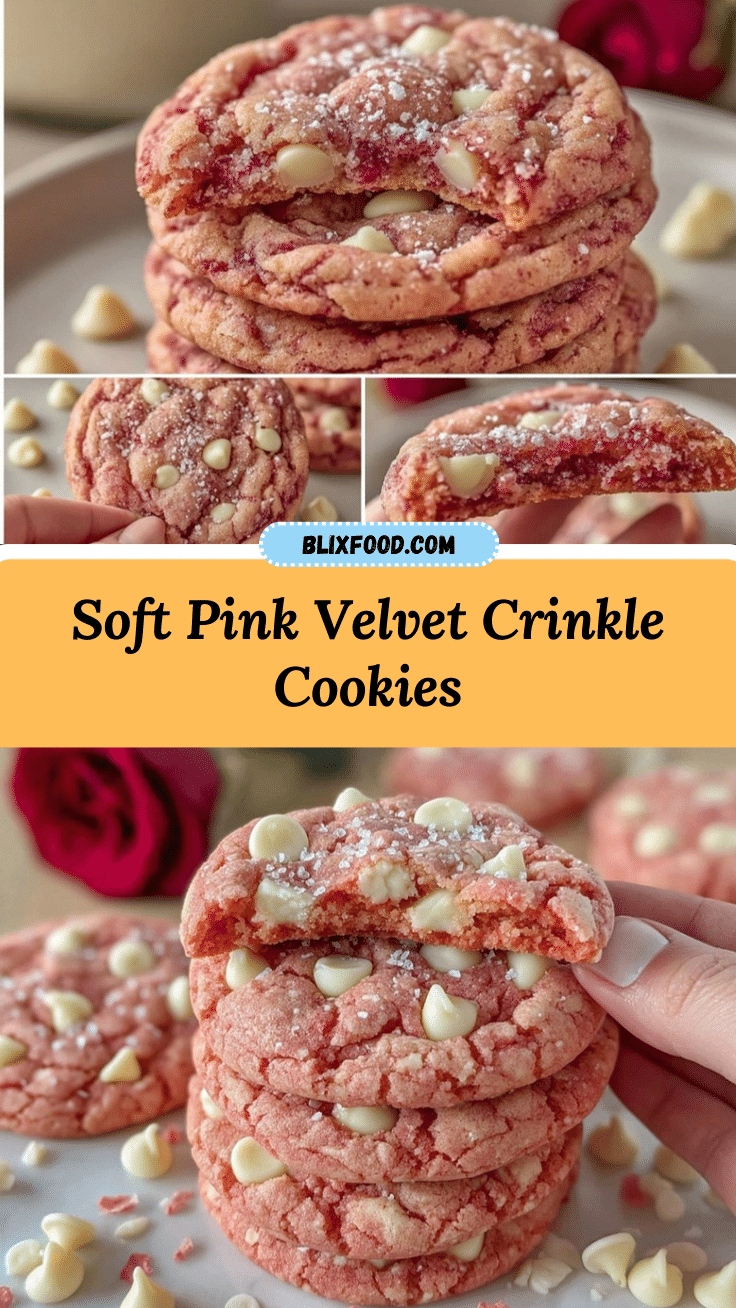
Tender Pink Velvet Crinkle Cookies Recipe Easy Homemade White Chocolate Chip Treats

These tender pink velvet crinkle cookies with white chocolate chips offer a perfect balance of playful color, melt-in-your-mouth texture, and just the right amount of sweetness. Easy to make and ideal for celebrations or everyday treats.
- Prep Time: 15 minutes
- Cook Time: 12 minutes
- Total Time: 42 minutes
- Yield: 24 cookies 1x
- Category: Dessert
- Cuisine: American
Ingredients
- 2 ½ cups (310 g) all-purpose flour
- 2 tablespoons unsweetened cocoa powder
- 1 teaspoon baking powder
- ½ teaspoon salt
- ¾ cup (170 g) unsalted butter, softened
- 1 ½ cups (300 g) granulated sugar
- 2 large eggs, room temperature
- 2 teaspoons vanilla extract
- 1 teaspoon gel red food coloring
- 1 ½ cups (270 g) white chocolate chips
- ½ cup (60 g) powdered sugar for coating
Instructions
- Preheat your oven to 350°F (175°C) and line two baking sheets with parchment paper or silicone mats.
- In a large bowl, sift together the flour, cocoa powder, baking powder, and salt. Whisk to combine evenly.
- In another bowl, beat the softened butter with granulated sugar using an electric mixer on medium speed until light and fluffy, about 3 minutes.
- Beat in the eggs one at a time, mixing well after each addition. Stir in vanilla extract and gel red food coloring until the dough turns vibrant pink.
- Gradually add the dry ingredients to the wet mixture, mixing on low speed or folding gently with a spatula until just combined.
- Gently fold in the white chocolate chips.
- Cover the bowl with plastic wrap and refrigerate the dough for at least 30 minutes.
- Using a cookie scoop or spoon, form 1 ½-inch balls and roll each ball generously in powdered sugar until fully coated.
- Place the coated dough balls 2 inches apart on the prepared baking sheets.
- Bake for 10-12 minutes or until the tops are set but still soft to the touch.
- Let the cookies cool on the baking sheet for 5 minutes before transferring to a wire rack to cool completely.
Notes
Use gel food coloring for vibrant pink color without thinning the dough. Chill dough for at least 30 minutes to prevent spreading and achieve crinkles. Coat dough balls generously in powdered sugar for classic crinkle effect. Avoid overmixing after adding dry ingredients to keep cookies tender. Butter should be softened but not melted.
Nutrition
- Serving Size: 1 cookie
- Calories: 150
- Sugar: 12
- Fat: 8
- Carbohydrates: 18
- Protein: 2
Keywords: pink velvet cookies, crinkle cookies, white chocolate chip cookies, easy cookie recipe, homemade treats, Valentine's Day cookies, tender cookies