Let me tell you, the scent of sharp cheddar mingling with creamy cream cheese wafting from the kitchen is enough to make anyone’s mouth water—and that’s just the start of this classic creamy cheese ball recipe. The first time I made this little gem was at a chilly winter potluck years ago. I was instantly hooked, the kind of moment where you pause, take a deep breath, and just smile because you know you’re onto something truly special. This recipe brings together smooth, tangy, and savory all in one cozy bite.
When I was knee-high to a grasshopper, my grandma used to whip up cheese balls for every holiday and family gathering. She swore it was the perfect crowd-pleaser, and honestly, she was right. This recipe feels like a warm hug from those days, a dash of nostalgia wrapped in every creamy scoop. My family couldn’t stop sneaking them off the platter (and I can’t really blame them).
You know what makes this classic creamy cheese ball recipe stand out? It’s dangerously easy, yet it delivers pure, nostalgic comfort. Perfect for potlucks, a sweet treat for your kids’ after-school snack, or something to brighten up your Pinterest cookie board with a savory twist. I’ve tested this recipe more times than I can count (in the name of research, of course), and it’s become a staple for family gatherings, gifting, and just those cozy nights when you want a little something special.
Why You’ll Love This Recipe
Honestly, this classic creamy cheese ball recipe has been a game-changer in my appetizer lineup. It’s simple to make but packs a punch in flavor, texture, and presentation. I’ve fine-tuned it through countless attempts—trust me, this one’s family-approved and chef-tested!
- Quick & Easy: Comes together in under 20 minutes, perfect for busy weeknights or last-minute cravings.
- Simple Ingredients: No fancy grocery trips needed; you likely already have everything in your kitchen.
- Perfect for Cozy Gatherings: Great for holiday parties, game nights, and casual get-togethers.
- Crowd-Pleaser: Always gets rave reviews from kids and adults alike—no one can resist that creamy, cheesy goodness.
- Unbelievably Delicious: The texture and flavor combo is next-level comfort food—smooth, tangy, with just the right hint of herbs and spice.
What makes this recipe different? It’s all about the balance: blending cream cheese and sharp cheddar for ultra-creamy texture, plus a touch of Worcestershire sauce that adds a subtle depth you don’t expect but can’t live without. You’re not just making any cheese ball—you’re crafting a flavor-packed appetizer that makes you close your eyes after the first bite. It’s comfort food reimagined—easier, faster, but with the same soulful satisfaction. Perfect for impressing guests without stress or turning a simple night into something memorable.
What Ingredients You Will Need
This classic creamy cheese ball recipe uses simple, wholesome ingredients to deliver bold flavor and satisfying texture without the fuss. Most are pantry staples, with a couple of fresh touches to keep it bright and lively.
- Cream Cheese, softened (I recommend Philadelphia for the best smoothness)
- Sharp Cheddar Cheese, shredded (extra sharp gives a nice punch)
- Worcestershire Sauce, a splash (adds savory depth)
- Garlic Powder, for a subtle kick
- Onion Powder, rounds out the flavor
- Fresh Chives, finely chopped (or green onions if preferred)
- Crushed Pecans or Walnuts, for rolling the cheese ball (toasted for extra crunch)
- Smoked Paprika, a pinch (optional, for color and smoky notes)
- Salt and Pepper, to taste
- Optional mix-ins: diced pimentos, cooked bacon bits, or chopped sun-dried tomatoes to customize your flavor
If you need to swap ingredients, feel free to use dairy-free cream cheese or vegan cheddar alternatives to keep it inclusive. For a gluten-free twist, just double-check your Worcestershire sauce as some brands contain gluten. I love to use toasted pecans here, but walnuts or even finely chopped almonds work beautifully too.
Equipment Needed
- Mixing bowl (medium size, to combine all ingredients comfortably)
- Electric mixer or sturdy spoon (an electric hand mixer speeds things up, but a wooden spoon works fine if you don’t have one)
- Measuring spoons and cups (for precise seasoning)
- Plastic wrap or parchment paper (to shape and chill the cheese ball)
- Serving platter or cheese board (for that cozy, inviting presentation)
- Optional: food processor (if you want extra finely chopped nuts or to mix in extras quickly)
I’ve made this with just a spoon and a bowl plenty of times—sometimes, simplicity is the best route. But if you want that perfectly smooth texture, an electric mixer is your friend. Also, a good-quality plastic wrap makes chilling and shaping a breeze without the mess.
Preparation Method
- Soften the cream cheese: Let 8 ounces (225 grams) of cream cheese sit at room temperature for about 30 minutes. This makes mixing easier. If you’re short on time, microwave it in 10-second bursts—just until soft, not melted.
- Mix the cheeses: In your mixing bowl, combine the softened cream cheese with 2 cups (200 grams) shredded sharp cheddar cheese. Use an electric mixer on medium speed or stir vigorously with a spoon until smooth and well blended. The texture should be creamy but with some cheese bits for bite.
- Add seasoning: Stir in 1 teaspoon Worcestershire sauce, 1/2 teaspoon garlic powder, 1/2 teaspoon onion powder, salt, and pepper to taste. Give it a good mix. Taste as you go—this is where you tailor the flavor.
- Fold in fresh chives: Add 2 tablespoons finely chopped fresh chives. The green flecks add freshness and a subtle oniony zing that lifts the whole cheese ball.
- Shape the cheese ball: Lay out a sheet of plastic wrap or parchment paper. Spoon the cheese mixture onto it and shape into a ball about 5 inches (12 cm) in diameter. Wrap tightly and refrigerate for at least 1 hour—this helps the flavors meld and firms up the shape.
- Prepare the nut coating: While chilling, toast 1 cup (100 grams) of crushed pecans or walnuts in a dry skillet over medium heat for 3-5 minutes, stirring often, until fragrant and lightly browned. Let cool.
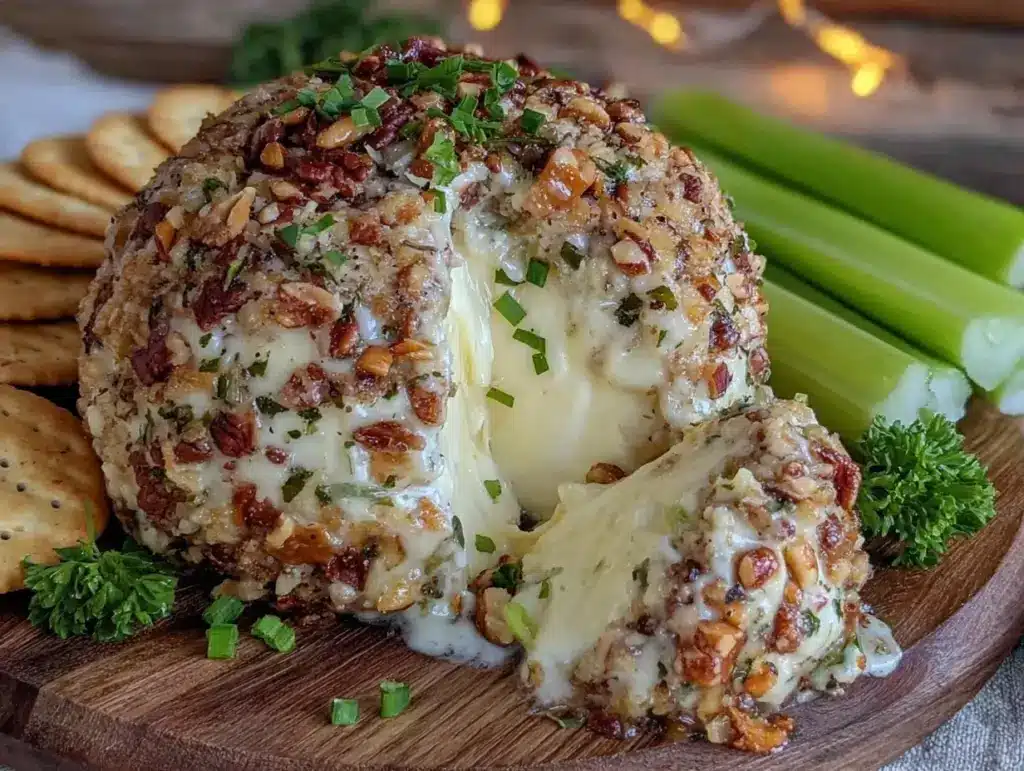
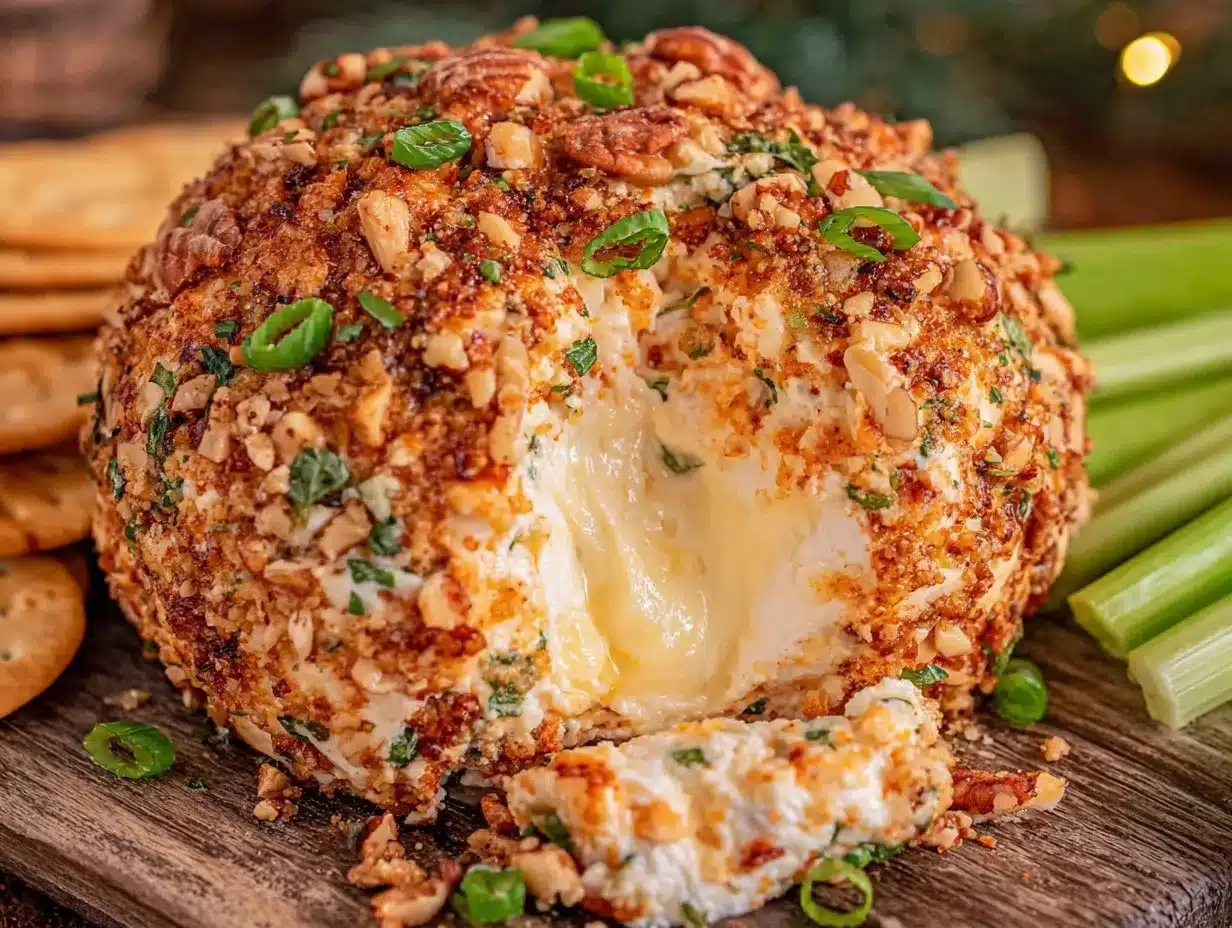
- Coat the cheese ball: Unwrap the chilled cheese ball and roll it around in the nuts until fully coated. Press gently so the nuts stick well.
- Final chill: Place the coated cheese ball on a serving plate, cover loosely with plastic wrap, and refrigerate for another 30 minutes before serving. This final step makes slicing or spreading easier and lets the flavors settle.
Pro tip: If the cheese ball feels too soft to roll in nuts, pop it back in the fridge for 15 minutes. Also, if you want a more colorful look, sprinkle smoked paprika on the nuts before rolling—it adds a warm glow and smoky aroma.
Cooking Tips & Techniques
Honestly, making the perfect cheese ball is more about finesse than fancy techniques. Here’s what I’ve learned through trial, error, and a few happy accidents:
- Room temperature cream cheese is key: Cold cream cheese makes for a lumpy, hard-to-mix mess. Soften it well—trust me, it makes all the difference.
- Don’t overmix: You want some texture from the shredded cheddar, not a paste. Mix until just combined for the best mouthfeel.
- Chill well: Patience here pays off. Chilling lets the flavors marry and makes shaping easier.
- Toast your nuts: Raw nuts can be a bit bland. Toasting brings out their natural oils and crunch, adding a delicious layer to the cheese ball.
- Use fresh herbs: Fresh chives or green onions brighten the flavor. Dried herbs can taste flat or powdery.
- Multitasking: While the cheese ball chills, prep your crackers or veggies for serving, so everything’s ready to go.
One time, I forgot to chill the cheese ball properly, and it ended up too soft to roll—lesson learned! Also, if you find the mixture too stiff, a splash of milk or cream helps loosen it without losing flavor.
Variations & Adaptations
This classic creamy cheese ball recipe is super flexible. Here are a few ways I like to switch it up depending on the season or mood:
- Spicy Kick: Add 1-2 teaspoons of your favorite hot sauce or finely chopped jalapeños for a peppery punch.
- Herb Lover’s: Mix in fresh parsley, dill, or basil alongside chives for a garden-fresh vibe.
- Bacon Bliss: Stir in crispy cooked bacon bits for a smoky, savory twist. Bonus points if you crumble them on top too.
- Gluten-Free Friendly: Use gluten-free Worcestershire sauce and serve with gluten-free crackers or veggies.
- Vegan Version: Swap cream cheese and cheddar for vegan alternatives and use maple syrup or agave to add a touch of sweetness balancing the savory.
I once tried sun-dried tomatoes and basil with pine nuts coating for an Italian-inspired ball—it was a hit at my summer picnic! Feel free to get creative; this recipe welcomes your personal touch.
Serving & Storage Suggestions
Serve this cheese ball chilled or just slightly softened at room temperature for easier spreading. I like to arrange it on a wooden cheese board surrounded by an assortment of crackers, sliced baguette, baby carrots, celery sticks, and crisp apple slices to balance the richness.
Pair it with a chilled glass of white wine or sparkling water with lemon for a light, refreshing combo. This appetizer really shines at cozy gatherings, holiday parties, or casual get-togethers.
To store, tightly wrap the cheese ball in plastic wrap and keep it refrigerated for up to 5 days. You can also freeze it for up to 3 months—thaw overnight in the fridge before serving. Just keep in mind the texture might soften slightly after freezing, so it’s best for spreading rather than slicing.
Flavors actually mellow and develop over a day or two, so if you can make it ahead, even better. The savory notes deepen, making every bite even more satisfying.
Nutritional Information & Benefits
This classic creamy cheese ball recipe is rich and indulgent, but it also packs some nutritional perks. A typical 2-tablespoon serving contains approximately:
| Calories | 110 kcal |
|---|---|
| Fat | 9g |
| Protein | 4g |
| Carbohydrates | 1g |
| Calcium | 10% DV |
The cream cheese and cheddar provide a good dose of calcium and protein, essential for bone health and muscle maintenance. The nuts add heart-healthy fats and a bit of fiber. Just a heads-up: this recipe contains dairy and nuts, so it’s not suitable for those with allergies to these ingredients.
From a wellness standpoint, enjoying this cheese ball in moderation feels like a treat without guilt. It’s perfect for satisfying savory cravings while offering some nutritional value.
Conclusion
So, why is this classic creamy cheese ball recipe worth making? Because it’s easy, delicious, and has that timeless appeal that brings people together. Whether you stick with the original or try one of the variations, it’s a cozy appetizer that fits any occasion.
I love this recipe because it reminds me of family, laughter, and those simple moments that matter most. Plus, it’s a total crowd-pleaser that comes together faster than you’d expect—always a win in my book.
Give it a try, tweak it to your liking, and let me know how it goes! Don’t forget to share your own twists or questions in the comments below—I’m always excited to hear from fellow cheese ball fans.
Here’s to many cozy gatherings filled with good food and great company!
FAQs
Can I make the cheese ball ahead of time?
Absolutely! Making it a day in advance actually helps the flavors blend beautifully. Just keep it wrapped and refrigerated until serving.
What can I use instead of nuts for coating?
If you’re allergic or don’t like nuts, try crushed pretzels, crispy fried onions, or finely chopped fresh herbs for a fresh alternative.
How long will the cheese ball keep in the fridge?
It stays good for up to 5 days when properly wrapped. Just keep an eye on freshness, especially if you add perishable mix-ins.
Can I freeze the cheese ball?
You can freeze it for up to 3 months. Thaw it overnight in the fridge before serving. The texture might be a bit softer but still tasty and spreadable.
Is this recipe suitable for a low-carb diet?
Yes! The cheese ball itself is low-carb. Just be mindful of what you serve it with—opt for veggies or low-carb crackers instead of bread.
Pin This Recipe!

Classic Creamy Cheese Ball Recipe Easy Perfect Appetizer for Cozy Gatherings

A classic creamy cheese ball combining sharp cheddar and cream cheese with a touch of Worcestershire sauce, perfect for cozy gatherings and crowd-pleasing appetizers.
- Prep Time: 10 minutes
- Cook Time: 5 minutes
- Total Time: 1 hour 45 minutes
- Yield: 12 servings 1x
- Category: Appetizer
- Cuisine: American
Ingredients
- 8 ounces cream cheese, softened
- 2 cups shredded sharp cheddar cheese
- 1 teaspoon Worcestershire sauce
- 1/2 teaspoon garlic powder
- 1/2 teaspoon onion powder
- Salt and pepper to taste
- 2 tablespoons fresh chives, finely chopped
- 1 cup crushed pecans or walnuts, toasted
- Pinch of smoked paprika (optional)
- Optional mix-ins: diced pimentos, cooked bacon bits, or chopped sun-dried tomatoes
Instructions
- Soften the cream cheese by letting it sit at room temperature for about 30 minutes or microwave in 10-second bursts until soft but not melted.
- In a mixing bowl, combine the softened cream cheese with shredded sharp cheddar cheese. Mix with an electric mixer on medium speed or stir vigorously until smooth but still slightly textured.
- Stir in Worcestershire sauce, garlic powder, onion powder, salt, and pepper. Taste and adjust seasoning as needed.
- Fold in the finely chopped fresh chives.
- Lay out a sheet of plastic wrap or parchment paper. Spoon the cheese mixture onto it and shape into a ball about 5 inches in diameter. Wrap tightly and refrigerate for at least 1 hour.
- While chilling, toast the crushed pecans or walnuts in a dry skillet over medium heat for 3-5 minutes until fragrant and lightly browned. Let cool.
- Unwrap the chilled cheese ball and roll it in the toasted nuts until fully coated, pressing gently to adhere.
- Place the coated cheese ball on a serving plate, cover loosely with plastic wrap, and refrigerate for another 30 minutes before serving.
Notes
Room temperature cream cheese is key for smooth mixing. Don’t overmix to keep some texture. Chill well to firm up the cheese ball for easier shaping and coating. Toast nuts to enhance flavor and crunch. If too soft to roll, chill longer. Optional smoked paprika adds color and smoky aroma. Variations include adding hot sauce, fresh herbs, bacon bits, or using vegan/dairy-free alternatives.
Nutrition
- Serving Size: 2 tablespoons
- Calories: 110
- Fat: 9
- Carbohydrates: 1
- Protein: 4
Keywords: cheese ball, creamy cheese ball, appetizer, party food, easy cheese ball, sharp cheddar, cream cheese, cozy gatherings


