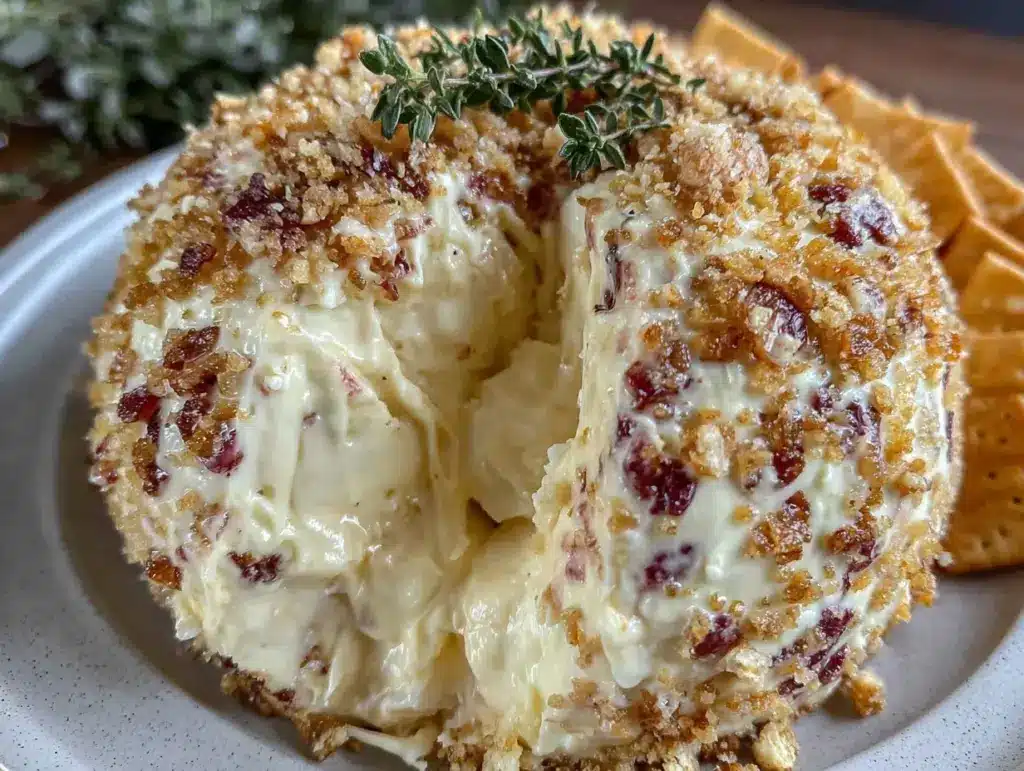
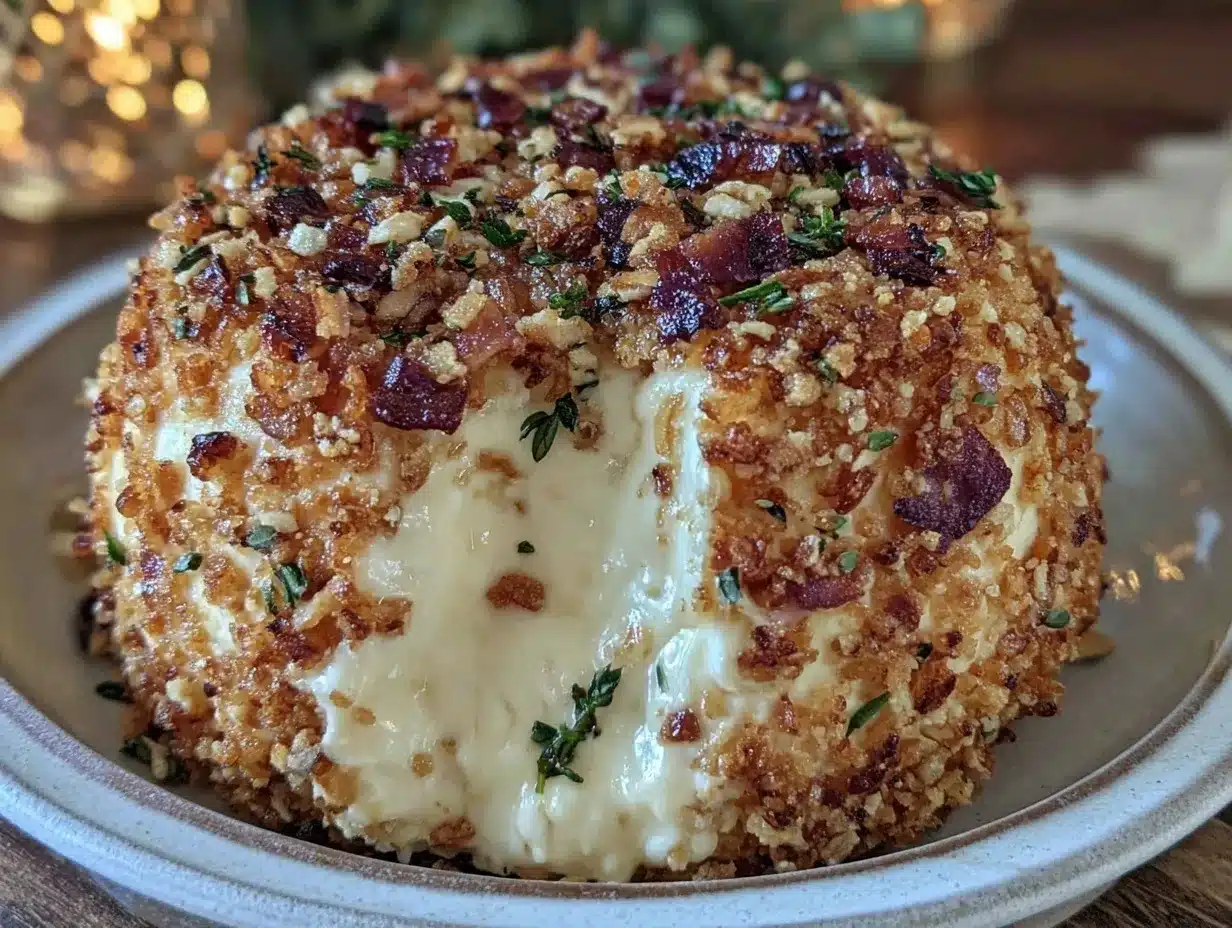
Picture this: you walk into a room, and the air is filled with the savory perfume of fresh herbs, toasted nuts, and a hint of roasted garlic. That little pop of scent that makes everyone’s head turn, noses twitching, wondering, “What’s that amazing smell?” That’s the moment a creamy garlic cheese ball with herb and nut crust comes to life. The first time I whipped up this cheese ball, I was elbow-deep in a pre-holiday kitchen rush, hunting for a recipe that would wow my friends but not leave me frazzled. I remember rolling the cheese mixture in a mountain of herbs and nuts, the crunch echoing in my hands, and thinking, “Oh, this is going to be good.”
Honestly, the first bite was a revelation. I paused—just for a second—because you know how sometimes you stumble onto something that’s almost too good to be true? The creamy, garlicky center melted across my tongue, and the crust gave a satisfying crackle. My kids kept circling the kitchen, sneaking pinches when they thought I wasn’t looking (they were not subtle). Even my husband, who’s not a huge cheese fan, came back for seconds. It was the kind of moment where you just know you’ve created a new family classic.
This recipe takes me right back to those old-school potlucks, when I’d show up with a covered dish and hope for the best. But let’s face it—this cheese ball is the star of any snack table. It’s the party starter, the conversation piece, and, if I’m being honest, dangerously easy to eat before your guests even arrive. Whether you need a quick treat for your book club, something fancy for a holiday gathering, or a make-ahead snack for movie night, this creamy garlic cheese ball has your back. After testing it every which way (in the name of research, of course), it’s become a staple for gifting, hosting, and those “just because” moments that honestly make life sweeter. If you’re craving a recipe that feels like a warm hug on a plate, you’re going to want to bookmark this one.
Why You’ll Love This Creamy Garlic Cheese Ball Recipe
You know, I’ve made my fair share of cheese balls over the years—some were lopsided, a few a little bland, and once I tried one that tasted suspiciously like plastic wrap (let’s not talk about that). But this creamy garlic cheese ball with herb and nut crust? It’s my gold standard now. I’ve tested it with picky eaters, cheese snobs, and my “just give me chips” father-in-law, and every single time it’s been a hit. Here’s why I think you’ll love it, too:
- Quick & Easy: Comes together in under 20 minutes (plus a little chill time), which means you can make it before guests arrive or even the night before. Perfect for those last-minute, “Oh no, what should I bring?” moments.
- Simple Ingredients: No wild goose chases at the store—just basic cheeses, garlic, herbs, and pantry nuts. You probably have everything you need right now.
- Perfect for Entertaining: Whether it’s a holiday party, a backyard picnic, or a cozy game night, this cheese ball fits in everywhere. It’s easy to transport, too—just wrap and go.
- Crowd-Pleaser: Grown-ups love the savory herb crust, kids go for the creamy center, and even the “I’m not a cheese person” types sneak a second bite.
- Unbelievably Delicious: The combination of smooth, tangy cheese, roasted garlic, and that herby, nutty crunch is comfort food at its best—without being heavy or greasy.
What sets this creamy garlic cheese ball recipe apart? For starters, blending cream cheese, sharp cheddar, and parmesan gives you a super-smooth, ultra-flavorful base. The roasted garlic adds mellow sweetness (instead of raw bite), and the fresh herb-and-nut crust brings color and texture with every bite. Sometimes I even sneak in a pinch of smoked paprika or a dash of lemon zest—little twists that make it feel gourmet without the fuss.
This isn’t just another cheese ball—it’s the one that makes you close your eyes and savor every bite. The kind you want on your table for special occasions, but easy enough for a Tuesday. It’s comfort food that doesn’t feel old-fashioned, healthier than the processed stuff, and flexible enough for any crowd. There’s nothing fussy here—just honest, satisfying flavor and a recipe you can count on every single time.
What Ingredients You Will Need
This creamy garlic cheese ball recipe uses a handful of simple, trusty ingredients, but each one brings something special to the party. I’m all about keeping things straightforward—no searching for fancy cheeses or weird seasonings. If you’ve got a well-stocked fridge and a basic spice rack, you’re good to go! Here’s what you’ll need:
- For the Cheese Ball:
- Cream cheese – 8 oz (225 g), softened to room temperature (I love Philadelphia brand for its smoothness)
- Sharp cheddar cheese – 1 cup (100 g), finely shredded (adds tang and body; orange or white cheddar both work)
- Parmesan cheese – 1/3 cup (30 g), finely grated (gives salty depth)
- Unsalted butter – 2 tablespoons (28 g), softened (helps with texture and richness)
- Roasted garlic – 2 large cloves, mashed (if you’re short on time, use 1 teaspoon garlic powder)
- Fresh chives – 2 tablespoons, finely chopped (for mild onion flavor)
- Fresh parsley – 1 tablespoon, finely chopped (adds color and freshness)
- Black pepper – 1/2 teaspoon, freshly cracked (or more to taste)
- Sea salt – 1/4 teaspoon, or to taste
- Lemon juice – 1 teaspoon, freshly squeezed (brightens up the cheese)
- Worcestershire sauce – 1/2 teaspoon (optional, but adds a nice savory kick)
- For the Herb & Nut Crust:
- Pecans or walnuts – 1/2 cup (50 g), finely chopped and lightly toasted (pecans are my favorite for sweetness, but walnuts work too)
- Fresh parsley – 2 tablespoons, chopped (extra for rolling)
- Fresh dill or thyme – 1 tablespoon, chopped (dill is classic, thyme adds a twist)
- Paprika – 1/4 teaspoon (optional, for color and warmth)
Ingredient Tips:
- If you need to go nut-free, substitute toasted sunflower or pumpkin seeds (they toast up beautifully and still give crunch).
- Dairy-free? Use a vegan cream cheese and your favorite plant-based shreds. It’s not quite the same, but it absolutely works in a pinch.
- Fresh herbs make a difference, but you can swap in 1 teaspoon dried herbs for every tablespoon fresh if that’s what you have.
- For a gluten-free cheese ball, just make sure your Worcestershire sauce is gluten-free (some brands add wheat—tricky, I know).
- Want a spicy kick? Add 1/4 teaspoon cayenne or a few dashes of hot sauce.
That’s it—nothing fancy, just real ingredients doing what they do best. And the best part? You can swap, tweak, or double the recipe depending on what you have in the fridge or who’s coming to dinner.
Equipment Needed
You don’t need a fancy kitchen to pull off this creamy garlic cheese ball—just a few simple tools and you’re in business:
- Mixing bowl (medium to large): For combining all the cheese ball ingredients. Glass or stainless steel both work—I just grab whatever’s clean!
- Hand mixer or sturdy spatula: A hand mixer makes blending super smooth, but a strong arm and a spatula will do the trick if you’re feeling old-school.
- Plastic wrap or wax paper: To help shape and chill the cheese ball. I’ve tried parchment too, and it works fine.
- Small skillet: For toasting the nuts. You can use a toaster oven if you prefer, but I like to watch them closely on the stovetop.
- Chef’s knife and cutting board: For chopping nuts and herbs. A food processor is handy if you’re making a double batch, but definitely not necessary.
- Measuring cups and spoons: Accuracy is your friend here, but I’ll admit I eyeball the herbs sometimes!
- Serving plate or platter: To show off your finished cheese ball—bonus points if it’s a pretty one for your Pinterest photos!
If you don’t have a hand mixer, let the cream cheese soften extra well and use a sturdy fork to mash everything together. For toasting nuts, just keep the heat low and stir often—nuts can go from perfect to burnt in a blink (been there, done that). And if you need to keep things budget-friendly, store-brand cheese and a basic spatula get the job done just fine.
Preparation Method
-
Soften the Cheese:
Leave your cream cheese and butter out at room temperature for about 30–45 minutes. This makes them blend smoothly. If you’re in a hurry, cut them into cubes and let them sit—just don’t microwave, or they’ll get runny.
-
Roast the Garlic (Optional but Worth It):
If you’re using fresh garlic, preheat your oven to 400°F (200°C). Slice the top off a bulb, drizzle with olive oil, wrap in foil, and roast for 30–40 minutes until soft and golden. Cool, then squeeze out 2 cloves for the cheese ball. If you need to skip this, garlic powder works in a pinch.
-
Toast the Nuts:
Place chopped pecans or walnuts in a dry skillet over medium heat. Stir frequently for 3–5 minutes until fragrant and lightly browned. Set aside to cool. Watch closely—nuts burn fast (ask me how I know)!
-
Mix the Cheese Ball Base:
In your mixing bowl, combine 8 oz (225 g) cream cheese, 1 cup (100 g) shredded cheddar, 1/3 cup (30 g) parmesan, and 2 tablespoons (28 g) butter. Beat with a hand mixer or mash with a spatula until smooth and creamy. Add the roasted garlic, 2 tablespoons chives, 1 tablespoon parsley, 1/2 teaspoon black pepper, 1/4 teaspoon salt, 1 teaspoon lemon juice, and 1/2 teaspoon Worcestershire sauce (if using). Mix until everything’s well blended and speckled with herbs.
-
Shape the Cheese Ball:
Scoop the cheese mixture onto a sheet of plastic wrap. Gather the wrap around the cheese and shape into a ball (or a log if that’s easier for you). Twist the ends to seal. Chill in the fridge for at least 1 hour—up to 24 hours is fine. This helps the flavors meld and the ball firm up for rolling.
-
Prepare the Herb & Nut Crust:
On a plate, mix your cooled toasted nuts, 2 tablespoons fresh parsley, 1 tablespoon dill or thyme, and 1/4 teaspoon paprika if using. Spread into an even layer.
-
Coat the Cheese Ball:
Unwrap the chilled cheese ball and gently roll it in the herb and nut mixture, pressing lightly so everything sticks. I use my hands, but a piece of wax paper helps if you want to keep things tidy. If there are bald patches, sprinkle extra nuts and herbs on top.
-
Chill Until Serving:
Place the finished cheese ball on a serving plate and cover loosely with wrap. Chill until you’re ready to serve (at least 30 minutes more makes it easier to slice). Bring to room temperature for 10–15 minutes before serving so it spreads easily.
Preparation Tips: If your cheese ball feels too soft, pop it in the freezer for 10 minutes before shaping. If it’s too firm to roll in the crust, let it sit out for a couple of minutes. And if you’re making it ahead, the flavor only gets better overnight—just keep it tightly wrapped to prevent fridge odors.
Cooking Tips & Techniques
I’ve made this creamy garlic cheese ball recipe so many ways—some successful, some not so much (like that one time I forgot to toast the nuts and, yikes, it just wasn’t the same). Here are my best tricks for a perfect result every time:
- Softening is Key: Don’t rush the cream cheese and butter. If they’re too cold, your cheese ball will turn out lumpy and hard to mix. Letting them sit out makes everything blend smooth as silk.
- Roasted Garlic Magic: Roasting turns garlic sweet and mellow—no sharp bite. If you’re short on time, use garlic powder, but honestly, roasted is worth the extra 30 minutes. Sometimes I roast a whole head just for cheese balls and keep the rest in the fridge.
- Toast the Nuts: This step brings out the oils and adds a deeper, almost caramel-like flavor. Burnt nuts are bitter, so stir constantly and don’t wander away (learned that the hard way when I got distracted by a phone call).
- Chill for Success: Chilling helps the cheese ball hold its shape and lets the flavors meld. If you skip this step, it can end up spreadable instead of sliceable (which is still tasty, but not as pretty on a platter).
- Hands or Tools: I usually just use my hands to shape and roll, but if you want a neater finish, try using a piece of wax paper or even disposable kitchen gloves—especially if you’re prepping for a crowd.
- Adjust Seasoning: Taste the cheese mixture before shaping. If you like it tangier, add a bit more lemon juice or pepper. For extra richness, a splash of cream works wonders.
The biggest mistake I see is skipping the chill or using cold cheese straight from the fridge. Both mess with the texture! If you end up with a cheese ball that’s too firm, let it sit out for a few minutes before serving. Too soft? Pop it in the freezer for a quick fix. And if your crust doesn’t stick, try patting the outside of the cheese ball with a damp paper towel and then rolling again—works like a charm.
Variations & Adaptations
The beauty of this creamy garlic cheese ball recipe is how flexible it is. Whether you’ve got dietary needs or just want to shake things up, there’s a version for everyone:
- Nut-Free Version: Swap the pecans or walnuts for toasted sunflower seeds or pumpkin seeds. They add crunch without any allergens—my friend’s son is allergic to everything, and this swap always makes him happy.
- Dairy-Free or Vegan: Use your favorite non-dairy cream cheese (like Kite Hill or Tofutti), plant-based cheddar shreds, and vegan parmesan. The texture is a bit softer, but the taste is still spot-on. Just chill a little longer for firmness.
- Spicy Kick: Add 1/4 teaspoon cayenne pepper or a few dashes of hot sauce to the cheese mixture. You can also mix some finely chopped pickled jalapeños into the crust for extra zing.
- Different Cheeses: Try swapping the cheddar for pepper jack, gouda, or even smoked mozzarella for a twist. Each cheese brings its own unique flavor—smoked cheeses are especially fun for fall parties.
- Seasonal Herbs: In the summer, I love using fresh basil and tarragon. Around the holidays, sage and rosemary make it feel festive. Dried herbs work in a pinch—just use less, since they’re stronger.
- Shape It Up: Instead of a ball, shape the cheese mixture into a log and roll in the crust. Or make mini cheese balls for individual servings (great for buffets or kids’ parties).
One of my favorite spins was a “Greek” cheese ball—swapping in feta, adding chopped olives, and rolling in fresh dill and oregano. It was a total hit at a family picnic! Don’t be afraid to experiment—the base recipe is forgiving and really lets you play with flavors.
Serving & Storage Suggestions
This creamy garlic cheese ball is best served slightly cool—not fridge-cold, but not soft either. Let it rest on the counter for 10–15 minutes before serving so it spreads easily but holds its shape. I like to serve it on a pretty platter surrounded by:
- Crunchy crackers (multigrain, wheat, or gluten-free all work)
- Fresh veggie sticks: carrots, celery, bell peppers, cucumber
- Pretzel thins or pita chips for extra crunch
- Toasted baguette slices (if you’re feeling fancy)
It pairs perfectly with sparkling water, crisp white wine, or a simple lemonade—whatever makes your gathering feel special. For holidays, I’ll garnish with extra herbs or a sprinkle of pomegranate seeds for a pop of color (so Pinterest-worthy!).
Storage Tips: Wrap any leftover cheese ball tightly in plastic or place in an airtight container. It keeps in the fridge for up to 5 days—if it lasts that long! For longer storage, wrap well and freeze for up to a month. Thaw overnight in the fridge, then roll in fresh herbs and nuts to refresh the crust before serving.
Leftovers make an amazing bagel or sandwich spread, or even a stuffing for chicken breasts. The flavors actually deepen over time, so don’t worry if you’re prepping ahead for a party. Just keep the crust fresh by rolling right before serving if you make it more than a day ahead.
Nutritional Information & Benefits
Here’s a quick look at what you’re getting in every serving (based on a 12-serving ball):
- Calories: ~160 per serving
- Protein: 5 g
- Carbs: 2 g (most from nuts and herbs)
- Fat: 14 g (mostly from cheese and nuts)
- Sugar: <1 g
Health Benefits: Nuts add healthy fats and a bit of plant protein, while fresh herbs bring antioxidants and vitamins. Using real cheese means more calcium and less processed stuff. It’s naturally low in carbs and gluten-free if you check your Worcestershire sauce. Allergens to watch for: dairy and nuts—see Variations for swaps!
I love that this cheese ball feels decadent but gives you good fats and flavor. It’s a treat, sure, but not one that leaves you feeling weighed down. Every bite is pure, savory comfort—without the guilt.
Conclusion
If you’ve been searching for a crowd-pleasing appetizer that’s easy, flexible, and guaranteed to draw a crowd, this creamy garlic cheese ball with herb and nut crust is your new go-to. The combo of creamy cheese, mellow garlic, and that vibrant, crunchy crust is honestly hard to beat. You can tweak it to match your pantry, your mood, or your guests’ needs—and it always delivers.
This recipe has earned a spot at every party and family gathering I host. I love it for its simplicity, but mostly for the way it brings people together (and keeps them coming back for seconds). Give it your own twist, snap a photo, and let me know how it turns out—I love seeing your spins!
So go ahead, bookmark this one, print it out, or pin it for later. I have a feeling it’ll be a staple in your kitchen, too. Don’t forget to drop a comment with your favorite variations or to share with a friend who needs a little cheese ball magic in their life. Happy snacking!
Frequently Asked Questions
How far in advance can I make this creamy garlic cheese ball?
You can make it up to 2 days ahead—just keep it tightly wrapped in the fridge. For the freshest crust, roll in herbs and nuts the day you serve.
Can I freeze the cheese ball?
Yes! Wrap it well (before or after rolling in the crust) and freeze for up to a month. Thaw overnight in the fridge, then roll in fresh herbs and nuts to refresh before serving.
What can I use instead of nuts for the crust?
Try toasted sunflower or pumpkin seeds for crunch, or roll in just herbs if you need a completely nut-free version. Crushed pretzels also work in a pinch!
Is this creamy garlic cheese ball recipe gluten-free?
It is, as long as you use gluten-free Worcestershire sauce (some brands contain wheat) and serve with gluten-free crackers or veggies.
How long will leftovers last?
Stored in an airtight container in the fridge, leftovers keep for up to 5 days. They make a great spread for bagels, sandwiches, or wraps!
Pin This Recipe!

Creamy Garlic Cheese Ball Recipe – Easy Party Appetizer with Herb and Nut Crust

This creamy garlic cheese ball features a blend of cream cheese, cheddar, and parmesan, with mellow roasted garlic and a crunchy herb and nut crust. It’s a quick, crowd-pleasing appetizer perfect for parties, holidays, or casual gatherings.
- Prep Time: 15 minutes
- Cook Time: 5 minutes (toasting nuts) + 30 minutes (optional garlic roasting)
- Total Time: 1 hour 20 minutes (includes chilling)
- Yield: 12 servings 1x
- Category: Appetizer
- Cuisine: American
Ingredients
- 8 oz cream cheese, softened to room temperature
- 1 cup sharp cheddar cheese, finely shredded
- 1/3 cup parmesan cheese, finely grated
- 2 tablespoons unsalted butter, softened
- 2 large cloves roasted garlic, mashed (or 1 teaspoon garlic powder)
- 2 tablespoons fresh chives, finely chopped
- 1 tablespoon fresh parsley, finely chopped
- 1/2 teaspoon freshly cracked black pepper
- 1/4 teaspoon sea salt
- 1 teaspoon freshly squeezed lemon juice
- 1/2 teaspoon Worcestershire sauce (optional)
- 1/2 cup pecans or walnuts, finely chopped and lightly toasted
- 2 tablespoons fresh parsley, chopped (for crust)
- 1 tablespoon fresh dill or thyme, chopped (for crust)
- 1/4 teaspoon paprika (optional, for crust)
Instructions
- Leave cream cheese and butter out at room temperature for 30–45 minutes to soften.
- If using fresh garlic, preheat oven to 400°F. Slice top off a bulb, drizzle with olive oil, wrap in foil, and roast for 30–40 minutes until soft and golden. Cool, then squeeze out 2 cloves. (Or use garlic powder.)
- Toast chopped pecans or walnuts in a dry skillet over medium heat for 3–5 minutes until fragrant and lightly browned. Set aside to cool.
- In a mixing bowl, combine cream cheese, cheddar, parmesan, and butter. Beat with a hand mixer or mash with a spatula until smooth and creamy.
- Add roasted garlic, chives, parsley, black pepper, salt, lemon juice, and Worcestershire sauce. Mix until well blended.
- Scoop cheese mixture onto a sheet of plastic wrap. Gather wrap around cheese and shape into a ball (or log). Twist ends to seal. Chill in fridge for at least 1 hour, up to 24 hours.
- On a plate, mix cooled toasted nuts, parsley, dill or thyme, and paprika. Spread into an even layer.
- Unwrap chilled cheese ball and gently roll in herb and nut mixture, pressing lightly so everything sticks. Fill in bald patches as needed.
- Place finished cheese ball on a serving plate, cover loosely, and chill until ready to serve (at least 30 minutes more). Bring to room temperature for 10–15 minutes before serving.
Notes
For nut-free, use toasted sunflower or pumpkin seeds. Dairy-free versions work with vegan cream cheese and shreds. Chilling is key for texture and flavor. Roll in crust just before serving for freshest results. Leftovers make a great spread for bagels or sandwiches.
Nutrition
- Serving Size: 1/12 of cheese ball
- Calories: 160
- Sugar: 1
- Sodium: 220
- Fat: 14
- Saturated Fat: 6
- Carbohydrates: 2
- Fiber: 0.5
- Protein: 5
Keywords: cheese ball, party appetizer, garlic, herbs, nuts, holiday, snack, easy, gluten-free, vegetarian


