“You won’t believe how a little slip-up in my pantry led to the creamiest garlic herb cheese ball I’ve ever made,” I said, laughing to myself as I wiped the counter. It was a Saturday afternoon at my friend Linda’s place, a typical pre-party hustle — except I forgot the usual crackers. Panic? Nah. Instead, I grabbed what was on hand, and that’s when the magic happened. Honestly, the creamy garlic herb cheese ball that resulted was so smooth and flavorful, everyone kept sneaking bites before the main event. You know that feeling when a simple appetizer turns into the star of the night? This recipe nails that vibe every single time.
What’s funny is that the inspiration came from overhearing an elderly neighbor chatting about her “secret party starter” while we were both waiting for our coffee at the local café. She was this quiet, unassuming lady who you’d never guess had a knack for crowd-pleasing recipes. Well, I tried her approach but added my own twist — more garlic, a bit more herbs, and a few unexpected cream cheese blends. The result? A creamy, dreamy cheese ball that’s got the perfect balance of tang and herbaceous punch. I made a bit of a mess rolling it, and I probably looked a bit silly with cream cheese on my fingers, but hey — that’s the real cooking moment, right?
This creamy garlic herb cheese ball recipe stays with me because it’s not just about the taste — it’s the way it brings people together. Maybe you’ve been there, scrambling to put together something quick for guests and hoping it doesn’t look like you just whipped it up last minute. Well, this cheese ball is your go-to. It’s easy, impressive, and honestly, a little addictive. Whether you’re hosting game night, a holiday shindig, or simply want something tasty to nibble on, this recipe has your back.
Why You’ll Love This Recipe
Cooking this creamy garlic herb cheese ball has become a staple in my entertaining repertoire — and for good reason. It’s a recipe that’s been tested in my kitchen more times than I can count, and each batch gets rave reviews. Plus, it’s been family-approved (my picky cousin, no less!). Here’s why you’ll want to keep this one handy:
- Quick & Easy: Ready in under 20 minutes, making it perfect for busy weeknights or last-minute party prep.
- Simple Ingredients: No need for fancy shopping trips — most of these are pantry and fridge staples.
- Perfect for Entertaining: Whether it’s a casual get-together or a festive gathering, this cheese ball fits right in.
- Crowd-Pleaser: Kids and adults alike can’t get enough of the creamy, garlicky flavor combo.
- Unbelievably Delicious: The smooth texture paired with fresh herbs and garlic makes every bite a delight.
What sets this apart? It’s the harmony of fresh herbs with just the right amount of garlic — not too overpowering, but enough to make you sit up and take notice. Plus, the blend of cream cheese and sharp cheddar gives the cheese ball a fluffy yet rich texture that’s unlike the typical dense versions you often see. Honestly, it’s the kind of thing that makes you close your eyes after the first bite and say, “Yep, this is going on the rotation.”
What Ingredients You Will Need
This creamy garlic herb cheese ball recipe uses simple, wholesome ingredients to deliver bold flavor and satisfying texture without the fuss. Most ingredients are easy to find and perfect for throwing together in a pinch.
- Cream cheese, softened (I like using Philadelphia for the best smoothness)
- Sharp cheddar cheese, shredded (freshly shredded is always better than pre-shredded)
- Garlic cloves, minced (about 2 cloves for that perfect garlicky punch)
- Fresh parsley, finely chopped (adds brightness and color)
- Fresh chives, chopped (for a subtle oniony note)
- Dill weed, dried or fresh (adds a lovely herbaceous depth)
- Sour cream (adds tang and creaminess; you can swap with Greek yogurt for a lighter option)
- Worcestershire sauce, a splash (trust me on this — it rounds out the flavor)
- Salt and pepper, to taste
- Chopped nuts for coating (optional: pecans or walnuts work beautifully)
- Crackers or sliced baguette, for serving
If you find yourself without fresh herbs, dried herbs work fine, but use about half the amount to keep flavors balanced. Also, if you’re gluten-free, serving with rice crackers or veggie sticks is a fantastic alternative. Feel free to swap the cheddar for smoked gouda if you want a twist — I’ve done that on lazy Sundays, and it’s a keeper!
Equipment Needed
- Mixing bowl — a medium-sized one works best to combine ingredients without spills
- Hand mixer or sturdy spoon — I find a hand mixer cuts down on effort, but spoon-stirring works fine too
- Measuring cups and spoons — for precise seasoning
- Knife and cutting board — for chopping herbs and garlic
- Plastic wrap or parchment paper — to shape and chill the cheese ball
- Serving plate or board — presentation counts, even for cheese balls!
If you don’t have a hand mixer, no worries. Just be prepared for a bit more elbow grease. And if you want to keep things budget-friendly, a sharp paring knife and a good cutting board make all the herb prep easier. Also, cleaning your equipment right after makes the whole experience less of a chore — cream cheese can get sticky!
Preparation Method
- Soften the cream cheese: Leave the cream cheese out at room temperature for about 30 minutes before starting. This helps it blend smoothly. (Tip: If you’re short on time, microwave for 10 seconds, but don’t melt it!)
- Mix the base: In your mixing bowl, combine 8 oz (225 g) of softened cream cheese with 1 cup (100 g) shredded sharp cheddar cheese. Use a hand mixer on low speed or stir vigorously with a spoon. This should take about 3-5 minutes until creamy and well combined.
- Add flavorings: Stir in 2 minced garlic cloves, 2 tablespoons chopped fresh parsley, 1 tablespoon chopped chives, and 1 teaspoon dill weed. Add 2 tablespoons sour cream and 1 teaspoon Worcestershire sauce. Season with ½ teaspoon salt and ¼ teaspoon black pepper. Mix well to distribute everything evenly. (If it feels too stiff, add an extra tablespoon of sour cream.)
- Chill the mixture: Using plastic wrap, scoop the cheese mixture onto the wrap and shape it into a ball roughly 4 inches (10 cm) in diameter. Wrap tightly and refrigerate for at least 1 hour. This helps the flavors meld and firms up the shape for easier handling.
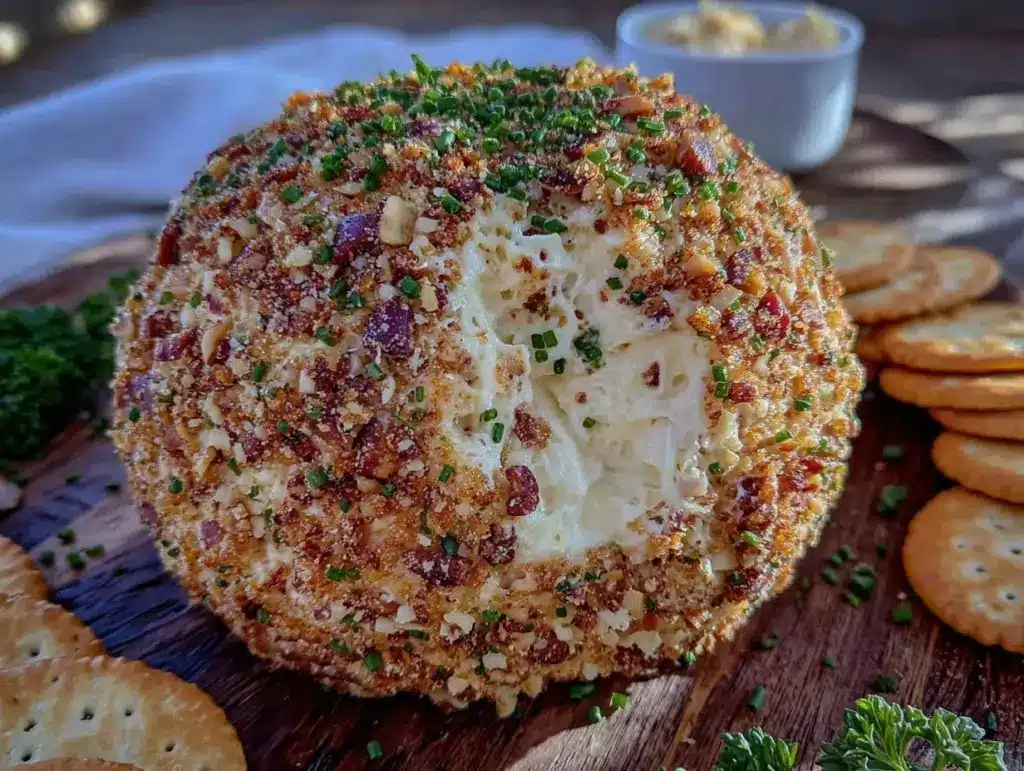
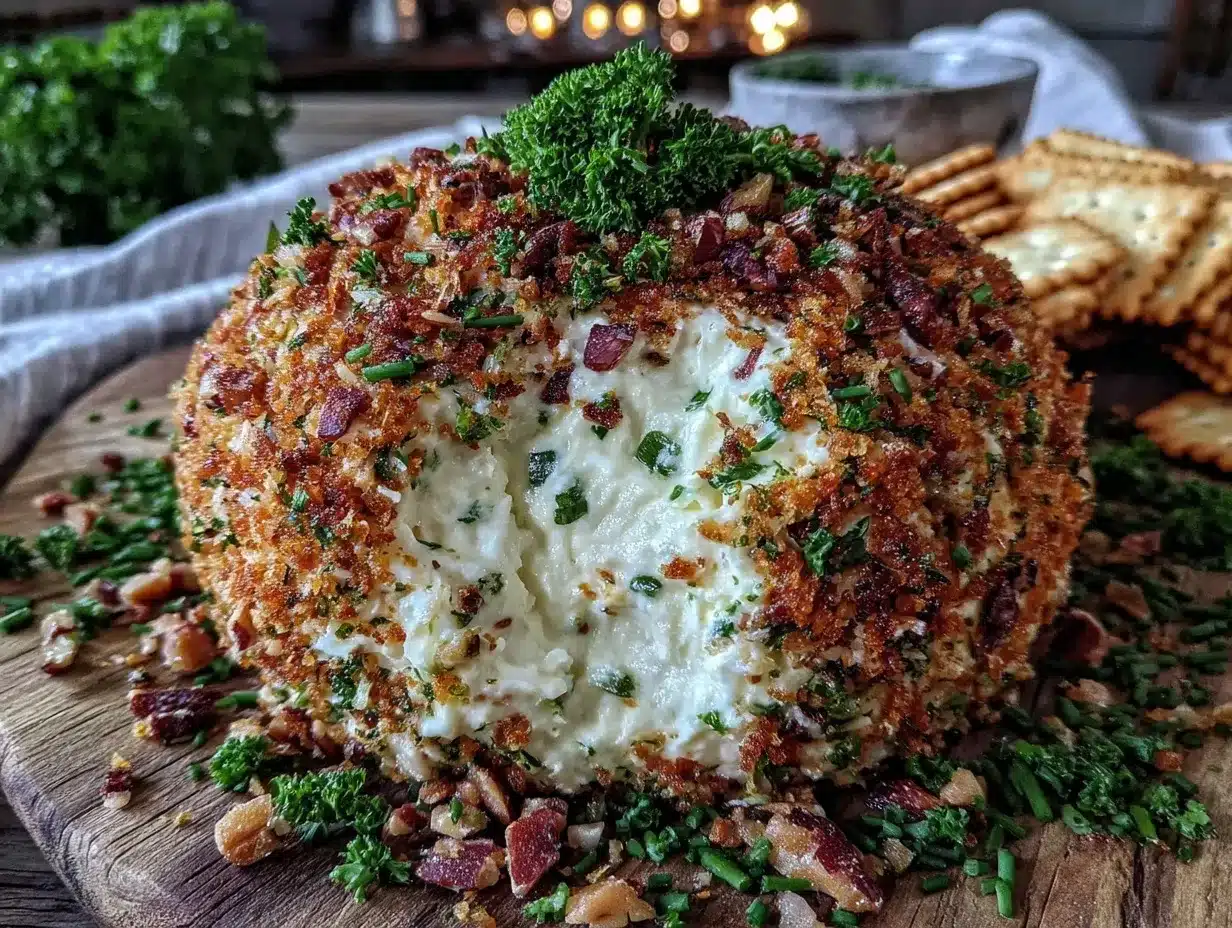
- Prepare the coating: While chilling, chop about ½ cup (50 g) of nuts finely — pecans or walnuts are great. You can also mix in some extra chopped herbs if you like. Spread them out on a plate.
- Coat the cheese ball: Remove the chilled cheese ball from the fridge and unwrap. Roll it gently but firmly in the nut and herb mixture until fully coated. This step adds a delightful crunch and contrast to the creamy inside.
- Final chill & serve: Place the coated cheese ball on a serving plate and chill for another 15 minutes before serving. This ensures it holds its shape and the coating sticks well. Serve with crackers, sliced baguette, or fresh veggies.
Pro tip: If your hands get too sticky while rolling, wet them slightly — it helps prevent the cheese from sticking to your fingers. Also, don’t skip the chilling steps; they really make a difference in texture and flavor harmony.
Cooking Tips & Techniques
Getting the perfect creamy garlic herb cheese ball is all about balance and attention to detail. Here’s what I’ve learned through trial, error, and a few messy kitchen moments:
- Use room temperature cream cheese: It blends easier with other ingredients, giving you that ultra-smooth finish. Cold cream cheese is stubborn and lumps up, which nobody wants.
- Fresh herbs matter: Dried herbs can be a bit dusty and overpowering, so whenever possible, chop fresh parsley, chives, and dill. They brighten the flavor and add a lovely pop of color.
- Don’t skimp on garlic: Two cloves give a nice punch without being overwhelming. If you love garlic, feel free to add a little extra — just be mindful of raw garlic’s sharpness.
- Chill time is your friend: It not only firms up the ball for rolling but also lets the flavors meld beautifully. I usually prepare this a few hours ahead, sometimes even the night before.
- Coating options: Nuts add crunch, but you can also use finely chopped olives, bacon bits, or even crispy fried onions for a twist.
- Watch your salt: Since cheddar and Worcestershire sauce add saltiness, taste the mixture before adding more. You can always sprinkle extra on top if needed.
- Multitasking tip: While the cheese ball chills, prep your serving platter, slice veggies, or mix a cocktail — keeps the party prep smooth and stress-free.
One time I tried blending the herbs in a food processor, and it ended up too mushy and bitter. Since then, I stick to hand-chopping for better texture and flavor release.
Variations & Adaptations
This creamy garlic herb cheese ball recipe is versatile enough to suit different tastes and dietary needs. Here are some ways to switch things up:
- Spicy kick: Add finely diced jalapeños or a pinch of cayenne pepper for heat. I once brought this version to a tailgate, and it disappeared fast!
- Vegetarian-friendly: Omit Worcestershire sauce (contains anchovies) and swap with soy sauce or tamari for that umami boost.
- Gluten-free: Serve with gluten-free crackers or fresh veggie sticks instead of bread or traditional crackers.
- Seasonal herbs: In summer, try adding basil and tarragon for a fresh, bright twist. I did this once at a garden party, and it was a hit.
- Dairy-free: Use dairy-free cream cheese and vegan cheddar alternatives. The texture might differ slightly, but the flavor still shines.
Personally, I’ve experimented with a smoked paprika swirl inside the cheese ball, which adds a subtle smokiness that pairs beautifully with the garlic and herbs. It’s a fun variation when you want to surprise your guests!
Serving & Storage Suggestions
Serve this creamy garlic herb cheese ball chilled or at room temperature. It’s best to take it out of the fridge about 15 minutes before serving to soften slightly and release those flavors.
Presentation-wise, place it on a rustic wooden board, surrounded by an assortment of crackers, baguette slices, fresh cucumber rounds, and colorful bell pepper strips. A few sprigs of parsley or chives scattered around add a lovely finishing touch.
When storing leftovers, wrap the cheese ball tightly in plastic wrap and keep it refrigerated. It stays fresh for up to 4 days. If you want to keep it longer, you can freeze it for up to 3 months — just thaw overnight in the fridge before serving.
Reheating isn’t recommended since the texture changes, but if you want it softer, let it sit at room temperature for a bit. Flavors often mellow and blend even more after a day or two, so if you’re prepping early, it only gets better with time.
Nutritional Information & Benefits
This creamy garlic herb cheese ball is a tasty treat that also offers some nutritional perks. Here’s a rough estimate per serving (based on 12 servings):
| Nutrient | Amount |
|---|---|
| Calories | 120 kcal |
| Protein | 5 g |
| Fat | 10 g |
| Carbohydrates | 1 g |
| Fiber | 0.3 g |
| Sodium | 180 mg |
Key ingredients like garlic bring antioxidant properties and immune support, while fresh herbs add vitamins and minerals. Using sharp cheddar boosts protein and calcium. For those watching carbs, this appetizer is naturally low-carb and gluten-free if served with veggies.
As a self-proclaimed cheese lover who also values balance, I appreciate that this recipe feels indulgent without going overboard. It’s a little taste of comfort with some fresh, wholesome elements.
Conclusion
This creamy garlic herb cheese ball recipe proves that simple ingredients can come together to make something truly memorable. It’s easy, quick, and has that perfect blend of creamy texture and fresh flavors that guests keep asking about. Whether you customize it with your favorite herbs, add a spicy twist, or keep it classic, this cheese ball invites you to make it your own.
Honestly, I keep making it because it’s reliable and always a hit — plus, it reminds me of that afternoon at Linda’s when a missing ingredient turned into a recipe success story. So next time you need a fuss-free party starter that looks impressive and tastes even better, give this recipe a go. Don’t forget to leave a comment sharing your tweaks or stories — I love hearing how these recipes find a spot in your kitchens!
Here’s to many more gatherings filled with good food and great company!
FAQs About Creamy Garlic Herb Cheese Ball
Can I make the cheese ball ahead of time?
Absolutely! It actually tastes better after resting overnight as the flavors meld. Just keep it tightly wrapped in the fridge.
What’s the best way to soften cream cheese quickly?
Leave it out at room temperature for 30 minutes. If you’re in a hurry, microwave for 10 seconds, but don’t let it melt.
Can I use pre-shredded cheese?
Yes, but freshly shredded melts and blends better, giving a creamier texture.
What can I use instead of nuts for coating?
Try finely chopped herbs, crispy bacon bits, or even crushed crackers for different textures.
Is this recipe gluten-free?
The cheese ball itself is gluten-free. Just serve with gluten-free crackers or veggies to keep it that way.
Pin This Recipe!

Creamy Garlic Herb Cheese Ball
A smooth and flavorful cheese ball combining cream cheese, sharp cheddar, garlic, and fresh herbs. Perfect for parties and quick entertaining.
- Prep Time: 10 minutes
- Cook Time: 0 minutes
- Total Time: 1 hour 25 minutes
- Yield: 12 servings 1x
- Category: Appetizer
- Cuisine: American
Ingredients
- 8 oz cream cheese, softened
- 1 cup sharp cheddar cheese, shredded
- 2 garlic cloves, minced
- 2 tablespoons fresh parsley, finely chopped
- 1 tablespoon fresh chives, chopped
- 1 teaspoon dill weed, dried or fresh
- 2 tablespoons sour cream
- 1 teaspoon Worcestershire sauce
- ½ teaspoon salt
- ¼ teaspoon black pepper
- ½ cup chopped nuts (pecans or walnuts), for coating (optional)
- Crackers or sliced baguette, for serving
Instructions
- Soften the cream cheese by leaving it out at room temperature for about 30 minutes or microwave for 10 seconds without melting.
- In a mixing bowl, combine softened cream cheese and shredded sharp cheddar cheese. Mix with a hand mixer on low speed or stir vigorously with a spoon until creamy and well combined (3-5 minutes).
- Add minced garlic, chopped parsley, chopped chives, dill weed, sour cream, Worcestershire sauce, salt, and black pepper. Mix well to distribute evenly. If mixture is too stiff, add an extra tablespoon of sour cream.
- Scoop the cheese mixture onto plastic wrap and shape into a ball about 4 inches in diameter. Wrap tightly and refrigerate for at least 1 hour.
- While chilling, finely chop nuts and optionally mix with extra chopped herbs. Spread on a plate.
- Remove chilled cheese ball from fridge, unwrap, and roll gently but firmly in the nut and herb mixture until fully coated.
- Place coated cheese ball on a serving plate and chill for another 15 minutes before serving.
- Serve with crackers, sliced baguette, or fresh veggies.
Notes
Use room temperature cream cheese for smooth blending. Fresh herbs are preferred over dried for better flavor and color. Chill the cheese ball well to firm up and meld flavors. Wet hands slightly when rolling to prevent sticking. Nuts can be substituted with chopped herbs, bacon bits, or crushed crackers for coating. For gluten-free serving, use gluten-free crackers or veggie sticks. Worcestershire sauce can be omitted or replaced with soy sauce or tamari for vegetarian version.
Nutrition
- Serving Size: Approximately 1/12th
- Calories: 120
- Sodium: 180
- Fat: 10
- Carbohydrates: 1
- Fiber: 0.3
- Protein: 5
Keywords: cheese ball, garlic herb cheese ball, party appetizer, creamy cheese ball, easy appetizer, homemade cheese ball