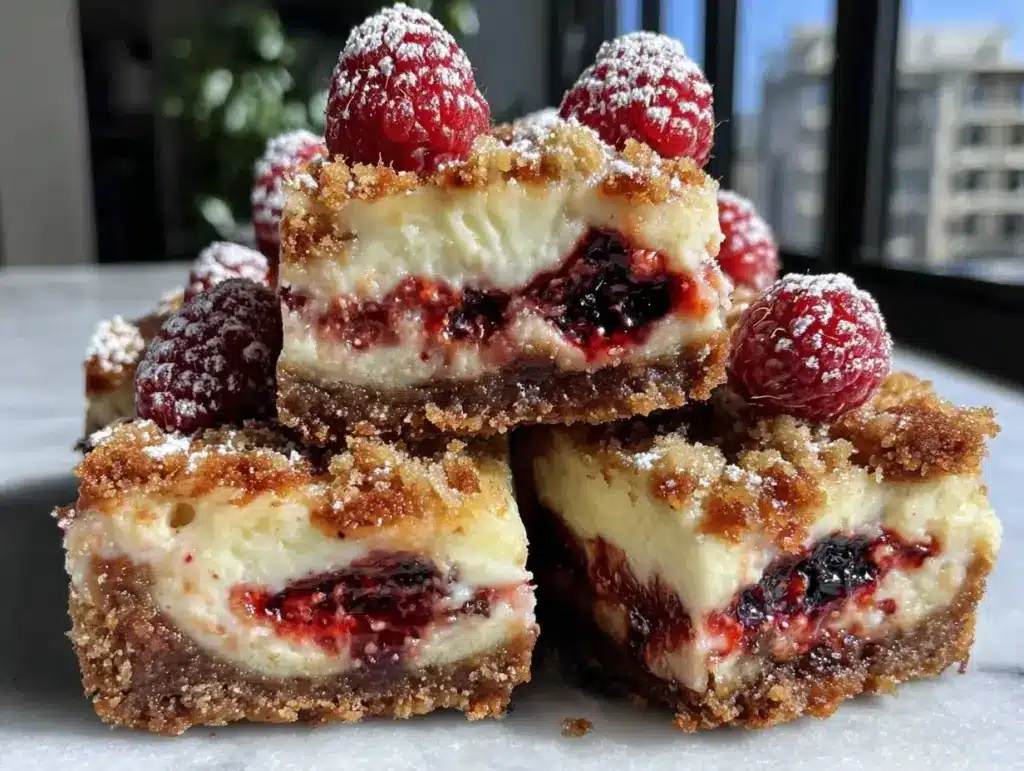
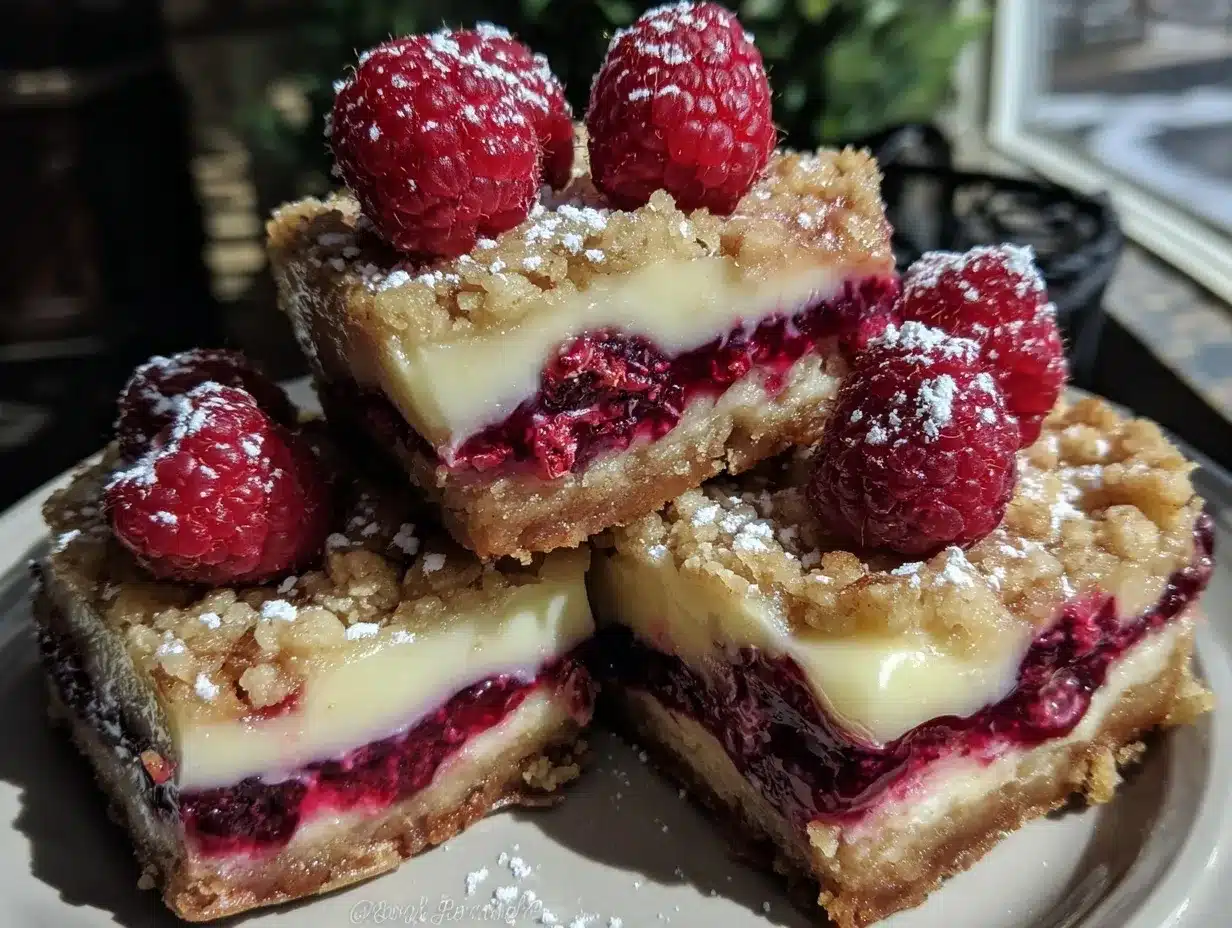
Picture this: the moment you pull a pan of creamy lemon raspberry cheesecake crumble bars from the oven, the air fills with the bright scent of citrus and sweet, tangy berries. The golden crumble topping is just begging to be picked off by sneaky fingers (guilty as charged), and the creamy cheesecake layer practically glows under the soft light in your kitchen. When you slice into these bars, the knife glides through silky cheesecake, meets the tart pop of raspberry, and finally crunches through a buttery crumble base—each bite is a little slice of dessert heaven.
The very first time I made these, it was a rainy Saturday afternoon—the kind that calls for baking something cozy, preferably in pajamas. I was chasing that perfect marriage of creamy and crumbly, sweet and tangy. The first taste? I was instantly hooked. It’s the kind of moment where you pause, take a deep breath, and just smile because you know you’re onto something truly special. These bars remind me of summer picnics as a kid, when I was knee-high to a grasshopper and my grandma would make lemon squares that disappeared in minutes. I can’t help but think she would have loved this twist.
Honestly, my family couldn’t stop sneaking these bars off the cooling rack (and I can’t really blame them). There’s something about the combination of creamy cheesecake, bright lemon, and juicy raspberries that’s pure, nostalgic comfort—but in a dangerously easy bar form. Perfect for potlucks, sweet treats for your kids, or to brighten up your Pinterest cookie board, these creamy lemon raspberry cheesecake bars are a staple for family gatherings and gifting. I’ve tested them more times than I care to admit (in the name of research, of course), and every time, they feel like a warm hug. You’re going to want to bookmark this one.
Why You’ll Love This Recipe
If you’re a dessert lover, let me say—these creamy lemon raspberry cheesecake bars are about to become your new obsession. Years of recipe testing (and plenty of taste-testing) have fine-tuned these bars to be the best they can be. Here’s why you’ll love making—and eating—these:
- Quick & Easy: Comes together in under an hour, perfect for busy weeknights or last-minute cravings. No water bath, no fussy techniques—just mix, layer, and bake.
- Simple Ingredients: Everything you need is probably already in your kitchen. No need for specialty items or fancy grocery runs. We’re talking cream cheese, fresh lemon, raspberries, and pantry staples.
- Perfect for Entertaining: These bars slice up beautifully and travel well, making them ideal for potlucks, brunches, or holiday gatherings. I’ve brought them to birthday parties and they always disappear quickly!
- Crowd-Pleaser: Adults love the creamy, tangy cheesecake, while kids go wild for the sweet crumble and juicy berries. I’ve never had leftovers, not once.
- Unbelievably Delicious: The texture is spot-on—ultra-creamy cheesecake with a buttery crumb base and the sunny pop of lemon. Each bite is balanced, never too sweet, and always satisfying.
What makes these creamy lemon raspberry cheesecake bars stand out from the rest? For starters, blending the cream cheese with sour cream gives a silky, lush texture that never cracks. The crumble topping? It’s the same dough as the base, but baked to golden perfection for double the crunch. And the fresh lemon zest—oh boy, it makes the flavor sing. It’s comfort food reimagined: faster, easier, and with all the soul-soothing satisfaction you crave. Whether you want to impress guests without stress, or simply treat yourself to something memorable, these bars deliver every single time.
What Ingredients You Will Need
This recipe uses simple, wholesome ingredients to deliver bold flavor and satisfying texture without the fuss. Most of these are pantry staples, and I’ll share a few of my favorite brands and tips for getting the best results. Here’s what you’ll need for creamy lemon raspberry cheesecake bars:
- For the Crumble Base & Topping:
- 1 ½ cups (180g) all-purpose flour (King Arthur is my go-to for consistent texture)
- ¾ cup (150g) granulated sugar
- ½ cup (115g) unsalted butter, cold and cubed (I love using Kerrygold for the richness)
- ¼ teaspoon fine sea salt
- 1 teaspoon lemon zest (adds brightness)
- For the Cheesecake Layer:
- 8 ounces (225g) cream cheese, softened (full fat for the creamiest results)
- ¼ cup (60g) sour cream (adds tang and prevents cracking)
- ½ cup (100g) granulated sugar
- 1 large egg, room temperature
- 2 tablespoons (30ml) fresh lemon juice (from about 1 lemon)
- 1 teaspoon vanilla extract
- For the Raspberry Filling:
- 1 cup (120g) fresh raspberries (or frozen, if out of season—no need to thaw)
- 1 tablespoon (8g) cornstarch (helps set the fruit so it’s not runny)
- 1 tablespoon (12g) granulated sugar (optional, for extra sweetness)
Ingredient Tips: If you need a gluten-free option, swap the all-purpose flour for your favorite 1:1 gluten-free baking blend (I like Bob’s Red Mill). Dairy-free? Use vegan cream cheese and coconut yogurt in place of sour cream. In summer, swap in fresh blackberries or blueberries instead of raspberries for a fun twist. I always recommend using freshly squeezed lemon juice—it’s a game changer for flavor. If you can’t get fresh raspberries, frozen will work just fine (just toss with the cornstarch before layering).
Equipment Needed
You won’t need any fancy equipment for these creamy lemon raspberry cheesecake bars. Here’s what I use (and some budget-friendly tips):
- 8×8-inch (20×20 cm) baking pan: Lined with parchment for easy lifting. I’ve used glass and metal pans—both work, but metal gives a slightly crisper edge.
- Mixing bowls: One medium for the crumble, one small for the cheesecake mixture.
- Electric mixer: Hand or stand mixer is great for the cheesecake layer. If you’re doing this by hand, just make sure everything is really soft first.
- Microplane or zester: For the lemon zest. A fine grater works in a pinch.
- Rubber spatula: For smoothing the layers.
- Measuring cups and spoons: Accurate measurements are key for baking. If you love precision, a small kitchen scale is worth the investment (mine was under $20 and it’s a game changer).
If you don’t have parchment, you can grease the pan with butter and dust with flour, but parchment really makes cleanup a breeze. My favorite pans are the nonstick ones from USA Pan, but honestly, any sturdy pan will do the trick. Just make sure to cool the bars fully before slicing for neat squares!
Preparation Method
Here’s the step-by-step for making creamy lemon raspberry cheesecake crumble bars. I’ll include my favorite troubleshooting notes, sensory cues, and a few secrets I’ve learned along the way.
- Preheat and Prep: Preheat your oven to 350°F (175°C). Line your 8×8-inch (20×20 cm) pan with parchment, leaving a little overhang for easy lifting. (This makes the bars easy to remove—trust me on this!)
- Make the Crumble Base: In a medium bowl, combine 1 ½ cups (180g) flour, ¾ cup (150g) sugar, ¼ teaspoon salt, and 1 teaspoon lemon zest. Add ½ cup (115g) cold, cubed butter. Use your fingers or a pastry cutter to work the butter into the dry ingredients until the mixture looks like coarse crumbs (you want pea-sized clumps). If in doubt, a few streaks of butter are okay—it helps the crumble stay tender.
- Press the Base: Transfer about two-thirds of the crumble mixture into the prepared pan. Press it firmly and evenly into the bottom—use the bottom of a measuring cup for an even layer. Reserve the remaining third for the topping.
- Prepare Raspberry Filling: In a small bowl, toss 1 cup (120g) raspberries with 1 tablespoon (8g) cornstarch and 1 tablespoon (12g) sugar (if using). The berries should be lightly coated and glossy. If using frozen berries, toss quickly and layer immediately to avoid excess moisture.
- Make Cheesecake Layer: In a medium bowl, beat 8 ounces (225g) softened cream cheese until smooth—about 30 seconds. Add ¼ cup (60g) sour cream, ½ cup (100g) sugar, 1 large egg, 2 tablespoons (30ml) lemon juice, and 1 teaspoon vanilla. Beat until everything is fully combined and no lumps remain. It should look creamy and pale.
- Layer and Assemble: Pour the cheesecake mixture over the pressed crumble base. Spread evenly with a spatula. Scatter the raspberry mixture evenly over the cheesecake layer—try not to clump them all in one spot, unless you love pockets of berry flavor!
- Add Crumble Topping: Sprinkle the reserved crumble mixture evenly over the top. Don’t worry if it looks uneven—those crispy bits are the best part.
- Bake: Bake for 35-40 minutes, or until the top is golden brown and the edges are set. The center will wobble slightly when you shake the pan—but it will firm up as it cools. If the crumble starts to get too brown, loosely cover with foil for the last 10 minutes.
- Cool and Chill: Let the bars cool in the pan for 1 hour, then transfer to the fridge for at least 2 hours to set. (This step is key for neat slices!) The bars are best served cold but will hold up at room temp for a couple hours.
- Slice and Serve: Lift the bars out using the parchment overhang. Use a sharp knife to cut into squares—wipe the blade between cuts for clean edges. You’ll see those gorgeous layers: crumbly base, creamy cheesecake, juicy raspberries, and golden topping.
Prep Notes: If your cheesecake batter seems lumpy, let it sit for 5 minutes and beat again. For extra lemon flavor, sprinkle a little zest on top before serving. Don’t skip the chilling step—it really makes a difference!
Cooking Tips & Techniques
Here’s what I’ve learned (sometimes the hard way) about making creamy lemon raspberry cheesecake bars that look—and taste—amazing every single time:
- Room Temperature Ingredients: Make sure your cream cheese and egg are at room temperature for a silky-smooth batter. Cold ingredients lead to lumps, and nobody wants a chunky cheesecake.
- Don’t Overmix: Just mix the cheesecake layer until smooth. Overmixing can add too much air, which sometimes causes cracks or a weird texture. If in doubt, stop when it’s creamy.
- Berry Placement: Spread the raspberries evenly so every bite gets a pop of fruit. If you pile them all in one spot, those pieces will be extra juicy (which isn’t the worst thing, but makes slicing messier).
- Crumb Texture: If your crumble feels too dry, add a teaspoon of cold water. If too wet, sprinkle in another tablespoon of flour. You want it to stick together when you pinch it—like wet sand at the beach.
- Watch the Bake Time: Ovens can be quirky! Check at 35 minutes—the edges should be set and the crumble golden. If the center jiggles just a bit, that’s perfect. Overbaking will dry out the cheesecake layer.
- Chill, Chill, Chill: I’ve rushed these bars before (impatient, I know), and they always fall apart. Chill at least two hours for the cleanest slices.
One time, I tried skipping the parchment and had to chisel the bars out of the pan. Never again! The parchment makes everything easier. If you’re multitasking, prep the crumble while the cream cheese softens. And if you want extra fancy bars, drizzle a little white chocolate on top after they’re chilled. That’s a Pinterest-worthy move!
Variations & Adaptations
These creamy lemon raspberry cheesecake bars are endlessly customizable. Here are some of my favorite spins:
- Gluten-Free: Use a 1:1 gluten-free flour blend instead of all-purpose. I’ve tested with Bob’s Red Mill and Cup4Cup—both work great.
- Dairy-Free: Swap cream cheese and sour cream for plant-based versions (like Kite Hill or Tofutti). Use vegan butter in the crumble. The texture stays creamy, and the flavor is surprisingly close.
- Flavor Variations: Try orange zest and blueberries for a different citrus-berry combo. Or, swap the raspberries for blackberries when they’re in season. Even strawberries work—just chop them small.
- Nutty Crunch: Add ½ cup (50g) chopped pecans or walnuts to the crumble topping. I’ve tried this for holiday baking, and it’s always a hit with the grown-ups.
- Low-Carb: Use almond flour instead of regular flour and a sugar substitute like Swerve or monk fruit sweetener. The bars turn out a little softer, but still delicious.
My personal favorite adaptation? Swapping half the raspberries with diced peaches in late summer. The sweet-tart combo is so good, I might just make it my new tradition. Whatever you do, don’t be afraid to play with what’s in season or what you have on hand—these bars are forgiving and fun!
Serving & Storage Suggestions
Creamy lemon raspberry cheesecake bars are best served chilled, straight from the fridge. The flavors are brighter, and the layers hold together beautifully. If you want to get fancy, dust with powdered sugar or add a twist of lemon zest on top.
- Serving Ideas: These bars pair perfectly with a cup of tea or coffee. For a summer party, serve with a scoop of vanilla ice cream or a dollop of whipped cream. If you’re feeling extra, garnish with fresh mint leaves.
- Storage: Store bars in an airtight container in the refrigerator for up to 5 days. They freeze surprisingly well—wrap individual squares in plastic, then stash in a zip-top bag for up to 2 months. Thaw in the fridge overnight before serving.
- Reheating: These are best enjoyed cold, but if you like them a little softer, let them sit at room temperature for 20-30 minutes. Avoid microwaving; it can make the cheesecake rubbery.
- Flavor Notes: The lemon flavor deepens over time, and the crumble stays crisp for several days. If you like a softer top, store covered with a paper towel to absorb excess moisture.
Honestly, I’ve never seen these bars last more than a few days—they’re just that good!
Nutritional Information & Benefits
Here’s a general overview for one creamy lemon raspberry cheesecake bar (assuming 16 bars per pan):
- Calories: About 180 kcal
- Fat: 9g
- Carbohydrates: 22g
- Protein: 3g
- Sugar: 13g
Health Highlights: The fresh raspberries are packed with vitamin C and antioxidants. Lemon juice boosts immune support and adds a bright, fresh taste. You can make these gluten-free or low-carb with a few easy swaps. Note: Contains dairy and eggs—so watch out for allergies. From a wellness perspective, I love that these bars offer a sweet treat in perfectly portioned squares. You get all the flavor, but it’s easy to enjoy in moderation. Plus, making dessert at home means you control the ingredients!
Conclusion
If you’re looking for a dessert that’s easy, crowd-pleasing, and totally crave-worthy, these creamy lemon raspberry cheesecake bars check every box. They pack in nostalgia, bright flavors, and that irresistible creamy-crunchy combo—all without fuss. I love how versatile they are, whether you’re baking for a party or snacking in your slippers.
Feel free to customize the recipe to suit your tastes or dietary needs. Swap the fruit, play with the crumble, or add a drizzle of chocolate—make it your own! Personally, these bars have become my go-to for last-minute dessert emergencies and cozy afternoon baking. They always make me smile, and I hope they do the same for you.
Let me know in the comments if you try these creamy lemon raspberry cheesecake bars, or if you have your own twist! Share with friends, pin for later, and don’t forget to save this recipe—trust me, you’ll want to make it again and again. Happy baking!
FAQs
Can I use frozen raspberries for these cheesecake bars?
Absolutely! Frozen raspberries work just fine—use them straight from the freezer and toss with cornstarch before layering. No need to thaw first.
How do I keep the cheesecake layer from cracking?
Use room temperature cream cheese and don’t overmix. Chilling the bars after baking also helps set the layer perfectly without cracks.
Can I double the recipe for a larger crowd?
Yep! Just double all the ingredients and use a 9×13-inch (23×33 cm) pan. Add 5-10 minutes to the bake time and check for doneness.
What’s the best way to get clean slices?
Chill the bars completely in the fridge, then use a sharp knife. Wipe the blade between cuts for neat squares.
Are these bars gluten-free or dairy-free?
The classic recipe contains both, but you can easily substitute gluten-free flour and plant-based dairy alternatives for a version that fits your needs. Check the ingredient list above for tips!
Pin This Recipe!
Creamy Lemon Raspberry Cheesecake Bars
These creamy lemon raspberry cheesecake bars feature a silky cheesecake layer, tart raspberries, and a buttery crumble base and topping. Quick and easy to make, they’re perfect for potlucks, family gatherings, or a cozy afternoon treat.
- Prep Time: 20 minutes
- Cook Time: 40 minutes
- Total Time: 3 hours
- Yield: 16 bars 1x
- Category: Dessert
- Cuisine: American
Ingredients
- 1 1/2 cups all-purpose flour
- 3/4 cup granulated sugar
- 1/2 cup unsalted butter, cold and cubed
- 1/4 teaspoon fine sea salt
- 1 teaspoon lemon zest
- 8 ounces cream cheese, softened
- 1/4 cup sour cream
- 1/2 cup granulated sugar
- 1 large egg, room temperature
- 2 tablespoons fresh lemon juice
- 1 teaspoon vanilla extract
- 1 cup fresh raspberries (or frozen, unthawed)
- 1 tablespoon cornstarch
- 1 tablespoon granulated sugar (optional, for raspberry filling)
Instructions
- Preheat oven to 350°F (175°C). Line an 8×8-inch baking pan with parchment paper, leaving an overhang for easy lifting.
- In a medium bowl, combine flour, sugar, salt, and lemon zest. Add cold, cubed butter and use fingers or a pastry cutter to work into coarse crumbs.
- Press two-thirds of the crumble mixture firmly and evenly into the bottom of the prepared pan. Reserve the remaining third for topping.
- In a small bowl, toss raspberries with cornstarch and sugar (if using) until lightly coated.
- In another bowl, beat softened cream cheese until smooth. Add sour cream, sugar, egg, lemon juice, and vanilla extract. Beat until fully combined and creamy.
- Pour cheesecake mixture over the pressed crumble base and spread evenly.
- Scatter raspberry mixture evenly over the cheesecake layer.
- Sprinkle reserved crumble mixture over the top.
- Bake for 35-40 minutes, until the top is golden brown and edges are set. The center will wobble slightly.
- Cool in the pan for 1 hour, then refrigerate for at least 2 hours to set.
- Lift bars out using parchment overhang and slice into squares with a sharp knife, wiping the blade between cuts.
Notes
Use room temperature cream cheese and egg for a smooth batter. Don’t overmix the cheesecake layer. Chill bars fully before slicing for neat squares. For gluten-free, use a 1:1 gluten-free flour blend. Frozen raspberries work well; toss with cornstarch before layering. For extra lemon flavor, sprinkle zest on top before serving.
Nutrition
- Serving Size: 1 bar (1/16 of pan)
- Calories: 180
- Sugar: 13
- Sodium: 90
- Fat: 9
- Saturated Fat: 5
- Carbohydrates: 22
- Fiber: 1
- Protein: 3
Keywords: lemon raspberry cheesecake bars, easy dessert, crumble bars, cheesecake, lemon bars, raspberry bars, potluck dessert, summer baking, creamy cheesecake bars


