
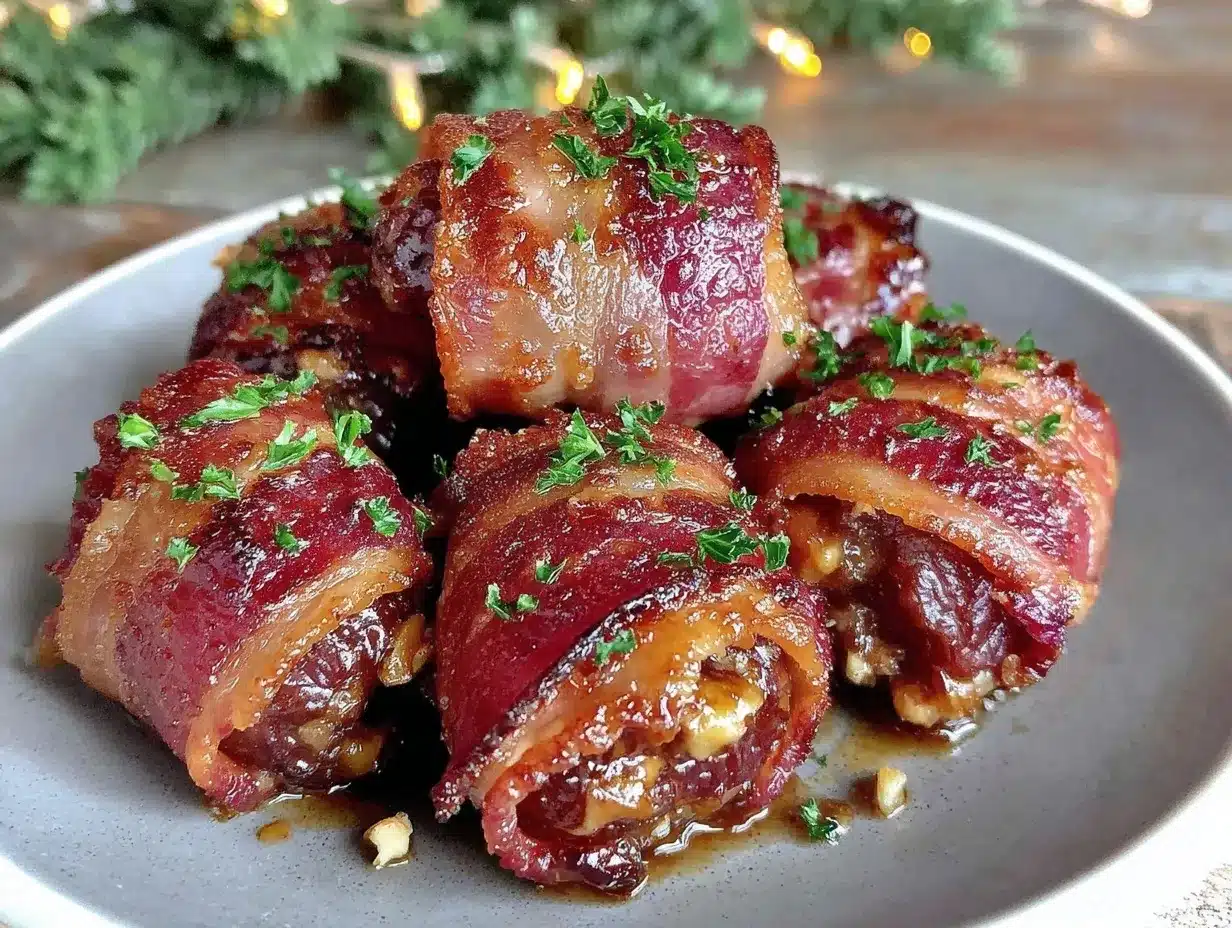
Picture this: you walk into a house that smells like smoky bacon, sweet caramelizing dates, and just a hint of toasty cheese bubbling away in the oven. The aroma hits you first—rich, savory, and slightly sweet. You can almost hear the sizzle. Then, you spot a tray of golden, crispy bacon-wrapped dates, each one glistening with a drizzle of honey and a sprinkle of flaky salt, looking like tiny, irresistible presents. Honestly, it’s the kind of appetizer that makes you want to abandon all social graces and hover near the kitchen until the last one disappears.
The first time I made these Crispy Bacon-Wrapped Dates with Cheese & Honey, it was a chilly December evening, and I was hunting for an appetizer that felt special but didn’t require a culinary degree or hours of prep. I’d tasted something similar at a friend’s wedding—just one bite, and I was instantly hooked. It was one of those moments where you pause, take a deep breath, and just smile because you know you’re onto something truly special. Funny enough, years ago, my grandma used to make “devils on horseback,” but I never realized how magical the combo of sweet dates and smoky bacon could be until I tried stuffing them with cheese and finishing them with honey.
Let’s face it, these bacon-wrapped dates don’t last long in my house. My kids call them “bacon candy,” and my husband can’t stop sneaking them off the pan (and really, who could blame him?). They’re dangerously easy, perfect for everything from glitzy New Year’s celebrations to backyard BBQs, and honestly, they brighten up any Pinterest party board. I wish I’d discovered this recipe when I was knee-high to a grasshopper—it’s pure, nostalgic comfort with a modern twist. I’ve tested and tweaked these little bites so many times—in the name of research, of course—they’re now a staple for family gatherings, gifting, and those nights when you want to impress but don’t want to stress. If you’re searching for an appetizer that feels like a warm hug and gets people talking, you’re going to want to bookmark this one.
Why You’ll Love This Crispy Bacon-Wrapped Dates Recipe
If you’re a fan of recipes that bring the wow-factor with minimal fuss, these bacon-wrapped dates are about to become your go-to appetizer. I’ve made them for everything from casual game nights to elegant holiday dinners, and honestly, they never fail to impress. Here’s what makes them a staple in my kitchen—and why you’ll love them too:
- Quick & Easy: These come together in under 30 minutes. Perfect for busy weeknights, impromptu guests, or when you realize at the last minute you volunteered to bring an appetizer.
- Simple Ingredients: No fancy shopping trips required. You probably have bacon, dates, cheese, and honey hanging out in your fridge and pantry already.
- Perfect for Any Occasion: These work for everything—holiday parties, brunch spreads, baby showers, or just a cozy night in with a glass of wine.
- Crowd-Pleaser: Kids inhale them, adults rave about them, and I’ve even seen “I don’t like dates” skeptics go back for seconds. True story.
- Unbelievably Delicious: The sweet, sticky dates mingle with creamy cheese and salty, crispy bacon. The honey drizzle and a sprinkle of sea salt at the end? That’s the magic touch.
What makes my version a little different? For starters, I rub the bacon with just a bit of smoked paprika or black pepper for extra flavor. I like to use a tangy goat cheese or a super-creamy blue cheese, depending on my mood (and, let’s be honest, what’s on sale). The cheese melts into the date, the bacon crisps up beautifully, and you get this incredible savory-sweet bite that’s a little fancier than your average appetizer. Plus, a quick broil at the end ensures every piece is as crispy as possible—no soggy bacon here!
This isn’t just another bacon-wrapped date recipe. It’s the kind of bite that makes you close your eyes for a second and just savor. It’s comfort food that’s a little healthier, a little faster, and infinitely more shareable. Whether you’re impressing guests or just treating yourself, this recipe turns any moment into something special. Trust me, you’ll be coming back to this one over and over.
What Ingredients You Will Need
This recipe uses simple, wholesome ingredients to deliver bold flavor and a satisfying texture—no complicated shopping lists here. Most of these are pantry staples or easy to find at any grocery store. Here’s what you’ll need to whip up these crispy bacon-wrapped dates with cheese & honey:
- Pitted Medjool Dates (20 pieces, about 200g): Soft, sweet, and easy to stuff. Look for plump, fresh dates. If you can only find whole dates, just slice them open and remove the pits (it takes seconds, I promise).
- Bacon (10 slices, about 225g): Regular-cut bacon works best. Thick-cut takes too long to crisp. I like to use applewood-smoked bacon for extra flavor, but any good-quality bacon will do. If you want to make it lighter, turkey bacon is a solid option (just watch the cook time—it crisps up fast!).
- Cheese for Stuffing (about 3 oz/85g):
- Goat Cheese: My personal favorite—tangy, creamy, and easy to pipe or spoon into the dates.
- Blue Cheese: For a bold, funky twist. Works great if you love a strong cheese flavor.
- Cream Cheese: Mild, smooth, and kid-friendly. This is the go-to if you’re feeding a crowd with simple tastes.
Note: You’ll need about 1 heaping teaspoon per date. Feel free to mix and match!
- Honey (about 2 tablespoons/40g): A drizzle after baking brings everything together. I love using local wildflower honey for an extra floral note.
- Smoked Paprika or Freshly Ground Black Pepper (optional, 1/2 teaspoon): I like to sprinkle this on the bacon before baking for a little extra oomph. Totally optional, but it does add depth.
- Flaky Sea Salt (like Maldon, to finish): Just a pinch sprinkled on while the dates are hot from the oven. This really makes the flavors pop.
- Toothpicks or Small Skewers: Essential for holding everything together and for easy serving.
Ingredient Tips: When picking your dates, go for ones that are soft but not mushy—Medjool is best. For bacon, avoid maple or sugar-cured varieties (they burn too quickly). If you need a dairy-free option, try stuffing the dates with a bit of almond butter or a vegan cheese spread. And if you’re gluten-free, good news—everything in this recipe is naturally gluten-free!
Equipment Needed
- Baking Sheet: A standard rimmed baking sheet works great. Line it with parchment paper or foil for easy cleanup (trust me on this one—bacon fat is no joke).
- Wire Rack (optional): Placing the dates on a rack lets the bacon crisp evenly. If you don’t have one, just bake directly on the parchment—no biggie.
- Small Bowl & Spoon: For mixing or softening your cheese filling (especially if you want to add herbs or spices).
- Piping Bag or Zip-Top Bag (optional): Makes stuffing the dates with cheese a breeze. But honestly, a teaspoon and your fingers work just fine, if a bit messy.
- Sharp Knife: For slicing dates open if they aren’t already pitted.
- Toothpicks: Keeps everything secure while baking and makes serving easy.
- Tongs: For flipping the dates (it gets hot in there!).
You don’t need any fancy gadgets for this recipe—just the basics. I’ve used everything from my grandmother’s ancient baking sheet to a shiny new nonstick pan, and both work well. Just line your tray to make cleanup less of a chore! Wire racks are great for extra crispiness but not essential. If you’re short on toothpicks, cut bamboo skewers in half. And if you’re prepping for a big party, invest in a second baking sheet so you can make double the batch (you’ll thank me later!).
Preparation Method
-
Preheat your oven: Set to 400°F (200°C). Line a rimmed baking sheet with parchment paper or foil for easy cleanup. If you have a wire rack, set it on top of the tray.
Tip: A hot oven is key for crispy bacon. Don’t skip the preheating! -
Prep the dates: If your dates aren’t pitted, use a sharp knife to slice lengthwise and remove the pits. Try not to cut all the way through—just make a little pocket for the filling.
Sensory cue: The date should open like a little book, but still hold together at the base. -
Stuff the dates: Spoon or pipe about 1 heaping teaspoon (5g) of your chosen cheese into each date. Press the date gently to close around the filling.
Prep note: Don’t overfill or the cheese will ooze out during baking. It’s okay if a little peeks out! -
Wrap with bacon: Cut each bacon slice in half crosswise (so you have 20 short pieces). Wrap one piece of bacon around each stuffed date, seam-side down. Secure with a toothpick through the middle.
Troubleshooting: If your bacon is slipping, pierce both ends with the toothpick to hold tight. - Season (optional): Sprinkle with smoked paprika or black pepper for extra flavor. This step is optional but recommended.
- Arrange on tray: Place wrapped dates on the prepared baking sheet (or wire rack), evenly spaced so the bacon crisps all around.
-
Bake: Bake at 400°F (200°C) for 15 minutes. Remove tray, flip each date with tongs, and bake for another 8–10 minutes, or until bacon is golden and crispy.
Sensory cue: You’ll know they’re done when the bacon is sizzling, browned, and just a tiny bit caramelized at the edges.
Warning: Ovens vary. If bacon is getting too dark, lower the heat a tad or move the tray up a rack. -
Honey drizzle: Remove from oven and, while still hot, drizzle each date with a little honey (about 1/4 teaspoon each). Sprinkle with flaky sea salt.
Tip: Don’t skip the salt. It makes all the flavors pop! -
Cool and serve: Let cool for 5 minutes before serving. The cheese will be molten at first, and the bacon crisps up as it sits.
Efficiency tip: Make a double batch and keep extras warm in a low oven (200°F/90°C) until ready to serve.
Troubleshooting: If bacon isn’t crisping, broil for 1–2 minutes at the end (watch closely!). If cheese is leaking, reduce filling a smidge next time. Dates sticking? Use parchment. These little tricks are learned the hard way—so you don’t have to!
Cooking Tips & Techniques
Here’s what I’ve learned after making about a zillion batches of crispy bacon-wrapped dates with cheese & honey:
- Cheese Choices Matter: Goat cheese is easy to work with, but blue cheese gives a punchy flavor (a little goes a long way!). Cream cheese is foolproof for first-timers.
- Don’t Overstuff: The temptation is real, but too much filling means cheese everywhere except inside your date. Less is more here.
- Toothpicks Are Your Friend: Secure both ends of the bacon with the toothpick. Otherwise, bacon likes to unravel as it shrinks in the oven.
- Wire Rack for the Win: If you have a rack, use it. The bacon crisps on all sides, and the fat drips away. If not, parchment works—just flip the dates halfway for even cooking.
- Broil for Extra Crisp: Sometimes the bacon needs a final blast under the broiler. Stand guard—one minute can make the difference between perfect and burnt.
- Batch Baking: When making these for a crowd, line up two trays and rotate them halfway through baking for even results.
- Multitasking: Stuff all the dates first, then wrap with bacon assembly-line style. It’s way faster than doing one at a time.
- Common Mistake—Too Much Honey: Drizzle lightly! Too much, and things get sticky and hard to handle. A little goes a long way.
Personal confession: I once forgot to flip the dates halfway through, and one side was crispy while the other was…meh. Lesson learned! Keep an eye on them and rotate for the best crunch. And if you’re making ahead, stuff and wrap the dates, then bake right before serving for maximum crispiness. There’s really nothing like the sizzle and aroma of these coming fresh out of the oven.
Variations & Adaptations
The beauty of this recipe is how easy it is to tweak. Here are some of my favorite ways to change things up:
- Dairy-Free: Skip the cheese and fill dates with almond butter or a vegan cheese spread. It’s still creamy, just a little nuttier.
- Nutty Crunch: Add a toasted almond or pecan inside each date along with the cheese for a crunchy surprise. My grandpa swears by this combo—especially with blue cheese!
- Spicy Kick: Mix a little hot honey or sriracha into the cheese before stuffing, or sprinkle with red pepper flakes before baking.
- Seasonal Flavors: In winter, add a pinch of cinnamon to the cheese. In summer, try stuffing with a little fresh basil or mint for a herby note.
- Different Cooking Methods: These can be grilled (indirect heat, medium grill, 10–12 minutes total, turning often) for a smoky outdoor flavor. I’ve also air-fried them at 375°F (190°C) for 10 minutes—works like a charm.
- Allergen Swaps: For nut allergies, just skip the nuts (obviously), and if you need pork-free, turkey bacon or even thinly sliced prosciutto works well (just adjust cook time—it crisps up fast).
My personal favorite? Goat cheese, a sliver of jalapeño, and a pecan tucked inside—sweet, spicy, creamy, and crunchy all at once. Play with the flavors to match your mood, the season, or whatever’s in your fridge. That’s the beauty of these crispy bacon-wrapped dates—endless possibilities and always a hit.
Serving & Storage Suggestions
These bacon-wrapped dates are best served warm, but honestly, they disappear at any temperature. Arrange them on a pretty platter, drizzle with a little extra honey, and sprinkle with flaky sea salt or chopped herbs for a Pinterest-worthy presentation. I like to offer toothpicks or small skewers for easy grabbing—keeps things tidy at parties!
Pair with a crisp white wine, sparkling rosé, or even a cold beer. For a more substantial spread, serve alongside a cheese board, marinated olives, or a simple arugula salad with lemon vinaigrette. These are fantastic as a pass-around appetizer, but I’ve also used them as a sweet-savory side for brunch (they pair beautifully with eggs and fruit salad).
Storing leftovers? Let any extras cool to room temperature. Store in an airtight container in the fridge for up to 3 days. To reheat, pop them in a 350°F (175°C) oven for 8–10 minutes or until warmed through and crispy again. You can also freeze unbaked, wrapped dates for up to a month—just bake straight from frozen, adding 5 minutes to the cook time.
Pro tip: The flavors get even richer after a day in the fridge, so don’t hesitate to make them ahead for stress-free hosting. (If you can manage not to eat them all first!)
Nutritional Information & Benefits
Each bacon-wrapped date (with goat cheese and honey) is approximately:
- Calories: 90
- Protein: 2g
- Fat: 4g
- Carbohydrates: 11g
- Sugar: 9g
- Fiber: 1g
Health Benefits: Dates provide natural sweetness, fiber, and potassium. Bacon adds protein and satisfying flavor, while cheese supplies calcium and a bit of healthy fat (especially if using goat cheese, which is easier to digest for some people). Honey brings antioxidants and a little energy boost. The recipe is naturally gluten-free and can be adapted for dairy-free or nut-free diets with simple swaps. Just note: bacon and cheese do add sodium, so enjoy as a treat.
I love that this recipe balances indulgence with a few wholesome ingredients—one or two satisfy even the biggest appetizer cravings!
Conclusion
So, why should you make these crispy bacon-wrapped dates with cheese & honey? Because they hit every note—a little salty, a little sweet, creamy, crunchy, and just a touch fancy without being fussy. They’re my favorite “wow” appetizer for a reason: ridiculously easy, endlessly customizable, and always gone in a flash.
I hope you’ll make these your own—swap out the cheese, add nuts, or play with spices. Cooking is all about having fun and finding what brings you joy. Personally, I love this recipe because it connects me to family traditions and always sparks conversation at the table. Plus, nothing beats the look on people’s faces when they try one for the first time!
If you try this recipe, I’d love to hear your thoughts, tweaks, and stories in the comments below. Share it with your friends, pin it to your party boards, or experiment with your favorite fillings. Happy cooking, and may your gatherings be full of good food, laughter, and a little bit of bacon magic!
Frequently Asked Questions
Can I make bacon-wrapped dates ahead of time?
Absolutely! Assemble and stuff the dates, wrap with bacon, then store covered in the fridge for up to 24 hours before baking. Bake just before serving for best texture and flavor.
What’s the best cheese to use?
Goat cheese is my top pick for its tangy creaminess, but blue cheese or cream cheese work well too. Choose what your crowd will love, or mix and match.
How do I keep the bacon from unraveling?
Secure each bacon-wrapped date with a toothpick through the center. If the bacon is extra slippery, pierce both ends for good measure.
Can I make these dairy-free or nut-free?
For dairy-free, fill dates with almond butter, sunflower seed butter, or a vegan cheese spread. For nut-free, just avoid adding nuts—dates and cheese alone are delicious!
How do I keep the bacon crispy?
Bake on a wire rack or flip the dates halfway through cooking. For extra crunch, broil for 1–2 minutes at the end, watching closely so nothing burns. Serve warm for the best texture!
Pin This Recipe!

Crispy Bacon-Wrapped Dates with Cheese & Honey

These irresistible bacon-wrapped dates are stuffed with creamy cheese, baked until crispy, and finished with a drizzle of honey and flaky sea salt. The perfect sweet-savory appetizer for parties, holidays, or cozy nights in.
- Prep Time: 15 minutes
- Cook Time: 25 minutes
- Total Time: 40 minutes
- Yield: 20 pieces (about 6–8 appetizer servings) 1x
- Category: Appetizer
- Cuisine: American
Ingredients
- 20 pitted Medjool dates (about 7 oz)
- 10 slices regular-cut bacon (about 8 oz)
- 3 oz goat cheese, blue cheese, or cream cheese (about 1 heaping teaspoon per date)
- 2 tablespoons honey
- 1/2 teaspoon smoked paprika or freshly ground black pepper (optional)
- Flaky sea salt, to finish
- Toothpicks or small skewers
Instructions
- Preheat oven to 400°F (200°C). Line a rimmed baking sheet with parchment paper or foil. If using, set a wire rack on top.
- If dates aren’t pitted, slice lengthwise and remove pits, creating a pocket for filling.
- Stuff each date with about 1 heaping teaspoon of cheese. Gently press to close.
- Cut each bacon slice in half crosswise. Wrap one piece of bacon around each stuffed date, seam-side down. Secure with a toothpick.
- Sprinkle with smoked paprika or black pepper, if desired.
- Arrange wrapped dates on the prepared baking sheet or wire rack, spaced apart.
- Bake for 15 minutes. Remove tray, flip each date with tongs, and bake for another 8–10 minutes, until bacon is golden and crispy.
- Remove from oven. While hot, drizzle each date with honey and sprinkle with flaky sea salt.
- Let cool for 5 minutes before serving. Serve warm.
Notes
For extra crispiness, broil the dates for 1–2 minutes at the end, watching closely. Use goat cheese for tang, blue cheese for bold flavor, or cream cheese for a mild option. Dates can be stuffed and wrapped ahead of time, then baked just before serving. For dairy-free, use almond butter or vegan cheese. Store leftovers in the fridge for up to 3 days and reheat in the oven for best texture.
Nutrition
- Serving Size: 1 bacon-wrapped date
- Calories: 90
- Sugar: 9
- Sodium: 140
- Fat: 4
- Saturated Fat: 2
- Carbohydrates: 11
- Fiber: 1
- Protein: 2
Keywords: bacon-wrapped dates, party appetizer, cheese stuffed dates, honey, easy appetizer, gluten-free, holiday snack, finger food, crowd-pleaser


