Picture this: you walk into a room, and the very first thing that hits you is the savory, creamy scent of cheese mingling with smoky bacon, fresh herbs, and toasted nuts. The air practically sparkles with anticipation. That’s exactly what happened the first time I made these mini cheese balls—the aroma alone had everyone drifting toward the kitchen, noses in the air like cartoon characters chasing a pie on a windowsill. I was instantly hooked (and so was my family, but more on that in a second).
I’ll never forget that afternoon—one of those drizzly weekends where you just want to snack and laugh with people you love. I’d stumbled onto the idea after seeing a plateful of cheese balls at a neighbor’s holiday party when I was knee-high to a grasshopper. Honestly, I wish I’d realized years ago how easy and fun these are to make. There’s something nostalgic about rolling creamy cheese into bite-sized orbs and coating them in crunchy, colorful toppings. It’s a little messy, sure, but in that “lick your fingers and laugh” kind of way.
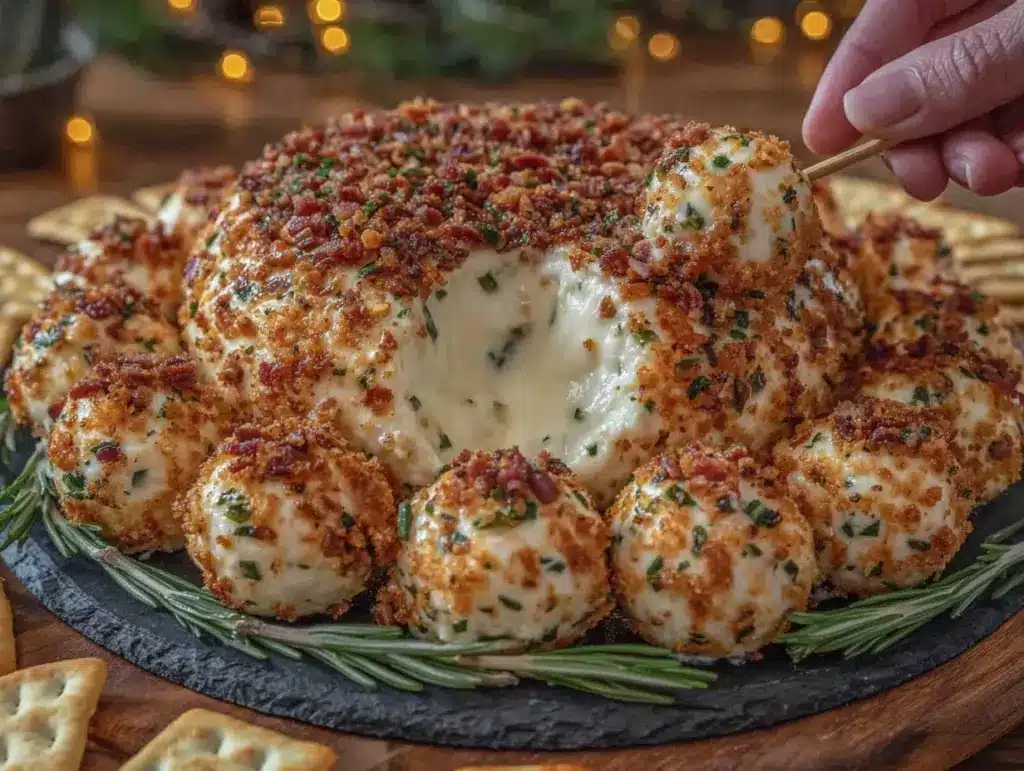
My family couldn’t stop sneaking these mini cheese balls off the tray—even before I’d finished rolling the very last one (and I can’t blame them, really). The combo of sharp cheese, tangy creaminess, and three totally different coatings—herb, pecan, and bacon—is absolute magic. These little guys show up at every gathering, from birthday parties to cozy movie nights, and always disappear faster than I think possible. They’re dangerously easy, endlessly customizable, and provide pure, nostalgic comfort.
Whether you’re looking for the perfect party bite, a make-ahead snack for your kids, or want to brighten up your Pinterest appetizer board, this mini cheese balls recipe is a total winner. I’ve tested it more times than I can count (in the name of research, of course), so you know it’s a staple for gifting, gatherings, or just treating yourself to something special. Honestly, they feel like a warm hug…and you’re going to want to bookmark this one.
Why You’ll Love This Mini Cheese Balls Recipe
When it comes to party appetizers, I’ve made my fair share of crowd-pleasers over the years. But these mini cheese balls with herb, pecan, and bacon coatings? They have a permanent spot on my table. Here’s why you’re going to fall for this recipe, too:
- Quick & Easy: These come together in just about 20 minutes (plus chilling time). Perfect when you need something fast but fabulous—no stress, no fancy equipment.
- Simple Ingredients: Everything you need is probably in your fridge or pantry. No wild goose chases to specialty stores—just good, honest flavors.
- Perfect for Every Occasion: Whether it’s a holiday party, baby shower, backyard BBQ, or a Tuesday night snack, these mini cheese balls fit right in. They’re even great for making ahead—huge bonus if you ask me!
- Crowd-Pleaser: I’ve watched kids devour these as eagerly as grown-ups (sometimes more so). The variety of coatings means everyone finds a favorite.
- Unbelievably Delicious: The creamy cheese base, zippy herbs, sweet smoky pecans, and crispy bacon hit every craving. The texture and flavor combo is next-level comfort food—salty, creamy, crunchy, and fresh all at once.
What really sets this mini cheese balls recipe apart is how the different coatings create their own little explosions of flavor. Most recipes stick to just one, but I love giving guests a trio of tastes and textures. The herbs add brightness, the pecans give a nutty sweetness, and the bacon—well, bacon just makes everything better, right?
I’ve honed this recipe over years of parties, potlucks, and late-night cravings. The secret is a touch of garlic and a bit of sharp cheddar for depth, plus making the balls just small enough that people can pop one (or three) without guilt. You know, it’s the kind of snack that feels special but not fussy—comfort food reimagined for modern life. They’re perfect for impressing guests, making memories with your kids, or adding a bit of fun to your next happy hour. Trust me, these mini cheese balls are the ones you’ll keep coming back to, bite after bite.
What Ingredients You Will Need for Mini Cheese Balls
This mini cheese balls recipe is all about simplicity—nothing wild, just classic, flavorful ingredients that come together for a crave-worthy appetizer. Here’s what you’ll need (and a few tips I’ve learned along the way):
- For the Cheese Ball Base:
- Cream cheese, softened (8 oz / 225 g): The heart of the cheese ball! Go for full-fat for the best texture and flavor.
- Sharp cheddar cheese, finely shredded (1 cup / 115 g): Adds bold flavor. I love Tillamook or Cabot brands. Pre-shredded works in a pinch, but freshly grated melts in better.
- Goat cheese or blue cheese, crumbled (2 oz / 60 g, optional): For a little tang—use goat cheese for a milder bite or blue for a bolder taste. Totally optional, but it takes these up a notch.
- Worcestershire sauce (1 tsp / 5 ml): Adds umami and depth. If you’re vegetarian, swap in soy sauce.
- Garlic powder (1/2 tsp / 2 g): For gentle savory warmth without raw garlic sharpness.
- Onion powder (1/2 tsp / 2 g): Boosts overall flavor. You can use finely minced chives if you want a little more freshness.
- Black pepper (1/4 tsp / 1 g): Freshly cracked makes a difference, trust me.
- Salt (1/4 tsp / 1 g, or to taste): Adjust depending on how salty your cheese is.
- For the Coatings:
- Fresh herbs, finely chopped (1/4 cup / 10 g): Think parsley, chives, or dill. I like a mix for color and flavor—whatever’s in the garden or fridge.
- Pecans, toasted and finely chopped (1/3 cup / 35 g): Walnuts or almonds work too. Toasting brings out the sweetness and crunch.
- Cooked bacon, finely crumbled (1/3 cup / 40 g): Go for crispy! You can use turkey bacon or smoked ham if you need a pork alternative.
- Optional add-ins: Dried cranberries (for color and sweet chew), cracked black pepper, or a pinch of smoked paprika for a little kick.
Ingredient notes: If you’re making these for a crowd, it’s easy to double or triple the recipe. Feel free to swap the cheddar for pepper jack or use dairy-free cream cheese and cheese shreds if you want a plant-based version. I’ve tried almond flour as a nut coating for a gluten-free crunch—so good! If you don’t have fresh herbs, dried work in a pinch (just use half the amount). The beauty of these mini cheese balls is how forgiving and flexible the ingredients are.
Equipment Needed
You don’t need a fancy kitchen to whip up these mini cheese balls—just a few basics and a little elbow grease:
- Medium mixing bowl: For blending the cheese mixture. Glass or stainless steel is easiest for mixing and cleanup.
- Rubber spatula or wooden spoon: To mash everything together (and scrape every last bit—don’t let any go to waste!).
- Hand mixer or stand mixer (optional): Makes the mixing part faster and fluffier, but a fork and some muscle work, too.
- Measuring cups and spoons: For accuracy, especially when dividing the coatings.
- Small plates or shallow bowls: For rolling the cheese balls in the different coatings.
- Baking sheet or large plate (lined with parchment or wax paper): For chilling and serving the mini cheese balls.
- Plastic wrap: To cover and chill the cheese mixture, which makes rolling much easier.
- Small cookie scoop or tablespoon (optional): Helps make the balls uniform in size—hand-rolling works fine, too.
I’ve made these with every kind of bowl and spoon in my kitchen—no need for anything fancy. If you don’t have a hand mixer, just let the cream cheese soften a bit longer so it mixes easily. For the coatings, pie plates or even paper plates do the trick. And if you’re making a huge batch? Chill the cheese mixture in two portions so it doesn’t get too soft. Cleanup is a breeze, especially if you line your sheet with parchment. Easy peasy!
How to Make Mini Cheese Balls (Step-by-Step)

-
Soften the Cream Cheese:
Let 8 oz (225 g) of cream cheese sit at room temperature for 20–30 minutes. It should feel soft but not melty to the touch. This helps everything mix together smoothly. -
Mix the Base:
In a medium mixing bowl, combine the softened cream cheese, 1 cup (115 g) finely shredded sharp cheddar cheese, and (optional) 2 oz (60 g) crumbled goat or blue cheese. Add 1 tsp (5 ml) Worcestershire sauce, 1/2 tsp (2 g) garlic powder, 1/2 tsp (2 g) onion powder, 1/4 tsp (1 g) black pepper, and 1/4 tsp (1 g) salt. Use a hand mixer or a wooden spoon to blend until completely smooth and uniform—about 2–3 minutes.
Prep note: Scrape down the sides to get all the cheesy goodness mixed in. -
Chill the Mixture:
Cover the bowl with plastic wrap and chill for at least 30 minutes (up to 2 hours). This makes the cheese easier to roll and helps the flavors meld.
Tip: If you’re in a rush, pop it in the freezer for 10–15 minutes, but don’t forget about it! Too cold, and it’s hard to roll. -
Prep the Coatings:
While the cheese mixture chills, place each coating in a separate shallow bowl:- 1/4 cup (10 g) finely chopped fresh herbs
- 1/3 cup (35 g) chopped toasted pecans
- 1/3 cup (40 g) crispy crumbled bacon
- Optional: Add dried cranberries, cracked pepper, or smoked paprika to taste
Note: Toast the nuts in a dry skillet for 2–3 minutes over medium heat, stirring often, until fragrant. Let them cool before using.
-
Form the Mini Cheese Balls:
Scoop out about 1 tablespoon (15 g) of the cheese mixture and roll between your palms to form a ball. Repeat until all the mixture is used—you should get about 18–20 mini balls.
Tip: If the mixture sticks, dampen your hands with cold water. If it gets too soft, pop the balls back in the fridge for a few minutes. -
Roll in Coatings:
Roll each cheese ball in your chosen coating, pressing lightly so it sticks. Alternate between herbs, pecans, and bacon for a pretty (and tasty) variety.
Troubleshooting: If your toppings aren’t sticking, let the cheese balls sit for a minute at room temp, or press a bit more firmly. -
Chill and Serve:
Place coated cheese balls on a parchment-lined plate or tray. Chill for at least 20 minutes before serving to firm them up. Serve with pretzel sticks, crackers, or fresh veggies for dipping.
Make-ahead note: These keep well for 2–3 days if covered and chilled.
There you have it! Creamy, crunchy, herby, and just a little decadent. And if a few disappear while you’re working? Chef’s privilege!
Cooking Tips & Techniques for Success
- Mix Thoroughly, But Don’t Overwork: The key to a creamy base is soft cream cheese and well-shredded cheese. Over-mixing can make the balls a little gluey (learned that the hard way), so just mix until smooth.
- Chill for Easy Rolling: Warm cheese is sticky and hard to shape. Chill the mixture until firm but pliable. If it gets too cold, let it sit for 5 minutes before rolling.
- Uniform Size Matters: Use a small cookie scoop or tablespoon for even mini cheese balls. This helps them chill evenly and look pretty on a platter.
- Coating Sticking Issues: If your toppings slide off, let the cheese balls soften just a touch, then roll again. Press gently but firmly for a solid coating.
- Toasting Nuts for More Flavor: Raw nuts are fine, but toasting in a skillet brings out natural oils and sweetness. Don’t walk away—nuts go from perfect to burnt in a heartbeat (ask me how I know…)
- Make Ahead & Batch Preparation: Make the cheese mixture up to 2 days ahead and roll in coatings just before serving for freshest texture. If prepping for a party, pop them on a tray with plenty of space so they don’t stick together.
- Multitasking Trick: While the cheese chills, prep your coatings and set out your serving tray. It makes everything come together smoothly and keeps cleanup simple.
Honestly, I’ve had a few cheese ball mishaps—mixture too soft, toppings falling off, misshapen blobs—but every time, a little patience and chilling time saves the day. The more you make these, the faster and more consistent you’ll get. Promise!
Mini Cheese Balls Variations & Adaptations
One of the best things about this mini cheese balls recipe is how easily you can mix it up for dietary needs or just to match your mood. Here are some of my favorite spins:
- Dietary Variations:
- Gluten-Free: Use gluten-free pretzels or crackers for serving. All the coatings are naturally gluten-free.
- Dairy-Free/Vegan: Use plant-based cream cheese and cheese shreds (like Daiya or Violife) and skip the bacon or use coconut bacon.
- Keto/Low-Carb: Stick to pecans and bacon for coatings, and serve with veggie sticks or low-carb crackers.
- Seasonal Twists:
- Spring/Summer: Add lemon zest and fresh basil or mint to the herb coating.
- Fall/Winter: Mix in a little dried cranberry or chopped dried apricot with the pecans for a holiday vibe.
- Flavor Add-Ins:
- Spicy: Stir in a pinch of cayenne or diced jalapeño to the cheese mixture.
- Smoky: Add smoked paprika to the base or sprinkle on top of the bacon coating.
- Sweet & Savory: Mix a teaspoon of honey or hot honey into the cheese base for a subtle sweetness.
- Personal Favorite: I once rolled these in everything bagel seasoning—so fun and flavorful!
You can also make a big cheese ball and coat half in herbs, half in nuts for a pretty centerpiece. Don’t be afraid to experiment—half the fun is seeing what flavor combos you love best.
Serving & Storage Suggestions
Serving: These mini cheese balls shine at room temperature, so take them out of the fridge about 10–15 minutes before serving. Arrange them on a pretty platter with pretzel sticks (poke them right in for easy grabbing), crackers, or crunchy veggie sticks. I love pairing them with a light white wine or sparkling cider for a festive touch.
For parties, I sprinkle a few extra herbs and nuts on the platter for color—it makes everything look fresh and inviting. They’re also lovely as an addition to a charcuterie board or picnic spread. If you’re feeling fancy, tuck a single dried cranberry on top of each herby one (hello, Pinterest-worthy appetizers!).
Storage: Leftover mini cheese balls keep well in an airtight container in the refrigerator for up to 3 days. Place parchment or wax paper between layers to prevent sticking. Freezing isn’t recommended—they tend to lose their creamy texture—but you can freeze the cheese mixture (uncoated) for up to a month and roll in coatings after thawing.
To refresh after chilling, let them sit out for a few minutes—flavors bloom as they warm up. If the coatings get a little soft, just give them a quick roll in fresh toppings before serving. Honestly, they taste even better the next day as the flavors meld. Snack time, sorted!
Nutritional Information & Benefits
These mini cheese balls are definitely a treat, but with all the protein and healthy fats from cheese and nuts, they’re more satisfying than your average party snack. Here’s an estimate per serving (1 cheese ball):
- Calories: ~90 kcal
- Fat: 7 g
- Protein: 3 g
- Carbs: 2 g
- Sugar: less than 1 g
They’re gluten-free (as long as your dippers are), and you can easily make them low-carb or dairy-free. Pecans and bacon both offer healthy fats, and the fresh herbs add a little antioxidant punch. Just watch for potential allergens—dairy, nuts, and bacon (for pork-free diets). For me, these hit that perfect balance of indulgence and real-food ingredients. A little goes a long way for satisfying, happy snacking!
Conclusion
So, why should you give these mini cheese balls a whirl? They’re fast, fun, packed with flavor, and guaranteed to spark smiles at any gathering. You can dress them up or down, swap in your own favorite flavors, or simply enjoy the classic trio of herb, pecan, and bacon. Honestly, they’ve become a staple in my kitchen for good reason—they’re just that good.
Don’t be afraid to make them your own—try new coatings, play with cheese combos, or let your kids help with the rolling (it’s a little messy, but that’s half the fun). If you’re looking for an easy party appetizer that looks impressive and tastes even better, this mini cheese balls recipe is your answer. I’d love to hear what twists you try or see how yours turn out—leave a comment below, share your photos, or tag me on social media!
Happy snacking, friend. May your parties be full of laughter and your cheese balls never run out!
FAQs About Mini Cheese Balls
How far ahead can I make mini cheese balls?
You can make the cheese mixture up to 2 days ahead and keep it tightly covered in the fridge. Roll in coatings the day you plan to serve for the freshest texture.
Can I use different types of cheese?
Absolutely! Swap the cheddar for pepper jack, gouda, or even a bit of parmesan for extra flavor. Just make sure it’s a cheese that shreds and mixes well.
What’s the best way to keep the mini cheese balls from sticking together?
Place them on a parchment-lined tray and leave space between each ball. If stacking, layer with parchment or wax paper so they stay separate and pretty.
Are these safe for nut allergies?
You can skip the pecan coating and use seeds (like toasted pumpkin seeds) or just more herbs. Always check with your guests about allergies before serving.
Can I freeze mini cheese balls?
It’s best to freeze the cheese mixture before rolling in toppings. Thaw in the fridge, then shape and coat before serving. Freezing after coating can make the toppings soggy.
Pin This Recipe!

Mini Cheese Balls Recipe: Easy Party Appetizer with Herb, Pecan, and Bacon

These mini cheese balls are a quick, crowd-pleasing appetizer featuring a creamy cheese base rolled in a trio of coatings: fresh herbs, toasted pecans, and crispy bacon. Perfect for parties, gatherings, or snacking, they’re endlessly customizable and easy to make ahead.
- Prep Time: 20 minutes
- Cook Time: 0 minutes
- Total Time: 50 minutes
- Yield: 18–20 mini cheese balls 1x
- Category: Appetizer
- Cuisine: American
Ingredients
- 8 oz cream cheese, softened
- 1 cup sharp cheddar cheese, finely shredded
- 2 oz goat cheese or blue cheese, crumbled (optional)
- 1 tsp Worcestershire sauce (or soy sauce for vegetarian)
- 1/2 tsp garlic powder
- 1/2 tsp onion powder
- 1/4 tsp black pepper
- 1/4 tsp salt, or to taste
- 1/4 cup fresh herbs, finely chopped (parsley, chives, dill, or a mix)
- 1/3 cup pecans, toasted and finely chopped
- 1/3 cup cooked bacon, finely crumbled
- Optional: dried cranberries, cracked black pepper, smoked paprika
Instructions
- Let cream cheese sit at room temperature for 20–30 minutes until softened.
- In a medium mixing bowl, combine softened cream cheese, shredded cheddar, and optional goat or blue cheese. Add Worcestershire sauce, garlic powder, onion powder, black pepper, and salt. Mix until smooth and uniform, about 2–3 minutes.
- Cover the bowl with plastic wrap and chill for at least 30 minutes (up to 2 hours) to firm up the mixture.
- Prepare coatings in separate shallow bowls: herbs, toasted pecans, and crumbled bacon. Optional: add dried cranberries, cracked pepper, or smoked paprika to taste.
- Scoop about 1 tablespoon of cheese mixture and roll between your palms to form a ball. Repeat until all mixture is used (about 18–20 balls).
- Roll each cheese ball in your chosen coating, pressing lightly so it sticks. Alternate coatings for variety.
- Place coated cheese balls on a parchment-lined plate or tray. Chill for at least 20 minutes before serving.
- Serve with pretzel sticks, crackers, or fresh veggies for dipping. Store leftovers in an airtight container in the fridge for up to 3 days.
Notes
For best results, chill the cheese mixture before rolling. Toast nuts for extra flavor. Use a cookie scoop for uniform size. Make ahead by preparing the cheese mixture up to 2 days in advance and rolling in coatings just before serving. Easily adapt for dietary needs by swapping cheeses or coatings.
Nutrition
- Serving Size: 1 mini cheese ball
- Calories: 90
- Sugar: 1
- Sodium: 150
- Fat: 7
- Saturated Fat: 3
- Carbohydrates: 2
- Protein: 3
Keywords: cheese balls, party appetizer, mini cheese balls, herb cheese balls, bacon cheese balls, pecan cheese balls, easy appetizer, make ahead, gluten free, holiday snack


