
Let me tell you, the moment the scent of cool peppermint and buttery sugar wafts from my oven, you know it’s officially the holiday season. The aroma alone is enough to make you pause mid-sentence and just breathe it in. These peppermint snowflake sugar cookies bring back memories of winter afternoons spent with flour dust in my hair and candy cane bits stuck to my fingers. The first time I made these, I was knee-high to a grasshopper, perched atop a kitchen stool while my grandma measured out sugar like it was gold dust. There’s something magical about mixing peppermint into classic sugar cookie dough—it’s like biting into a snowy winter morning, crisp and sweet.
Honestly, I stumbled onto this recipe on a chilly December Saturday when I wanted something festive but easy enough for my kids to help out. I wish I’d discovered this peppermint snowflake sugar cookie recipe years ago—it’s that dangerously easy (and so much fun for little hands to cut out snowflakes and sprinkle crushed candy canes). My family couldn’t stop sneaking cookies off the cooling rack, and I can’t really blame them. These cookies have become a staple for our holiday gatherings, cookie exchanges, and even gifting to neighbors. They’re perfect for brightening up your Pinterest cookie board or serving at a snowy brunch. Each batch I bake feels like a warm hug, and I’ve tested this recipe more times than I can count—in the name of research, of course. You’re going to want to bookmark this one for every festive occasion!
Why You’ll Love This Peppermint Snowflake Sugar Cookies Recipe
After years of holiday baking (and a few too many burnt batches, let’s be real), I can say these peppermint snowflake sugar cookies are the kind of treat that checks all the boxes. Whether you’re a seasoned baker or just dipping your toes into cookie dough, here’s why you’ll be hooked:
- Quick & Easy: This recipe comes together in under an hour, so you’re not spending all day in the kitchen. Perfect for busy weeknights or last-minute holiday parties.
- Simple Ingredients: No fancy grocery trips here. All you need are pantry staples plus a dash of peppermint extract. You probably have everything already!
- Perfect for Festive Gatherings: These cookies shine at cookie swaps, school events, office parties, and cozy family movie nights. They bring instant holiday cheer wherever you serve them.
- Crowd-Pleaser: I’ve yet to meet a kid or adult who can resist their sweet crunch and wintery flavor. They always get rave reviews—especially with the sparkling snowflake shapes!
- Unbelievably Delicious: The combo of buttery sugar cookie dough and cool peppermint is pure comfort. Plus, the crushed candy cane topping adds a perfect burst of color and crunch.
What makes this recipe stand out? It’s all in the technique. Chilling the dough before rolling means crisp edges and a tender bite. I use a blend of vanilla and peppermint for balanced flavor, and you can tweak the peppermint strength to suit your taste. Forget bland or crumbly cookies—these hold their shape beautifully and taste like winter’s best moments. They’re also super adaptable, so you can go gluten-free or dairy-free if you need. Honestly, there’s nothing like seeing friends close their eyes after that first bite, savoring the nostalgia and joy baked right in. This recipe is comfort food at its most festive, and it’ll make your holiday table sparkle!
What Ingredients You Will Need for Peppermint Snowflake Sugar Cookies
This recipe uses simple, wholesome ingredients that come together for a bold flavor and satisfyingly crisp texture—without any fuss. Most of these are pantry staples, and you can easily make substitutions if needed. Here’s what you’ll need for your peppermint snowflake sugar cookies:
- For the Cookie Dough:
- 2 3/4 cups (345g) all-purpose flour (use gluten-free blend if needed)
- 1 teaspoon baking powder
- 1/2 teaspoon salt
- 1 cup (226g) unsalted butter, softened (room temperature is key for creaming—use plant-based butter for dairy-free)
- 1 cup (200g) granulated sugar (I like Domino brand for consistency)
- 1 large egg (room temperature for best results)
- 1 teaspoon vanilla extract (pure vanilla gives the best flavor)
- 1/2 teaspoon peppermint extract (adjust up to 1 teaspoon for stronger flavor)
- For the Snowflake Decor:
- 1/2 cup (60g) crushed peppermint candies or candy canes (adds crunch and sparkle—use naturally colored for a brighter look)
- 1 cup (120g) powdered sugar (for dusting or making simple icing)
- 2-3 teaspoons milk or dairy-free milk (for icing, if desired)
- Optional: blue or white sparkling sugar, edible glitter (for extra festive flair)
Ingredient Tips & Substitutions:
- If you’re out of peppermint extract, try a dash of mint extract (though the flavor will be a tad different).
- For vegan cookies, swap the egg for a flaxseed egg (1 tablespoon flaxseed meal + 2.5 tablespoons water, let sit 5 minutes).
- Don’t have candy canes? Any peppermint hard candies will work—just crush them with a rolling pin.
- Want gluten-free? Bob’s Red Mill 1:1 baking flour is my go-to for cookies that don’t fall apart.
- Using salted butter? Skip the added salt in the recipe.
These ingredients are easy to find and work together to create peppermint snowflake sugar cookies that are crisp, flavorful, and totally festive. The best part? You can swap and adjust things based on what you have or your dietary needs. I’ve tested with almond flour, coconut oil, and even natural food colorings—each batch was delicious!
Equipment Needed for Peppermint Snowflake Sugar Cookies
- Mixing Bowls: At least two medium bowls (one for dry, one for wet ingredients).
- Electric Mixer: Hand or stand mixer works fine—just makes creaming butter and sugar easier (I’ve done it by hand, but it’s definitely an arm workout!).
- Rolling Pin: Essential for rolling out the dough evenly. If you don’t have one, a clean wine bottle works in a pinch.
- Snowflake Cookie Cutters: Any snowflake-shaped cutter will do. You can use stars or circles if that’s what you have—no rules here.
- Baking Sheets: Heavy-duty sheets help prevent burning. I recommend lining with parchment paper for easy cleanup.
- Wire Cooling Rack: Lets cookies cool evenly and keeps them crisp. If you don’t have one, a clean oven rack works (just be gentle).
- Small Sifter or Fine Mesh Strainer: For dusting powdered sugar or applying sparkling sugar.
- Plastic Wrap: For chilling the dough and keeping it fresh.
Equipment Notes: I’ve baked these cookies with just the basics—no fancy gadgets needed. For cleanup, I love silicone baking mats (they’re reusable and budget-friendly). If your snowflake cutters are metal, make sure to dry them well to prevent rusting; I learned that the hard way after one snowy baking marathon!
How to Make Perfect Peppermint Snowflake Sugar Cookies
-
Prep Your Ingredients: Measure and set out all ingredients. Make sure your butter is softened and egg is at room temperature for easier mixing.
Time: 5 minutes -
Mix Dry Ingredients: In a medium bowl, whisk together 2 3/4 cups (345g) flour, 1 teaspoon baking powder, and 1/2 teaspoon salt. Mixing these first helps the cookies bake evenly.
Time: 2 minutes -
Cream Butter and Sugar: In a large bowl, beat 1 cup (226g) softened unsalted butter and 1 cup (200g) sugar with an electric mixer on medium speed until light and fluffy. This takes about 2-3 minutes. If the mixture is grainy, keep beating!
Time: 3 minutes -
Add Wet Ingredients: Beat in 1 large egg, 1 teaspoon vanilla extract, and 1/2 teaspoon peppermint extract. Mix until smooth and creamy—don’t rush this step, as it sets the stage for tender cookies.
Time: 1 minute -
Combine Wet and Dry: Gradually add the flour mixture to the wet ingredients, mixing on low until just combined. The dough will be soft but not sticky. If it’s too crumbly, add a teaspoon of milk.
Time: 2 minutes -
Chill the Dough: Shape the dough into a disc, wrap in plastic, and chill in the refrigerator for at least 30 minutes. Chilling keeps the cookies from spreading too much and makes rolling easier.
Time: 30 minutes
Prep Note: If you’re short on time, pop it in the freezer for 10-15 minutes instead. -
Preheat Oven and Prepare Sheets: Heat oven to 350°F (175°C). Line baking sheets with parchment paper.
Time: 5 minutes -
Roll and Cut Dough: On a lightly floured surface, roll dough to about 1/4-inch (6mm) thickness. Use snowflake cutters to cut out cookies and transfer to baking sheets, leaving about an inch (2.5cm) between each.
Time: 10 minutes
Prep Note: If dough gets sticky, refrigerate for 5 more minutes. -
Bake: Bake cookies for 8-10 minutes, until edges are set but not brown. They should look pale and slightly puffy.
Time: 8-10 minutes
Sensory Cue: They’ll smell sweet and minty with just a hint of golden color at the edges. -
Cool: Let cookies sit on the pan for 2 minutes, then transfer to wire racks to cool completely. Don’t skip this—moving too soon can cause breakage.
Time: 10 minutes -
Decorate: Drizzle or spread a simple icing (powdered sugar mixed with milk), then sprinkle with crushed peppermint candies and optional sparkling sugar.
Time: 10 minutes
Troubleshooting: If icing is too runny, add a bit more powdered sugar. If too thick, a few drops of milk will fix it. -
Serve and Enjoy: Once set, arrange cookies on a festive platter and bask in the compliments!
Prep Tip: Keep extras in an airtight tin for up to a week—if they last that long.
Pro Baking Tips & Techniques for Peppermint Snowflake Sugar Cookies
After dozens of batches (and a few lessons learned the hard way), here are my top tips for peppermint snowflake sugar cookies:
- Chill Your Dough: It’s tempting to skip, but chilling is the secret to crisp edges and perfect snowflake shapes. If you rush, cookies will spread and lose their detail.
- Roll Evenly: Use guide sticks or two rulers on each side to keep dough at a consistent thickness. Uneven dough bakes unevenly (I’ve had some snowflakes with burnt tips and doughy middles—learned my lesson!).
- Watch the Bake Time: Sugar cookies go from perfect to overbaked in a flash. Check at 8 minutes and pull them before they brown. They’ll firm up as they cool.
- Don’t Overmix: Once the flour goes in, mix just until combined. Overmixing = tough cookies. I made that mistake once and ended up with hockey pucks!
- Multitask: While dough chills, crush your candy canes and prep icing. It saves time and keeps things moving.
- Consistency Matters: For icing, aim for a thick but pourable consistency. If it’s too thin, it’ll run; too thick, it won’t spread smoothly.
- Use Parchment Paper: Prevents sticking and makes for easy cleanup. Trust me, scraping cookies off an unlined pan is never fun.
I’ve found that baking one sheet at a time in the center of the oven gives the most even results. Rotate pans halfway through if you’re baking two at once. And don’t worry about making each snowflake perfect—imperfections add charm!
Variations & Adaptations for Peppermint Snowflake Sugar Cookies
Peppermint snowflake sugar cookies are seriously versatile. Here’s how you can switch things up to suit your taste, dietary needs, or whatever’s in your pantry:
- Gluten-Free Variation: Substitute all-purpose flour with a gluten-free 1:1 baking blend. I’ve tried Bob’s Red Mill and King Arthur—both work great. Add 1 teaspoon xanthan gum if your blend doesn’t include it.
- Vegan Adaptation: Use plant-based butter and swap the egg for a flaxseed egg (1 tablespoon flaxseed meal + 2.5 tablespoons water, mixed and set for 5 minutes). The cookies are just as crisp and tasty!
- Chocolate Peppermint Twist: Add 1/4 cup (25g) unsweetened cocoa powder to the flour mix. Decorate with chocolate drizzle and crushed peppermint for a wintery chocolate-mint flavor.
- Seasonal Swap: Don’t love peppermint? Try orange or almond extract instead for a different festive flavor. Top with colored sanding sugar or sprinkles to suit any occasion.
- Allergen-Friendly: For nut allergies, stick with basic sugar cookie dough and avoid almond extract. For dairy-free, use coconut oil or plant butter.
My personal favorite? I once added a bit of lemon zest and subbed out the peppermint for lemon extract—super bright and fresh, perfect for springtime snowflakes! Don’t be afraid to get creative; that’s half the fun.
Serving & Storage Suggestions for Peppermint Snowflake Sugar Cookies
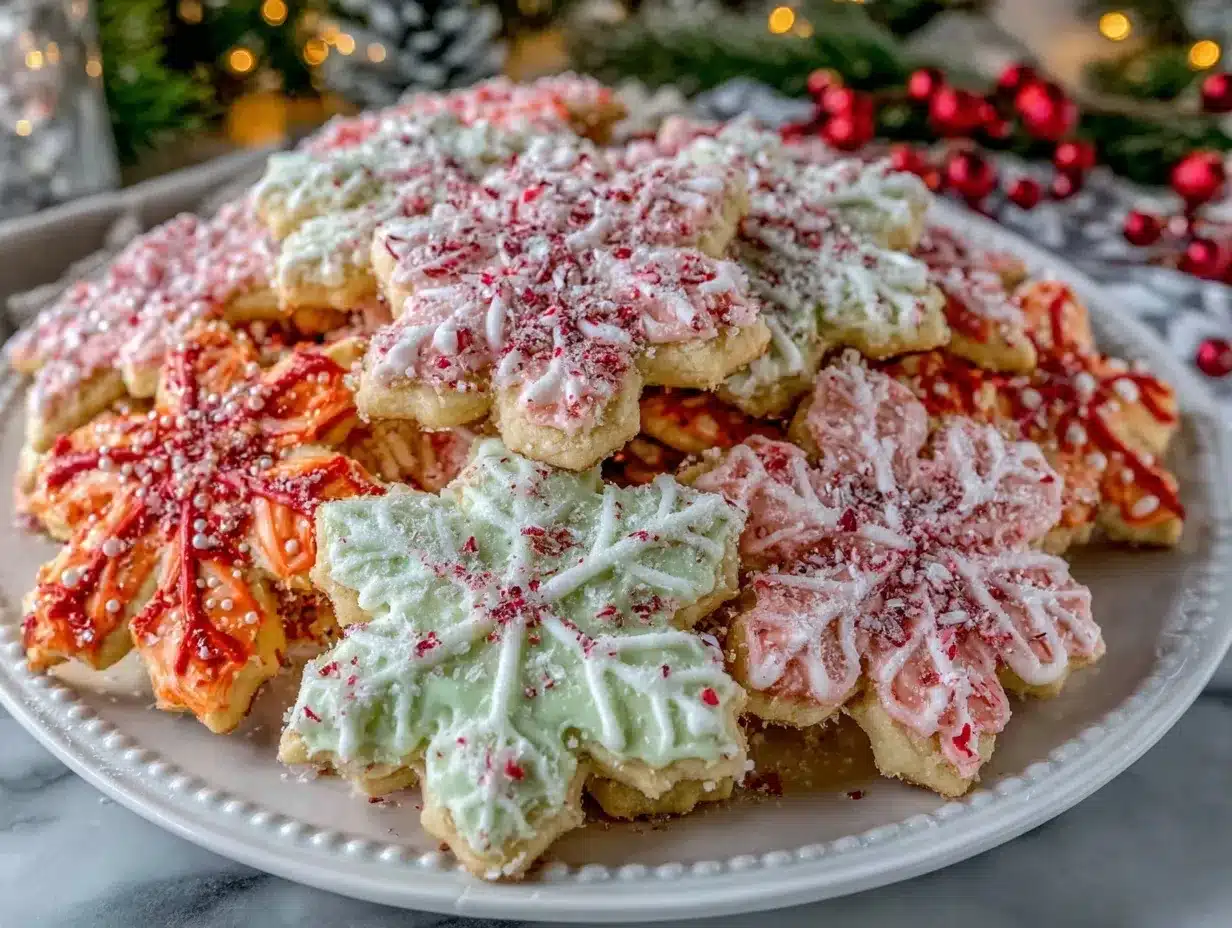
These peppermint snowflake sugar cookies are best enjoyed at room temperature, where their buttery crunch and cool mint flavor really shine. Arrange them on a festive platter with extra crushed peppermint sprinkled around for a snowy effect. They look gorgeous alongside mugs of hot cocoa, peppermint mochas, or spiced tea (trust me, the combo is pure winter comfort).
For storage, keep cookies in an airtight container at room temperature for up to one week. If you want to freeze them, layer between sheets of parchment in a freezer-safe tin—they’ll last up to 2 months. Reheat by letting them come to room temp, or pop in a 250°F (120°C) oven for 3 minutes if you like them warm.
Flavors tend to deepen after a day or two, making these peppermint snowflake sugar cookies even more delicious as they sit. Honestly, they’re perfect for making ahead for parties or gifting. Just be sure to keep iced cookies separated with parchment so the decorations don’t stick together!
Nutritional Information & Benefits
Each peppermint snowflake sugar cookie contains about 110 calories, 5g fat, 15g carbohydrates, and 1g protein (based on a standard 2-inch cookie). The main ingredients—flour, butter, and sugar—make these a classic treat, but you can make them lighter by swapping in low-fat or plant-based alternatives.
Peppermint extract isn’t just for flavor—it’s known for aiding digestion and bringing a refreshing twist to sweets. If you use gluten-free or dairy-free swaps, the cookies suit many common dietary needs. Beware, though: the crushed candy canes do contain added sugar and may include food coloring (choose natural if you prefer).
I love these peppermint snowflake sugar cookies for their feel-good, festive vibe. They’re not health food, but they’re a cheerful holiday treat that fits into most eating plans when enjoyed in moderation.
Conclusion
If you’re searching for the ultimate holiday cookie, these peppermint snowflake sugar cookies are truly worth trying. They’re easy, festive, and crowd-pleasing, with a flavor that’s pure winter nostalgia. Whether you stick to classic peppermint or try your own twist, you’ll end up with a platter of cookies that look stunning and taste even better.
Customize these to suit your family’s traditions or dietary needs—they’re flexible and forgiving. Honestly, I make these every year because they never fail to bring a smile (and a few happy crumbs) to everyone around my table.
Let me know if you bake these! Drop your comments below, share your best snowflake photos, or tell me your favorite variation. Wishing you a cozy, cookie-filled holiday—don’t forget to save this recipe for next year’s festivities!
FAQs About Peppermint Snowflake Sugar Cookies
How do I prevent my peppermint snowflake sugar cookies from spreading?
Chill the dough for at least 30 minutes before rolling and baking. Make sure your baking sheets are cool, and don’t overwork the dough—it helps keep those pretty snowflake shapes crisp.
Can I make these cookies ahead of time?
Absolutely! You can make the dough up to 2 days ahead and keep it wrapped in the fridge. Baked cookies stay fresh for up to a week in an airtight container, and they freeze beautifully for up to 2 months.
What’s the best way to crush peppermint candies for topping?
Place candy canes or peppermint candies in a zip-top bag and gently crush with a rolling pin. You want small pieces, not powder, for the best crunch and look.
Can I use different shapes if I don’t have snowflake cookie cutters?
Definitely! Stars, circles, or hearts work well. The key is to keep shapes similar in size so they bake evenly.
How do I make the icing set quickly for decorating?
Let iced cookies air dry for 30 minutes, or pop them in the fridge for 10 minutes to speed things up. The icing should be thick enough to stay put but thin enough to spread easily.
Pin This Recipe!
Peppermint Snowflake Sugar Cookies

These festive peppermint snowflake sugar cookies combine classic buttery sugar cookie dough with cool peppermint and a crunchy candy cane topping. They’re easy to make, perfect for holiday gatherings, and fun for kids to decorate.
- Prep Time: 20 minutes
- Cook Time: 10 minutes
- Total Time: 1 hour
- Yield: 36 cookies 1x
- Category: Dessert
- Cuisine: American
Ingredients
- 2 3/4 cups all-purpose flour (or gluten-free blend)
- 1 teaspoon baking powder
- 1/2 teaspoon salt
- 1 cup unsalted butter, softened
- 1 cup granulated sugar
- 1 large egg
- 1 teaspoon vanilla extract
- 1/2 teaspoon peppermint extract (up to 1 teaspoon for stronger flavor)
- 1/2 cup crushed peppermint candies or candy canes
- 1 cup powdered sugar (for dusting or icing)
- 2–3 teaspoons milk or dairy-free milk (for icing, if desired)
- Optional: blue or white sparkling sugar, edible glitter
Instructions
- Measure and set out all ingredients. Ensure butter is softened and egg is at room temperature.
- In a medium bowl, whisk together flour, baking powder, and salt.
- In a large bowl, beat softened butter and sugar with an electric mixer on medium speed until light and fluffy (about 2-3 minutes).
- Beat in egg, vanilla extract, and peppermint extract until smooth and creamy.
- Gradually add the flour mixture to the wet ingredients, mixing on low until just combined. If dough is crumbly, add a teaspoon of milk.
- Shape dough into a disc, wrap in plastic, and chill in the refrigerator for at least 30 minutes.
- Preheat oven to 350°F (175°C). Line baking sheets with parchment paper.
- On a lightly floured surface, roll dough to about 1/4-inch thickness. Use snowflake cutters to cut out cookies and transfer to baking sheets, leaving about an inch between each.
- Bake cookies for 8-10 minutes, until edges are set but not brown.
- Let cookies sit on the pan for 2 minutes, then transfer to wire racks to cool completely.
- Drizzle or spread icing (powdered sugar mixed with milk), then sprinkle with crushed peppermint candies and optional sparkling sugar.
- Once set, arrange cookies on a festive platter and serve. Store extras in an airtight container for up to a week.
Notes
Chill dough for crisp edges and defined shapes. Don’t overmix after adding flour. For gluten-free or vegan adaptations, substitute flour and egg as needed. Decorate with colored sugar or edible glitter for extra flair. Cookies freeze well for up to 2 months.
Nutrition
- Serving Size: 1 cookie (about 2-in
- Calories: 110
- Sugar: 8
- Sodium: 45
- Fat: 5
- Saturated Fat: 3
- Carbohydrates: 15
- Protein: 1
Keywords: peppermint, sugar cookies, holiday cookies, Christmas cookies, snowflake cookies, festive dessert, easy cookies, kid-friendly, cookie exchange


