Let me tell you, the sight of a perfectly arranged Bloody Mary bar is enough to make anyone’s mouth water and instantly spark that party vibe. The bright reds of the tomato juice, the glistening ice cubes, the colorful parade of garnishes—all lined up like a festive rainbow of flavors waiting to be mixed and matched. The first time I set up a Bloody Mary bar for a weekend brunch, I was instantly hooked. It was the kind of moment where you pause, take a deep breath, and just smile because you know you’re onto something truly special.
Years ago, back when I was knee-high to a grasshopper, brunches meant a simple coffee and toast. But stumbling upon the magic of a DIY Bloody Mary bar changed the game for me. Honestly, I wish I’d discovered this sooner because it turns any gathering into a fun, interactive experience. My family couldn’t stop sneaking picks from the garnish tray (and I can’t really blame them). Whether it’s a casual Sunday brunch or a festive holiday morning, this setup brings pure, nostalgic comfort with a twist.
Let’s face it, creating the perfect Bloody Mary bar isn’t just about throwing together some drinks. It’s about crafting an experience that’s dangerously easy and endlessly customizable, perfect for impressing guests or brightening up your Pinterest party board. After testing this setup multiple times (in the name of research, of course), it’s become a staple for family gatherings, gifting moments, and those “just because” celebrations. You’re going to want to bookmark this one.
Why You’ll Love This Recipe
This Bloody Mary bar setup has been tried, tested, and loved by friends, family, and a few curious neighbors. It’s a true crowd-pleaser with a handful of reasons why you’re going to want to set one up for your next gathering:
- Quick & Easy: Comes together in under 20 minutes, perfect for busy mornings or last-minute party plans.
- Simple Ingredients: No need for fancy or obscure items; most ingredients are pantry staples or easy to find at your local store.
- Perfect for Any Occasion: Great for brunches, holiday mornings, baby showers, or even game-day parties.
- Crowd-Pleaser: Kids (with virgin versions) and adults alike rave about the fresh flavors and fun garnishes.
- Unbelievably Delicious: The combination of tangy tomato juice, spicy seasonings, and crisp garnishes hits all the right notes.
What sets this Bloody Mary bar apart is the thoughtful balance between classic and creative. I’ve mixed in some secret seasoning blends and fresh twists you won’t find in your average bar setup. Plus, the way the garnishes are arranged encourages your guests to play bartender, making it a memorable part of your gathering. This isn’t just another drink station—it’s your best version of fuss-free entertaining that feels like a warm hug in a glass.
What Ingredients You Will Need
This Bloody Mary bar uses simple, wholesome ingredients to deliver bold flavor and satisfying texture without the fuss. Most of these are pantry staples or easy to grab, and you can mix and match to suit your crowd’s taste buds.
- Base Mix:
- Tomato juice (preferably low sodium for better seasoning control)
- Vodka (choose a clean, smooth brand like Tito’s for the best taste)
- Fresh lemon juice (adds brightness and balances the tomato)
- Worcestershire sauce (for that umami punch)
- Hot sauce (Tabasco or Cholula, depending on your heat preference)
- Horseradish (freshly grated or prepared, for that spicy kick)
- Celery salt (essential for that classic Bloody Mary flavor)
- Black pepper (freshly cracked, always better)
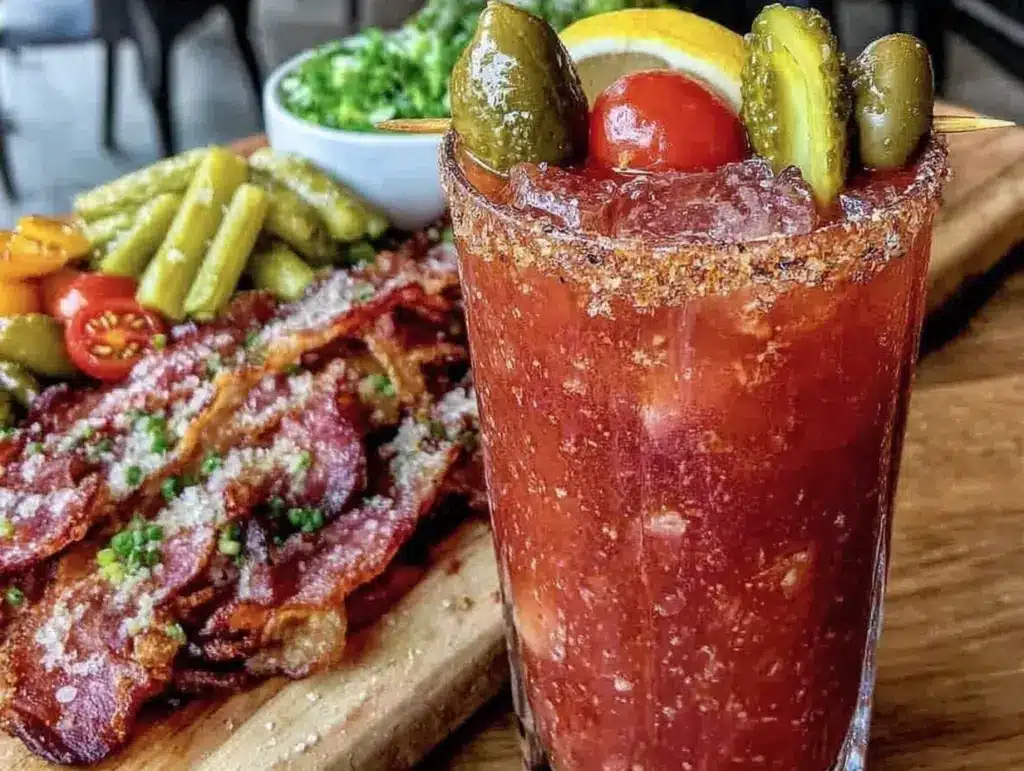
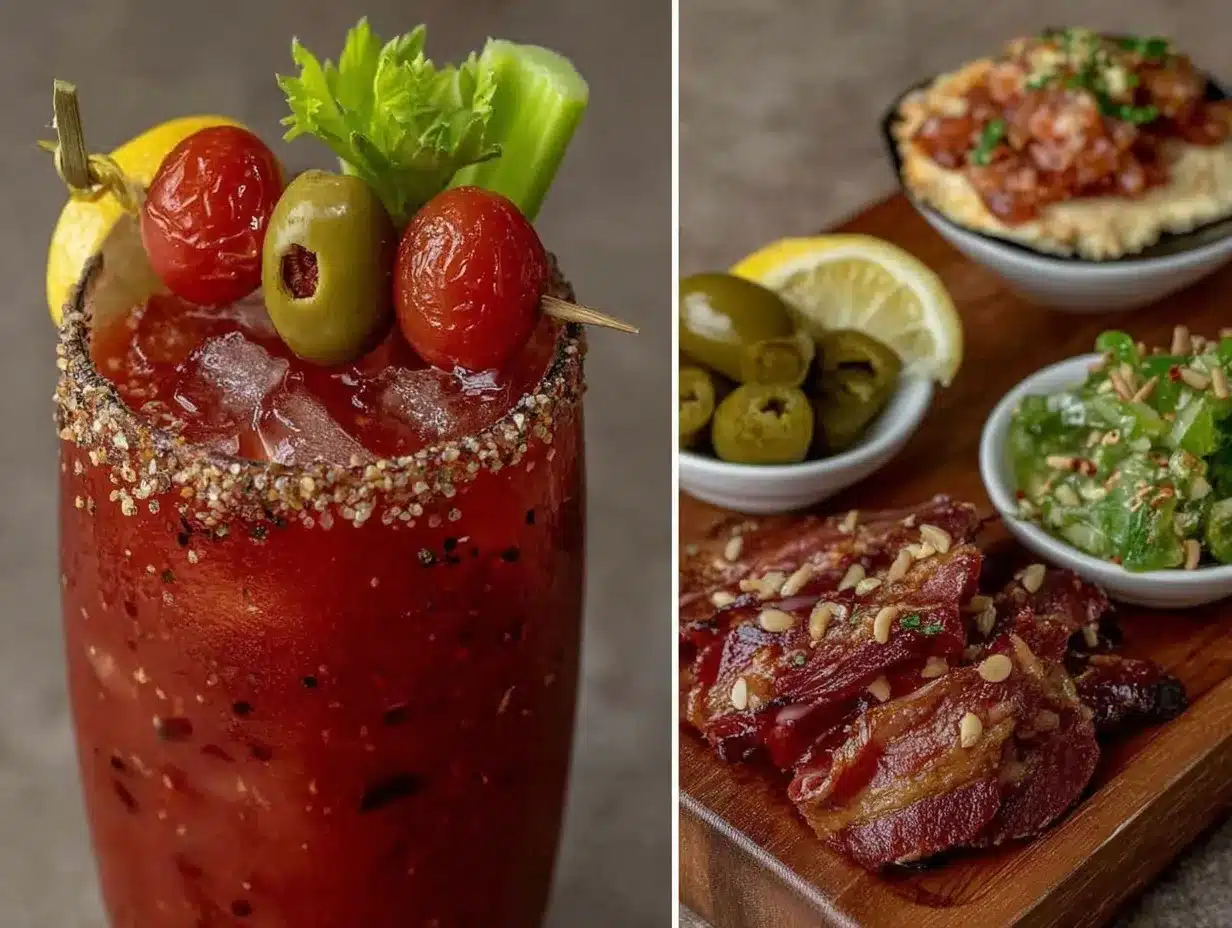
- Garnishes:
- Celery stalks (crisp and fresh)
- Pickles (dill spears or bread-and-butter for a sweet twist)
- Olives (green or black, pimento-stuffed if you can find them)
- Cherry tomatoes (adds a fresh pop of sweetness)
- Cooked bacon strips (because everything’s better with bacon)
- Pickled green beans or asparagus (adds a tangy crunch)
- Cheese cubes (sharp cheddar or pepper jack for a savory bite)
- Shrimp (for a touch of seafood luxury)
- Lemon and lime wedges (for extra zest)
- Optional Extras:
- Fresh herbs like dill, parsley, or chives (adds freshness and color)
- Celery bitters (for a subtle complexity)
- Smoked paprika or cayenne powder (to sprinkle on top)
- Pickled jalapeños (for heat lovers)
If you’re aiming for a vegetarian or vegan-friendly bar, just swap out the bacon and shrimp for extra veggies and plant-based cheese. For a lower-sodium version, look for no-salt-added tomato juice and dial back the celery salt. I personally love using fresh lemon juice over bottled—it makes a noticeable difference in brightness.
Equipment Needed
Setting up your Bloody Mary bar requires just a handful of basic kitchen tools, but having the right gear makes the whole experience smoother and more fun.
- Large Pitcher or Dispenser: For mixing and serving the Bloody Mary base. Glass pitchers work best so you can see those vibrant reds.
- Measuring Cups and Spoons: To keep your seasoning just right every time.
- Stirring Spoon or Bar Spoon: Long enough to reach the bottom and mix the drink well.
- Glasses: Classic highball or mason jars are perfect for that rustic touch.
- Small Bowls or Trays: For arranging garnishes. I like using shallow dishes so guests can easily grab what they want.
- Ice Bucket or Large Bowl: Keep ice handy and accessible.
- Tongs and Cocktail Picks: For hygienic and easy garnish handling.
If you don’t have a fancy bar spoon, a regular long-handled spoon does the trick. And if glass pitchers are too fragile for your crowd, a sturdy plastic dispenser with a spout works just fine. I recommend drying your tools thoroughly to avoid any dilution or unwanted flavors sneaking in.
Preparation Method
- Prepare the Bloody Mary Base (10 minutes): In a large pitcher, combine 4 cups (950 ml) of tomato juice with 1 cup (240 ml) vodka. Add 2 tablespoons (30 ml) fresh lemon juice, 1 tablespoon (15 ml) Worcestershire sauce, 1 teaspoon (5 ml) hot sauce (adjust to taste), 1 tablespoon (15 ml) prepared horseradish, 1 teaspoon (5 ml) celery salt, and ½ teaspoon (2.5 ml) freshly cracked black pepper. Stir well until all ingredients are fully blended.
- Taste and Adjust Seasonings (2 minutes): Give the mix a good stir and taste. This is where you can add more hot sauce, lemon juice, or celery salt depending on your preferences. The base should be tangy, spicy, and savory but balanced.
- Chill the Base (Optional, 15-30 minutes): If you have time, refrigerate the base to let flavors meld. If you’re short on time, adding ice directly to the glasses works too.
- Prepare Garnishes (10-15 minutes): Arrange celery stalks, pickles, olives, cherry tomatoes, cooked bacon, pickled veggies, cheese cubes, shrimp, and citrus wedges in separate small bowls or trays. Make sure to provide tongs or cocktail picks for easy grabbing.
- Set Up the Bar: Place the chilled Bloody Mary base pitcher on the table alongside the garnish trays, ice bucket, glasses, and stirrers. Arrange everything so guests can easily move down the line to customize their drink.
- Serve and Enjoy: Encourage guests to fill their glasses with ice, pour the Bloody Mary base, and load up on garnishes. Don’t forget to remind them to stir their drink well for the best flavor.
Pro tip: Keep extra celery salt and hot sauce nearby so guests can tweak their drinks. Also, for a virgin version, simply omit the vodka and add a little extra lemon juice and hot sauce for punch.
Cooking Tips & Techniques
When it comes to a Bloody Mary bar, a little know-how goes a long way. Here are some tips I’ve learned through trial, error, and a lot of happy sips:
- Fresh is Best: Fresh lemon juice and freshly cracked pepper make a noticeable difference. Bottled lemon juice just can’t compete.
- Balance Your Flavors: The key to a great Bloody Mary is balancing acidity, spice, and savoriness. Start with less seasoning—you can always add more!
- Chill Everything: Keeping your base, glasses, and garnishes chilled means the drink stays refreshing longer.
- Don’t Overdo the Horseradish: A little goes a long way. Too much can overpower the drink and clear the sinuses (been there, done that).
- Prep Garnishes Early: Some garnishes like bacon and pickled veggies can be prepped a day ahead. Just store them properly to keep fresh.
- Use Tongs or Picks: It’s more hygienic and keeps the bar looking neat.
- Offer Ice Separately: Some guests like more ice, others less. Having it separate gives everyone control.
One time, I forgot to stir the base properly and ended up with a salty bottom and bland top—lesson learned! Also, multitask by prepping garnishes while the base chills to save time. Trust me, these little tips make hosting so much smoother.
Variations & Adaptations
One of the best things about a Bloody Mary bar is how easy it is to customize. Here are some variations you might want to try:
- Spicy Twist: Add sliced fresh jalapeños, a splash of chipotle hot sauce, or sprinkle smoked paprika for a smoky heat.
- Vegetarian/Vegan Friendly: Skip bacon and shrimp, swap cheese for plant-based alternatives, and load up on extra veggies like cucumber ribbons, roasted peppers, or marinated artichokes.
- Different Spirits: Swap vodka for tequila (making a Bloody Maria), gin, or even mezcal for a smoky flavor.
- Seasonal Garnishes: In summer, fresh corn, heirloom cherry tomatoes, or watermelon cubes can be fun additions. Winter calls for pickled root veggies.
- Low-Sodium Option: Use low-sodium tomato juice and skip or reduce celery salt. Add fresh herbs to boost flavor instead.
I personally love a Bloody Mary bar with a tequila twist—something about that earthy flavor pairs beautifully with fresh lime and spicy garnishes. Feel free to experiment and make this setup your own party centerpiece.
Serving & Storage Suggestions
The best way to serve your Bloody Mary bar is chilled, with all garnishes fresh and ready to go. Highball glasses or mason jars work perfectly and add a laid-back vibe. Encourage guests to build their drinks slowly—adding ice first, then the base, followed by garnishes. It’s a fun way to get everyone chatting and tasting.
Complement your Bloody Mary bar with light brunch foods like mini quiches, fresh fruit platters, or savory pastries. For beverages, iced coffee or sparkling water with citrus slices make great non-alcoholic partners.
Leftover Bloody Mary base can be stored in an airtight container in the refrigerator for up to 2 days. Give it a good stir before serving again. Garnishes are best fresh but some, like pickles and olives, can be stored covered in the fridge for several days. If you have leftover bacon or shrimp, keep them refrigerated and use within 24 hours for best taste.
Reheating isn’t recommended for the base, but if you want a warm tomato cocktail, try a Bloody Mary-inspired soup instead. Over time, the flavors in the base meld and deepen, so don’t be surprised if it tastes even better the next day (if it lasts that long!).
Nutritional Information & Benefits
Here’s a rough breakdown for one serving (about 8 oz / 240 ml) of Bloody Mary base with vodka and standard garnishes:
| Nutrient | Amount |
|---|---|
| Calories | 150-180 |
| Carbohydrates | 7-10g |
| Protein | 1-2g |
| Fat | 0-2g |
| Sodium | 500-700mg (variable depending on ingredients) |
Tomato juice packs a punch of vitamin C, potassium, and antioxidants like lycopene, which supports heart health. The fresh lemon juice adds more vitamin C, while horseradish and hot sauce bring metabolism-boosting compounds. Just keep an eye on sodium if you’re watching salt intake.
This recipe can easily be adapted for gluten-free, low-carb, or vegan diets with a few smart swaps. Just remember, the real wellness magic is in enjoying good company and a well-made drink that makes you smile.
Conclusion
If you’re looking for an easy way to impress your guests and make your next gathering a hit, this perfect Bloody Mary bar setup is your answer. It’s flexible, fun, and packed with flavor, letting everyone create their perfect drink without stress. Personally, I love how this setup brings people together—there’s something about sharing garnishes and swapping stories over a spicy, tangy glass that just feels right.
Don’t hesitate to customize the ingredients and garnishes to fit your style or dietary needs. Go ahead, make it your own! If you try this at your next party, I’d love to hear about your favorite combinations and twists. Drop a comment, share your pics, or tell me your go-to garnish below. Cheers to good times and great drinks!
FAQs
What’s the best way to keep garnishes fresh during the party?
Keep garnishes chilled on trays over ice or in the fridge until just before serving. Cover with plastic wrap to prevent drying out.
Can I make the Bloody Mary base ahead of time?
Absolutely! Prepare the base up to 24 hours in advance and store it in the fridge. Stir well before serving.
How do I make a non-alcoholic Bloody Mary?
Simply omit the vodka and add a bit more lemon juice and hot sauce to maintain the flavor punch.
What are some fun garnishes to add besides the classics?
Try pickled okra, spicy green beans, cocktail onions, roasted peppers, or even mini grilled cheese skewers for a playful twist.
How can I make the drink less salty?
Use low-sodium tomato juice and reduce celery salt. Fresh herbs and extra lemon juice help boost flavor without added salt.
Pin This Recipe!

Perfect Bloody Mary Bar Setup Ideas for Easy Party Hosting

Create a customizable and crowd-pleasing Bloody Mary bar that’s quick, easy, and perfect for any occasion. This setup features a flavorful base mix and a variety of fresh garnishes to let guests craft their perfect drink.
- Prep Time: 20 minutes
- Cook Time: 0 minutes
- Total Time: 20 minutes
- Yield: 8 servings 1x
- Category: Beverage
- Cuisine: American
Ingredients
- 4 cups (950 ml) tomato juice (preferably low sodium)
- 1 cup (240 ml) vodka (choose a clean, smooth brand like Tito’s)
- 2 tablespoons (30 ml) fresh lemon juice
- 1 tablespoon (15 ml) Worcestershire sauce
- 1 teaspoon (5 ml) hot sauce (Tabasco or Cholula, adjust to taste)
- 1 tablespoon (15 ml) prepared horseradish
- 1 teaspoon (5 ml) celery salt
- ½ teaspoon (2.5 ml) freshly cracked black pepper
- Celery stalks (for garnish)
- Pickles (dill spears or bread-and-butter)
- Olives (green or black, pimento-stuffed if available)
- Cherry tomatoes
- Cooked bacon strips
- Pickled green beans or asparagus
- Cheese cubes (sharp cheddar or pepper jack)
- Shrimp
- Lemon and lime wedges
- Optional extras: fresh herbs (dill, parsley, chives), celery bitters, smoked paprika or cayenne powder, pickled jalapeños
Instructions
- In a large pitcher, combine 4 cups (950 ml) tomato juice with 1 cup (240 ml) vodka.
- Add 2 tablespoons (30 ml) fresh lemon juice, 1 tablespoon (15 ml) Worcestershire sauce, 1 teaspoon (5 ml) hot sauce, 1 tablespoon (15 ml) prepared horseradish, 1 teaspoon (5 ml) celery salt, and ½ teaspoon (2.5 ml) freshly cracked black pepper.
- Stir well until all ingredients are fully blended.
- Taste and adjust seasonings by adding more hot sauce, lemon juice, or celery salt as desired.
- Optionally chill the base in the refrigerator for 15-30 minutes to let flavors meld, or add ice directly to glasses if short on time.
- Prepare garnishes by arranging celery stalks, pickles, olives, cherry tomatoes, cooked bacon, pickled veggies, cheese cubes, shrimp, and citrus wedges in separate bowls or trays.
- Set up the bar by placing the chilled Bloody Mary base pitcher on the table alongside garnish trays, ice bucket, glasses, and stirrers.
- Encourage guests to fill their glasses with ice, pour the Bloody Mary base, and add garnishes to their liking.
- Remind guests to stir their drinks well for the best flavor.
Notes
Use fresh lemon juice and freshly cracked black pepper for best flavor. Chill the base and garnishes for a refreshing drink. Prepare garnishes a day ahead if needed and store properly. Offer ice separately for guest preference. For a virgin version, omit vodka and add extra lemon juice and hot sauce. Adjust seasoning to taste and keep extra celery salt and hot sauce nearby for guests.
Nutrition
- Serving Size: 1 serving (about 8 o
- Calories: 150180
- Sodium: 500700
- Fat: 2
- Carbohydrates: 710
- Protein: 12
Keywords: Bloody Mary, Bloody Mary bar, party drinks, brunch cocktail, vodka cocktail, DIY cocktail bar, garnishes, easy party drinks


