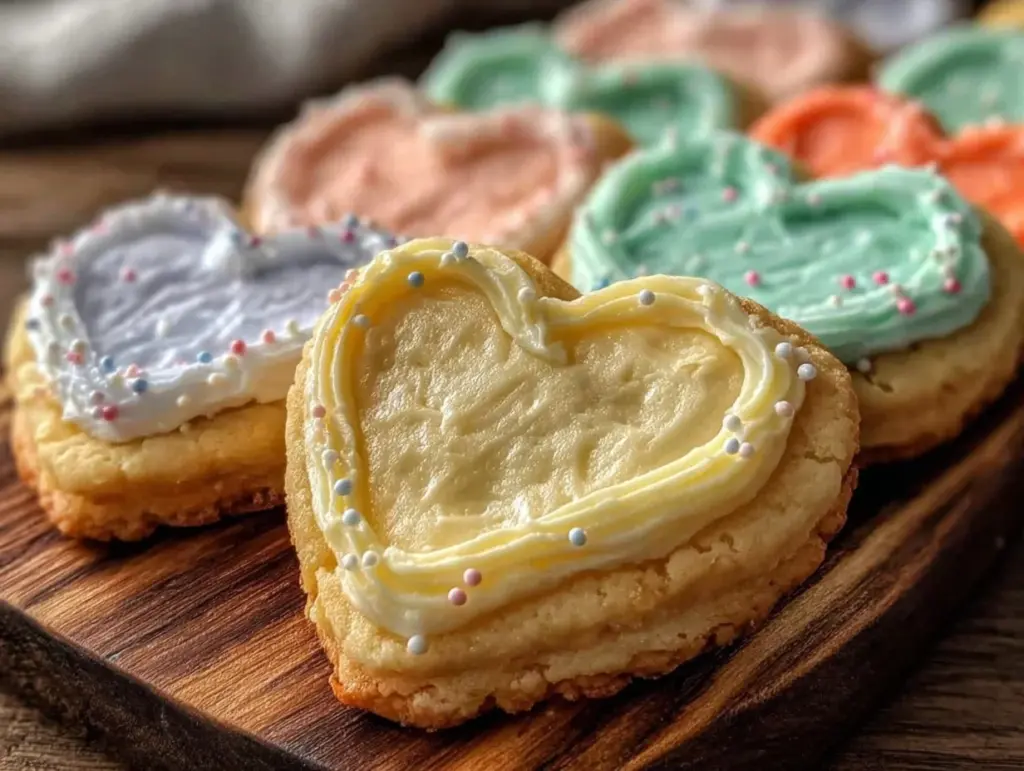
“You know, I wasn’t expecting much when my neighbor, Mrs. Whitaker, handed me a bag of these pastel little cookies last February. I was fixing her leaky faucet, and between the dripping water and the clanging tools, she smiled and said, ‘Try these—they’re my granddaughter’s recipe, and trust me, they’re a hit.’ I took a bite, and honestly, it was like biting into a tiny, sweet love letter. The perfect conversation heart sugar cookies were soft yet crisp on the edges, with that melt-in-your-mouth royal icing that wasn’t too sweet or too thick. What really caught me off guard was how the cookie held its shape so well, even after hours, without cracking or losing that delicate pastel charm. I mean, who knew a plumber’s granddaughter could whip up a cookie that feels like a Valentine’s Day hug?
That afternoon, I scribbled down the recipe on a napkin (right there on her kitchen counter) and promised myself I’d master these cookies. Little did I know, the process—especially the royal icing—would test my patience, my piping skills, and, frankly, my kitchen sanity. I even forgot to preheat the oven once, which led to a slightly underbaked batch that we happily ate anyway. Maybe you’ve been there, too—caught between wanting to impress and just getting it done. But after a handful of trials, tweaks, and a couple of frosting mishaps, I nailed the perfect conversation heart sugar cookies with royal icing that are not only adorable but downright delicious.
These cookies aren’t just for Valentine’s Day; they’re a sweet way to send a message anytime you want to brighten someone’s day. So, let me share how you can make these charming treats at home, with all the tips and tricks I wish I’d had when I started. After all, who doesn’t love a cookie that talks back?
Why You’ll Love This Recipe
Honestly, making perfect conversation heart sugar cookies with royal icing isn’t as intimidating as it seems. I’ve spent enough evenings covered in powdered sugar and royal icing to confidently say this recipe is:
- Quick & Easy: The dough comes together in under 20 minutes, and the royal icing dries fast enough to decorate and serve the same day—perfect for last-minute celebrations or sweet cravings.
- Simple Ingredients: You don’t need any fancy stuff—just basic pantry staples like flour, sugar, butter, and a few eggs. I usually grab my flour from King Arthur for its consistent texture, but any all-purpose will do.
- Perfect for Gifting: These cookies are charmingly nostalgic and make a heartfelt gift for friends, family, or coworkers. Plus, writing custom messages on them adds a personalized touch.
- Crowd-Pleaser: Kids love them for their fun shapes and colors, and adults appreciate the balance of sweet, buttery cookie with silky royal icing.
- Unbelievably Delicious: The cookie’s texture is soft with a slight crunch on the edges, while the royal icing has just the right sweetness and that signature smooth finish that melts in your mouth.
What sets this recipe apart is the icing technique—I blend the royal icing to the perfect consistency for both outlining and flooding, so you get crisp edges and smooth surfaces without the cracking or cloudiness that can plague other recipes. Plus, I’ll walk you through customizing the messages on your cookies, making these little hearts speak your language.
This recipe has stuck with me because it’s approachable yet rewarding, combining the nostalgia of conversation hearts with the satisfaction of homemade baking. Whether you’re a seasoned baker or just starting, these cookies will make you smile—and maybe even spark a few conversations of your own.
What Ingredients You Will Need
This recipe uses simple, wholesome ingredients to deliver that classic sweet flavor and perfect texture without fuss. Most are pantry staples, and you can easily swap a few to fit dietary needs or ingredient availability.
- For the Sugar Cookie Dough:
- 2 ¾ cups (345 g) all-purpose flour (King Arthur or similar for best results)
- 1 teaspoon baking powder
- ½ teaspoon salt
- 1 cup (227 g) unsalted butter, softened (room temperature, not melted)
- 1 ½ cups (300 g) granulated sugar
- 1 large egg (room temperature)
- 2 teaspoons pure vanilla extract
- 2 tablespoons whole milk (or any milk you prefer)
- For the Royal Icing:
- 4 cups (480 g) powdered sugar, sifted (use Domino or C&H for smoothness)
- 3 tablespoons meringue powder (for stability without raw egg whites)
- 5–6 tablespoons warm water (adjust to desired consistency)
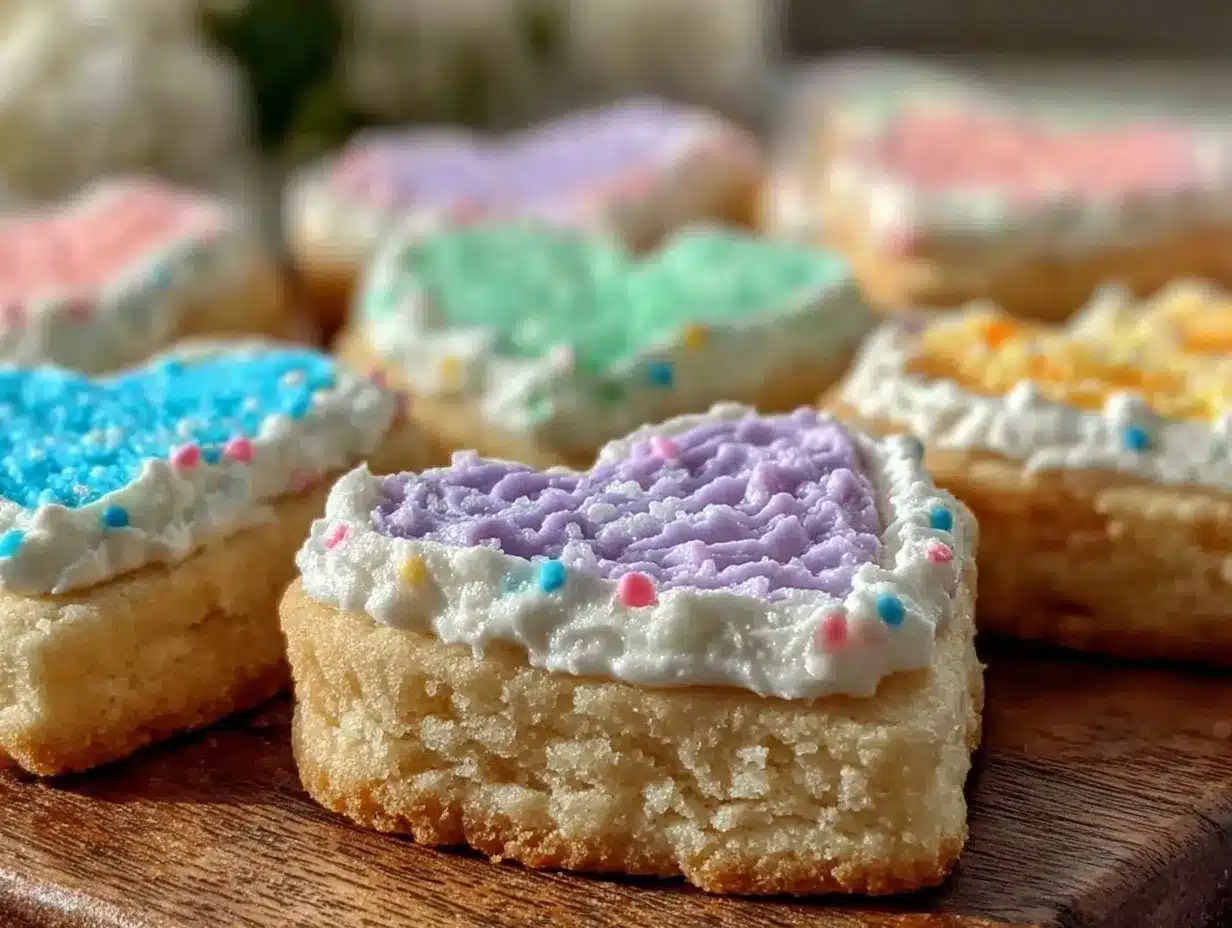
- Food coloring gels (pastels like pink, purple, yellow, green, and white work beautifully)
- Optional: 1 teaspoon vanilla or almond extract for subtle flavor
Ingredient tips: For the butter, I recommend unsalted to control salt level, but salted works in a pinch. If you want gluten-free cookies, swap the flour for a 1:1 gluten-free blend, though texture may vary slightly. For dairy-free, use coconut oil instead of butter and almond or oat milk.
Side note: I always sift my powdered sugar to prevent clumps in the royal icing, which makes piping so much smoother. Also, meringue powder is a game-changer for royal icing—it keeps it stable and safe without raw egg whites.
Equipment Needed
- Stand mixer or hand mixer (a strong mix makes a difference for dough and icing)
- Mixing bowls (medium-sized for dough, small for icing)
- Measuring cups and spoons (accurate measurements are key here)
- Rolling pin (a non-stick or lightly floured one helps prevent sticking)
- Cookie cutters in conversation heart shapes (about 2–3 inches wide)
- Baking sheets lined with parchment paper or silicone mats
- Wire cooling racks (for even cooling and icing drying)
- Piping bags and small round tips (#1 or #2) for outlining and flooding
- Toothpicks or scribe tools (great for popping air bubbles in icing)
If you don’t have a stand mixer, a hand mixer works fine—just give yourself a few extra minutes. For budget-friendly rolling pins, a smooth wine bottle or a clean glass can double up. And if you’re new to piping, zip-top bags with a tiny corner snipped work surprisingly well!
Keeping your piping tips clean during icing is important; I usually have a damp cloth nearby to wipe off excess icing so my lines stay crisp. Also, if your royal icing gets too thick while piping, just add a few drops of water and stir gently.
Preparation Method
- Mix Dry Ingredients: In a medium bowl, whisk together 2 ¾ cups (345 g) flour, 1 teaspoon baking powder, and ½ teaspoon salt. Set aside. This keeps everything evenly distributed—trust me, you don’t want pockets of baking powder.
- Cream Butter and Sugar: Using a stand or hand mixer, beat 1 cup (227 g) softened unsalted butter with 1 ½ cups (300 g) granulated sugar on medium speed until light and fluffy, about 3–4 minutes. You’ll notice the mixture turning pale—this is your crumb’s secret weapon.
- Add Egg, Vanilla, and Milk: Beat in 1 large room-temperature egg, 2 teaspoons vanilla extract, and 2 tablespoons milk until combined, about 1 minute. The batter will look rich and glossy here.
- Incorporate Dry Ingredients: Gradually add the flour mixture in two batches, mixing on low speed just until combined. Avoid overmixing to keep cookies tender.
- Chill the Dough: Divide dough in half, flatten into disks, wrap tightly with plastic wrap, and refrigerate for at least 1 hour. This step is crucial for rolling out smooth, non-sticky dough that holds shape when baked.
- Preheat Oven and Prepare Pans: Preheat oven to 350°F (177°C). Line baking sheets with parchment or silicone mats.
- Roll and Cut: On a lightly floured surface, roll one disk of dough to about ¼ inch (6 mm) thickness. Use conversation heart cookie cutters to cut shapes, then transfer cookies to baking sheets about 1 inch (2.5 cm) apart.
- Bake: Bake for 8–10 minutes, or until edges just begin to turn golden. Watch closely—overbaking leads to hard cookies. Let cool on baking sheet for 5 minutes, then transfer to wire racks to cool completely.
- Prepare Royal Icing: In a mixing bowl, combine 4 cups (480 g) sifted powdered sugar, 3 tablespoons meringue powder, and 5 tablespoons warm water. Beat on low, then high speed for about 7 minutes until stiff peaks form. Adjust water to get two consistencies: thicker for outlining, thinner (add a bit more water) for flooding.
- Color and Pipe: Divide icing into small bowls and tint with gel food coloring. Fit piping bags with small round tips (#1 or #2). Outline each cookie shape with thick icing and let set for 10 minutes. Then flood the inside with thinner icing, using a toothpick to spread evenly and pop air bubbles.
- Decorate Messages: Once flood icing is semi-dry (about 15 minutes), pipe short messages or words on each cookie. Classic phrases like “Be Mine” or “Sweet Talk” work great, or get creative!
- Dry Completely: Let cookies dry at room temperature for at least 4 hours, preferably overnight. This ensures the royal icing hardens perfectly without cracking.
Pro tip: If your workspace is humid, consider drying cookies in front of a fan or in a cool, dry room to avoid sticky icing.
Cooking Tips & Techniques
Making perfect conversation heart sugar cookies with royal icing has a few little quirks, but don’t worry—here are some tips I’ve learned the hard way:
- Butter Temperature: Using butter that’s too soft or melted can make dough greasy and hard to roll. Aim for room temperature—soft but still firm to the touch.
- Chilling the Dough: Don’t skip this! Chilling prevents spreading and helps cookies keep their cute heart shape.
- Rolling Out Dough: Roll evenly to avoid cookies baking unevenly. If dough gets sticky, pop it back in the fridge for a few minutes before continuing.
- Royal Icing Consistency: Getting the right thickness is tricky. Think of thick icing as toothpaste—holds its shape when squeezed. Thin flooding icing should flow smoothly but not be runny. Test with a spoon drip.
- Piping Practice: Practice piping on parchment before decorating cookies. It helps steady your hand and adjust pressure for consistent lines.
- Let Icing Set: Patience is key! Don’t rush drying times or the icing will crack or smudge.
- Storage: Store decorated cookies in an airtight container with parchment layers to prevent sticking.
I once tried speeding up drying by putting cookies in the fridge—it made the icing sweat and lose that smooth finish. Lesson learned: room temperature drying is best.
Variations & Adaptations
While the classic pastel colors and sweet messages are charming, you can customize these cookies in fun ways:
- Dietary Swaps: Use almond flour for gluten-free dough, and swap butter for coconut oil or vegan butter to make a dairy-free batch. For royal icing, aquafaba (chickpea water) can replace meringue powder for a vegan option.
- Flavor Twists: Add a teaspoon of almond extract or lemon zest to the dough for a subtle flavor boost that pairs beautifully with the sweet icing.
- Seasonal Colors: Instead of pastel pinks and purples, try bright reds and whites for Christmas, or orange and black for Halloween-themed hearts with spooky messages.
- Alternative Shapes: Use basic heart or circle cutters and write romantic or playful phrases for anniversaries, birthdays, or just because.
Personally, I once swapped the usual vanilla in the dough for rose water and tinted the icing soft pink—talk about a romantic twist that wowed my book club friends!
Serving & Storage Suggestions
These perfect conversation heart sugar cookies are best served at room temperature, where the cookie’s buttery texture and smooth royal icing shine. Arrange them on a pretty plate or wrap them individually in cellophane tied with ribbon for sweet gifting.
They pair wonderfully with a warm cup of tea, a glass of cold milk, or even a sparkling rosé for grown-up celebrations.
For storage, keep cookies in an airtight container layered with parchment paper to prevent sticking. They last for up to 5 days at room temperature. If you want to keep them longer, freeze undecorated cookies wrapped well for up to 3 months. Decorated cookies freeze less well due to icing texture, but you can freeze them carefully for short periods.
When reheating, avoid microwaves as they can melt the icing. Instead, let frozen cookies thaw at room temperature naturally. The flavors actually mellow and deepen a bit after a day, making them even more enjoyable.
Nutritional Information & Benefits
Each cookie (about 2.5 inches) contains approximately:
| Calories | 140 kcal |
|---|---|
| Carbohydrates | 22 g |
| Fat | 6 g |
| Protein | 1.5 g |
| Sugar | 14 g |
The key ingredients like butter provide a rich source of fat-soluble vitamins, and the egg adds a bit of protein. While these cookies are definitely a treat and not a health food, making them at home gives you control over ingredient quality—meaning no preservatives or artificial additives.
For those watching gluten or dairy, the suggested substitutions make this recipe more inclusive. Just be mindful of food allergies, especially egg and nuts if you use almond flour or coconut oil.
From a wellness perspective, baking these cookies is a fun way to connect with loved ones and slow down—sometimes that’s the biggest benefit of all.
Conclusion
Whether you’re looking to surprise someone with a sweet message or simply want a deliciously nostalgic treat, these perfect conversation heart sugar cookies with royal icing deliver every time. They strike the ideal balance between simplicity and charm, making them accessible for home bakers and impressive enough for special occasions.
Feel free to tweak the colors, flavors, and messages to fit your mood or celebration—you’ll find that part of the joy is making these cookies your own. I still get a little thrill each time I open the cookie tin and spot those cheerful hearts waiting to be shared.
If you try this recipe, I’d love to hear how it went! Drop a comment with your frosting tips, favorite messages, or any sweet mishaps you encountered. Sharing these moments makes baking even sweeter.
Happy baking and happy chatting with these charming little cookies!
FAQs
Can I make the cookie dough ahead of time?
Yes! You can prepare the dough and refrigerate it for up to 3 days before rolling and baking. Just make sure it’s wrapped tightly to prevent drying out.
How long does royal icing take to dry completely?
At room temperature, royal icing usually takes about 4–6 hours to fully harden. For best results, let the decorated cookies dry overnight before storing.
Can I use egg whites instead of meringue powder?
Yes, but for safety and consistency, meringue powder is recommended. If using raw egg whites, ensure they’re pasteurized and handle carefully to avoid contamination.
What’s the best way to fix cracked royal icing?
Cracks often happen if the icing dries too fast or is too thick. Try adding a little more water to thin your icing slightly and pipe a border around the cracked area to disguise it.
How do I store decorated cookies without the icing sticking?
Use layers of parchment paper between cookies in an airtight container. Avoid stacking cookies directly on top of each other to keep the icing intact.
Pin This Recipe!
Perfect Conversation Heart Sugar Cookies Recipe with Easy Royal Icing Tutorial

These charming conversation heart sugar cookies are soft with crisp edges and topped with smooth royal icing, perfect for Valentine’s Day or any occasion. The recipe includes tips for perfect dough and icing consistency for beautiful, personalized messages.
- Prep Time: 20 minutes
- Cook Time: 10 minutes
- Total Time: 1 hour 30 minutes
- Yield: 24 cookies 1x
- Category: Dessert
- Cuisine: American
Ingredients
- 2 ¾ cups (345 g) all-purpose flour
- 1 teaspoon baking powder
- ½ teaspoon salt
- 1 cup (227 g) unsalted butter, softened (room temperature, not melted)
- 1 ½ cups (300 g) granulated sugar
- 1 large egg (room temperature)
- 2 teaspoons pure vanilla extract
- 2 tablespoons whole milk (or any milk you prefer)
- 4 cups (480 g) powdered sugar, sifted
- 3 tablespoons meringue powder
- 5–6 tablespoons warm water (adjust to desired consistency)
- Food coloring gels (pastels like pink, purple, yellow, green, and white)
- Optional: 1 teaspoon vanilla or almond extract for subtle flavor
Instructions
- Mix Dry Ingredients: In a medium bowl, whisk together 2 ¾ cups (345 g) flour, 1 teaspoon baking powder, and ½ teaspoon salt. Set aside.
- Cream Butter and Sugar: Using a stand or hand mixer, beat 1 cup (227 g) softened unsalted butter with 1 ½ cups (300 g) granulated sugar on medium speed until light and fluffy, about 3–4 minutes.
- Add Egg, Vanilla, and Milk: Beat in 1 large room-temperature egg, 2 teaspoons vanilla extract, and 2 tablespoons milk until combined, about 1 minute.
- Incorporate Dry Ingredients: Gradually add the flour mixture in two batches, mixing on low speed just until combined. Avoid overmixing.
- Chill the Dough: Divide dough in half, flatten into disks, wrap tightly with plastic wrap, and refrigerate for at least 1 hour.
- Preheat Oven and Prepare Pans: Preheat oven to 350°F (177°C). Line baking sheets with parchment or silicone mats.
- Roll and Cut: On a lightly floured surface, roll one disk of dough to about ¼ inch (6 mm) thickness. Use conversation heart cookie cutters to cut shapes, then transfer cookies to baking sheets about 1 inch (2.5 cm) apart.
- Bake: Bake for 8–10 minutes, or until edges just begin to turn golden. Let cool on baking sheet for 5 minutes, then transfer to wire racks to cool completely.
- Prepare Royal Icing: In a mixing bowl, combine 4 cups (480 g) sifted powdered sugar, 3 tablespoons meringue powder, and 5 tablespoons warm water. Beat on low, then high speed for about 7 minutes until stiff peaks form. Adjust water to get two consistencies: thicker for outlining, thinner for flooding.
- Color and Pipe: Divide icing into small bowls and tint with gel food coloring. Fit piping bags with small round tips (#1 or #2). Outline each cookie shape with thick icing and let set for 10 minutes. Then flood the inside with thinner icing, using a toothpick to spread evenly and pop air bubbles.
- Decorate Messages: Once flood icing is semi-dry (about 15 minutes), pipe short messages or words on each cookie.
- Dry Completely: Let cookies dry at room temperature for at least 4 hours, preferably overnight.
Notes
Use room temperature butter for best dough texture. Chill dough for at least 1 hour to prevent spreading. Sift powdered sugar to avoid clumps in royal icing. Adjust royal icing consistency for outlining and flooding. Let decorated cookies dry at room temperature for at least 4 hours or overnight for best results. Store cookies in airtight containers with parchment layers to prevent sticking. For gluten-free or dairy-free options, substitute flour and butter accordingly. Avoid refrigerating decorated cookies to prevent icing sweating.
Nutrition
- Serving Size: 1 cookie (about 2.5
- Calories: 140
- Sugar: 14
- Fat: 6
- Carbohydrates: 22
- Protein: 1.5
Keywords: conversation heart cookies, sugar cookies, royal icing, Valentine's Day cookies, easy sugar cookies, decorated cookies, cookie decorating, homemade cookies


