“You won’t believe how this all started,” my neighbor Jake said as he flipped a tiny patty on the grill, “just a last-minute idea for our block party.” I was standing there, watching the sizzle and smelling that irresistible char, utterly hooked. It wasn’t just any burger night—this Perfect Mini Sliders Bar with Assorted Gourmet Toppings came out of what could only be called a happy accident. The summer afternoon was warm, the backyard buzzing with chatter, and honestly, I didn’t expect mini sliders to steal the entire show. But they did.
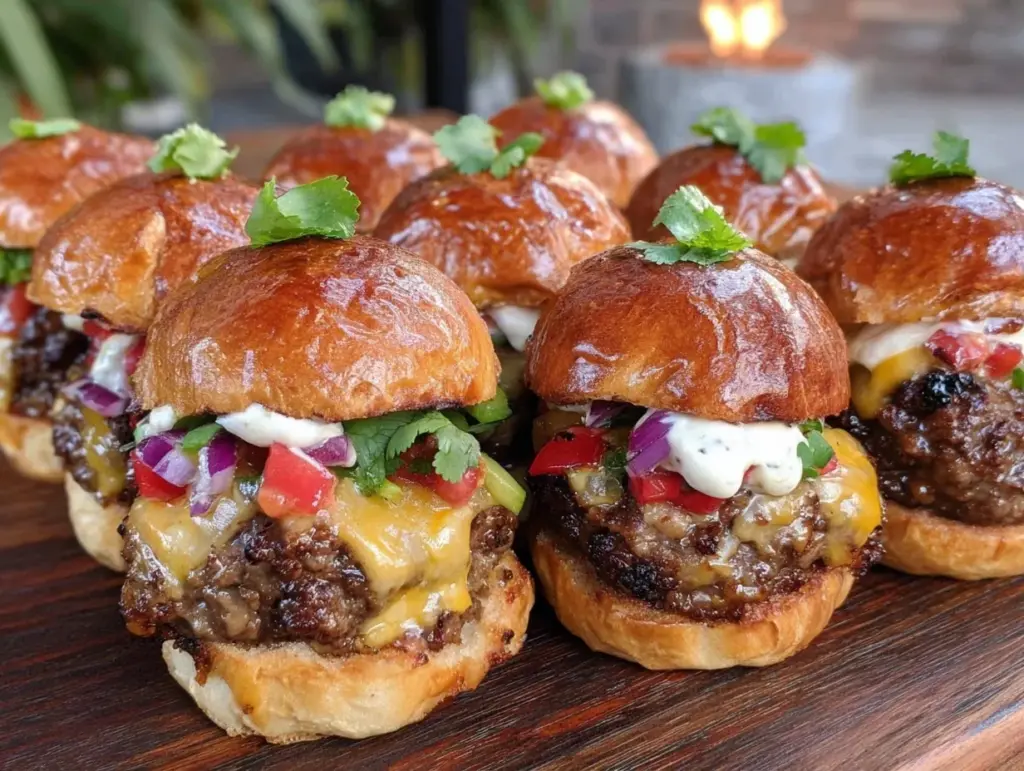
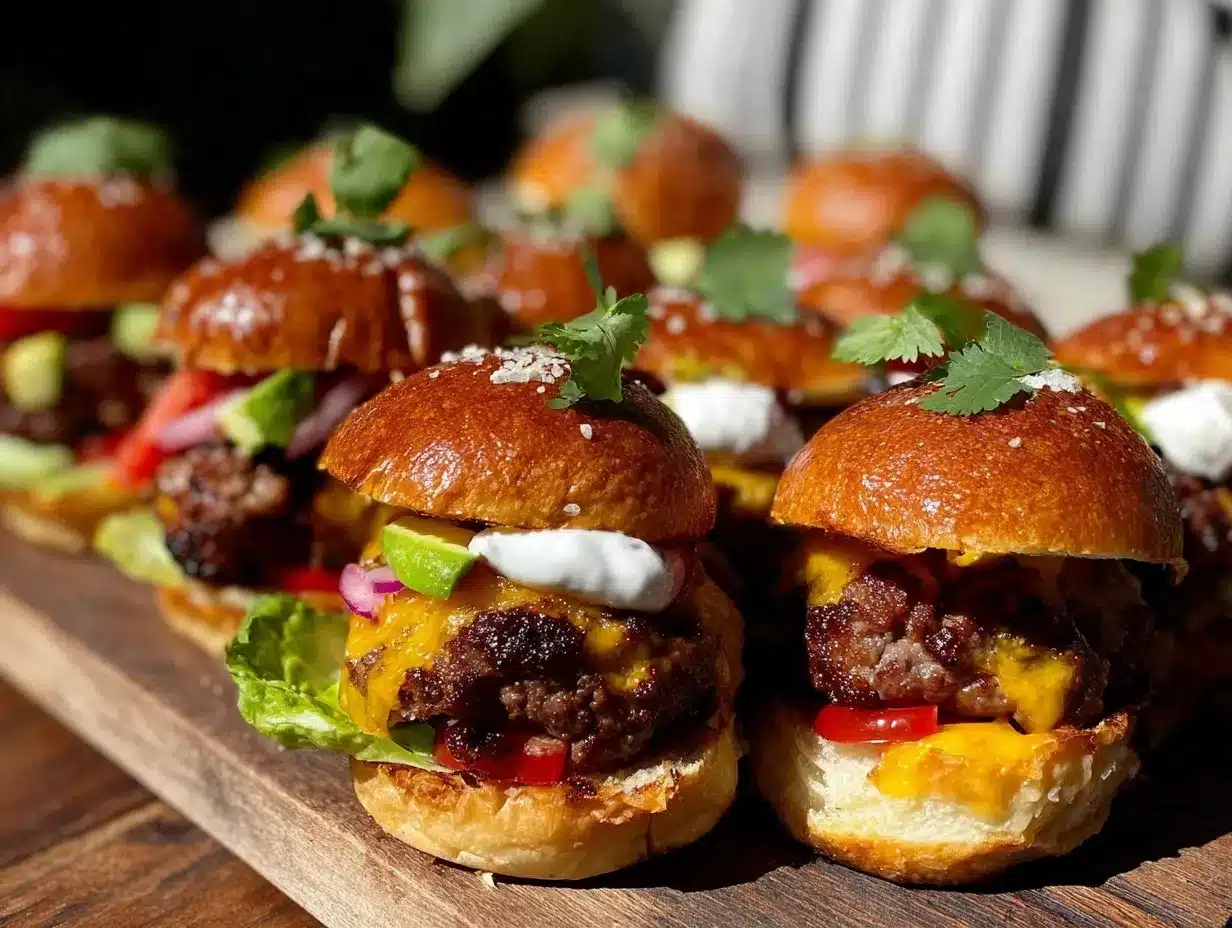
It was more than the tiny size that caught my attention; it was the way every bite packed a punch of flavors, from tangy pickles to creamy aioli, and unexpected touches like caramelized onions and smoked gouda. I remember dropping a slider halfway through because my hands were too full—classic me—but still, I kept coming back for more. Maybe you’ve been there, faced with a dish that looks simple but hits you with layers of taste and texture that keep you guessing.
What stuck with me is how this recipe makes hosting so easy yet impressive. You can have guests customize their own slider exactly how they like it, making it fun and interactive. And let me tell you, it’s not just for summer barbecues; these mini sliders are perfect for game nights, casual dinners, or even a quirky brunch. Keep reading, and I’ll share everything you need to create your own Perfect Mini Sliders Bar with all the gourmet fixings you can imagine.
Why You’ll Love This Recipe
Honestly, there’s something so satisfying about sliders that are perfectly bite-sized yet bursting with flavor. After testing countless batches, I can confidently say this Perfect Mini Sliders Bar recipe nails that balance every single time. Here’s why you’ll want to try it ASAP:
- Quick & Easy: These sliders come together in under 30 minutes, making them ideal for busy weeknights or last-minute gatherings.
- Simple Ingredients: No need for fancy or hard-to-find items—most of what you need is probably already in your pantry or fridge.
- Perfect for Any Occasion: Whether you’re hosting a casual get-together, celebrating game day, or just craving comfort food, these mini sliders fit the bill.
- Crowd-Pleaser: Kids, adults, picky eaters—you name it, everyone loves sliders, especially when they get to choose their own toppings.
- Unbelievably Delicious: The combination of juicy patties, soft buns, and gourmet toppings like garlic aioli and smoked cheeses takes these sliders beyond basic.
What sets this recipe apart is the attention to detail in both the patties and the toppings. For example, blending ground chuck with a touch of brisket adds that perfect, juicy texture without being greasy. Plus, the toppings bar lets you customize every bite—think tangy pickled jalapeños, sweet caramelized onions, or even a dollop of fresh guacamole. No cookie-cutter sliders here. It’s comfort food with personality, and honestly, it’s the kind of recipe that keeps me coming back whenever there’s a crowd to feed or a craving to satisfy.
What Ingredients You Will Need
This Perfect Mini Sliders Bar recipe uses simple, wholesome ingredients to deliver bold flavor and satisfying texture without the fuss. Most are pantry staples, and you can swap or skip toppings based on what you have on hand or your guest preferences.
- For the Sliders:
- 1 lb (450 g) ground chuck beef (80/20 blend for juiciness)
- ½ lb (225 g) ground brisket (optional but recommended for flavor)
- 1 tsp kosher salt
- ½ tsp freshly ground black pepper
- 1 tsp Worcestershire sauce (adds depth)
- Mini slider buns (about 12; I prefer King’s Hawaiian for a slightly sweet contrast)
- Gourmet Toppings Bar:
- Cheeses: smoked gouda, sharp cheddar slices, pepper jack (choose 2-3)
- Pickled jalapeños (for a spicy kick)
- Caramelized onions (slow-cooked for sweetness)
- Fresh arugula or baby spinach (adds peppery freshness)
- Tomato slices, thinly sliced
- Mini dill pickles or bread-and-butter pickles
- Avocado slices or fresh guacamole (optional for creaminess)
- Garlic aioli (mix mayo with minced garlic and lemon juice)
- Mustard and ketchup (classic condiments)
I recommend using fresh, quality beef from your trusted butcher or market. The brisket addition is my secret—it adds fat and flavor without weighing the sliders down. For toppings, pick what you love; in summer, swapping fresh tomatoes for roasted red peppers is a nice twist. Dairy-free? No problem—go for vegan cheese and swap garlic aioli with a simple avocado spread. The choice is yours, and the variety makes this sliders bar so much fun for everyone.
Equipment Needed
- Large mixing bowl for combining the ground meats and seasonings
- Grill or heavy skillet (cast iron works best for that perfect sear)
- Spatula or burger press (optional, but helps keep patties uniform)
- Baking sheet or platter for assembling sliders
- Small bowls or ramekins for arranging toppings
- Sharp knife and cutting board for slicing toppings
If you don’t have a grill, a cast iron skillet is your best friend here—trust me, I’ve made these indoors on a rainy day and the crust turned out beautifully. For portioning, I sometimes use an ice cream scoop to keep slider patties even-sized, which really helps with cooking times. Also, keeping your grill or pan well-oiled prevents sticking and makes flipping easier. Budget-friendly tip: no fancy burger press? Just use your hands and press gently to make 2-inch diameter patties. It’s all about the love you put into it!
Preparation Method
- Mix the Meats: In a large bowl, combine 1 lb (450 g) ground chuck and ½ lb (225 g) ground brisket. Add 1 tsp kosher salt, ½ tsp black pepper, and 1 tsp Worcestershire sauce. Use your hands to gently mix until just combined. Avoid overmixing to keep patties tender. (Approx. 5 minutes)
- Form Patties: Divide the mixture into 12 equal portions (about 2 oz or 56 g each). Roll into balls and then gently flatten into 2-inch (5 cm) diameter patties, about ½ inch (1.3 cm) thick. Make a slight indentation in the center with your thumb to prevent puffing during cooking. (Approx. 10 minutes)
- Preheat Grill or Skillet: Heat your grill to medium-high or place a cast iron skillet over medium heat. Lightly oil the surface to prevent sticking. (Approx. 5 minutes)
- Cook Patties: Place patties on the grill or skillet. Cook for about 3 minutes per side for medium doneness. Avoid pressing down on patties to retain juices. In the last minute of cooking, add cheese slices if using, and cover with a lid or tent with foil to melt. (Approx. 6-8 minutes)
- Prepare Buns and Toppings: While patties cook, slice buns in half and lightly toast them on the grill or in a toaster oven until golden—this adds a nice crunch and keeps buns from getting soggy. Arrange your toppings in small bowls or platters for easy access. (Approx. 10 minutes)
- Assemble Sliders: Place each patty on a toasted bun bottom, add desired toppings, a dollop of garlic aioli or condiments, then top with the bun crown. Encourage guests to build their own at the sliders bar! (Approx. 5 minutes)
- Serve Immediately: Sliders are best enjoyed fresh and warm. Have plenty of napkins on hand—things get delightfully messy! (Optional)
If you’re juggling multiple tasks, cook patties in batches and keep finished sliders warm on a baking sheet in a low oven (about 200°F / 93°C). Pro tip: don’t skip the indentation in the patties—this old trick keeps them from bulging and ensures a beautiful, flat mini burger every time.
Cooking Tips & Techniques
Making the perfect mini sliders isn’t rocket science, but a few tricks can really make the difference. First off, choosing the right meat blend is key. I learned the hard way that straight lean beef can be dry, so mixing chuck with brisket or adding a touch of pork fat keeps each bite juicy.
When forming patties, don’t overwork the meat. It’s tempting to pack them tight, but gentle handling means tender sliders. That little thumb dent? It’s a game-changer for keeping the shape intact.
One common slip is pressing down on the patties while cooking. I admit, I’ve done it (more times than I’d like to admit), but it squeezes out precious juices. Resist the urge! Let the heat do its thing.
Timing is everything. Mini sliders cook fast, so keep an eye on them—about 3 minutes per side is usually perfect for medium. Use a quick sear over higher heat for a flavorful crust without drying out the inside.
Don’t underestimate the power of toasting the buns. It adds texture and helps hold up to juicy toppings. Also, setting up a toppings bar with small bowls keeps things organized and makes the experience interactive and fun for guests.
Variations & Adaptations
This Perfect Mini Sliders Bar recipe is wonderfully flexible. Here are some ideas to tailor it to your taste or dietary needs:
- For a Vegetarian Option: Swap beef patties with black bean or lentil sliders. Top with avocado, spicy mayo, and pickled veggies for a satisfying bite.
- Seasonal Twists: In fall, try adding roasted butternut squash slices and sage aioli. Summer sliders shine with fresh tomato and basil pesto.
- Different Proteins: Use ground turkey or chicken with added herbs for a lighter version. Or go surf-and-turf with mini crab cakes as a topping!
- Gluten-Free Friendly: Use gluten-free slider buns or lettuce wraps. The toppings bar is naturally adaptable for all diets.
- My Favorite Variation: Once, I added a smoky chipotle mayo and swapped smoked gouda for blue cheese crumbles—unexpected but wow, what a flavor punch!
Serving & Storage Suggestions
Serve your mini sliders fresh and warm—right off the grill or skillet is when they taste best. Present them on a large platter with the buns and toppings arranged around for a DIY bar feel. Pair with crispy fries, a fresh salad, or even sweet potato chips.
If you have leftovers (and sometimes you won’t!), store sliders and toppings separately in airtight containers. Refrigerate for up to 2 days. To reheat, wrap sliders in foil and warm in a 350°F (175°C) oven for about 10 minutes to keep buns soft and patties juicy.
Flavors often deepen after a day, especially if you prepared toppings like caramelized onions or aioli in advance. Just remember to add fresh greens or tomatoes at serving time to keep things bright.
Nutritional Information & Benefits
Each mini slider (without toppings) contains approximately 180 calories, 12g fat, 12g protein, and 5g carbohydrates. The beef blend provides a good source of iron and zinc, essential for energy and immune health.
The toppings bar adds nutritional variety: fresh greens supply vitamins A and C, while avocado offers heart-healthy fats. Using whole-grain or gluten-free buns can increase fiber content and accommodate dietary needs.
This recipe is great for balanced eating when paired with fresh veggies and moderate portions. Plus, making sliders yourself means you control the quality of ingredients—no mystery additives or preservatives here!
Conclusion
This Perfect Mini Sliders Bar recipe is more than just a meal; it’s an experience that brings people together with flavor and fun. Whether you’re feeding a crowd or craving a cozy bite, sliders hit that sweet spot of comfort and customization. I love how you can make them your own—mixing and matching toppings, adjusting seasonings, or switching up proteins keeps it fresh every time.
Go ahead, gather your favorite toppings, prep those juicy patties, and watch how these mini delights steal the spotlight at your next gathering. And hey, if you try out a new topping combo or technique, come back and share—I’m always excited to hear how you make this recipe yours!
Frequently Asked Questions
How do I keep mini sliders from falling apart?
Use a meat blend with enough fat (around 20%) and handle the patties gently without overmixing. Adding a small indentation in the center helps them cook evenly and hold shape.
Can I prepare slider patties ahead of time?
Yes! You can form patties and keep them refrigerated for up to 24 hours before cooking. Just cover them tightly to prevent drying out.
What are some good vegetarian slider options?
Black bean, lentil, or chickpea patties work wonderfully. You can also try mushroom-based sliders or use grilled halloumi cheese as a hearty topping.
How do I melt cheese perfectly on mini sliders?
Add cheese during the last minute of cooking and cover the grill or skillet briefly to trap heat, allowing the cheese to melt evenly without overcooking the patty.
What’s the best way to toast slider buns?
Lightly brush buns with butter or olive oil and toast them cut-side down on a grill or skillet over medium heat until golden and slightly crisp. This prevents sogginess when adding juicy toppings.
Pin This Recipe!
Perfect Mini Sliders Bar Recipe Easy Homemade Sliders with Gourmet Toppings

These mini sliders are perfectly bite-sized, juicy, and bursting with flavor, featuring a blend of ground chuck and brisket with a customizable gourmet toppings bar. Ideal for casual gatherings, game nights, or brunch, they come together quickly and are fun to assemble.
- Prep Time: 15 minutes
- Cook Time: 15 minutes
- Total Time: 30 minutes
- Yield: 12 mini sliders 1x
- Category: Main Course
- Cuisine: American
Ingredients
- 1 lb ground chuck beef (80/20 blend for juiciness)
- ½ lb ground brisket (optional but recommended for flavor)
- 1 tsp kosher salt
- ½ tsp freshly ground black pepper
- 1 tsp Worcestershire sauce
- Mini slider buns (about 12; King’s Hawaiian preferred)
- Cheeses: smoked gouda, sharp cheddar slices, pepper jack (choose 2-3)
- Pickled jalapeños
- Caramelized onions
- Fresh arugula or baby spinach
- Tomato slices, thinly sliced
- Mini dill pickles or bread-and-butter pickles
- Avocado slices or fresh guacamole (optional)
- Garlic aioli (mayo mixed with minced garlic and lemon juice)
- Mustard and ketchup
Instructions
- In a large bowl, combine 1 lb ground chuck and ½ lb ground brisket. Add 1 tsp kosher salt, ½ tsp black pepper, and 1 tsp Worcestershire sauce. Mix gently by hand until just combined, avoiding overmixing. (Approx. 5 minutes)
- Divide the mixture into 12 equal portions (about 2 oz each). Roll into balls and gently flatten into 2-inch diameter patties about ½ inch thick. Make a slight indentation in the center with your thumb to prevent puffing during cooking. (Approx. 10 minutes)
- Preheat grill to medium-high or heat a cast iron skillet over medium heat. Lightly oil the surface to prevent sticking. (Approx. 5 minutes)
- Place patties on grill or skillet. Cook about 3 minutes per side for medium doneness. Avoid pressing down on patties. In the last minute, add cheese slices if using and cover with lid or foil to melt. (Approx. 6-8 minutes)
- While patties cook, slice buns in half and lightly toast on grill or in toaster oven until golden. Arrange toppings in small bowls or platters. (Approx. 10 minutes)
- Assemble sliders by placing each patty on a toasted bun bottom, adding desired toppings and a dollop of garlic aioli or condiments, then topping with bun crown. Encourage guests to build their own sliders. (Approx. 5 minutes)
- Serve immediately while warm. Optionally keep finished sliders warm on a baking sheet in a low oven (200°F) if cooking in batches.
Notes
Do not overmix the meat to keep patties tender. Make a thumb indentation in patties to prevent puffing. Avoid pressing patties while cooking to retain juices. Toast buns to prevent sogginess. Cook patties in batches if needed and keep warm in a low oven. For dairy-free, use vegan cheese and avocado spread instead of aioli.
Nutrition
- Serving Size: 1 mini slider
- Calories: 180
- Fat: 12
- Carbohydrates: 5
- Protein: 12
Keywords: mini sliders, homemade sliders, slider recipe, gourmet toppings, party food, easy sliders, beef sliders, game day food


