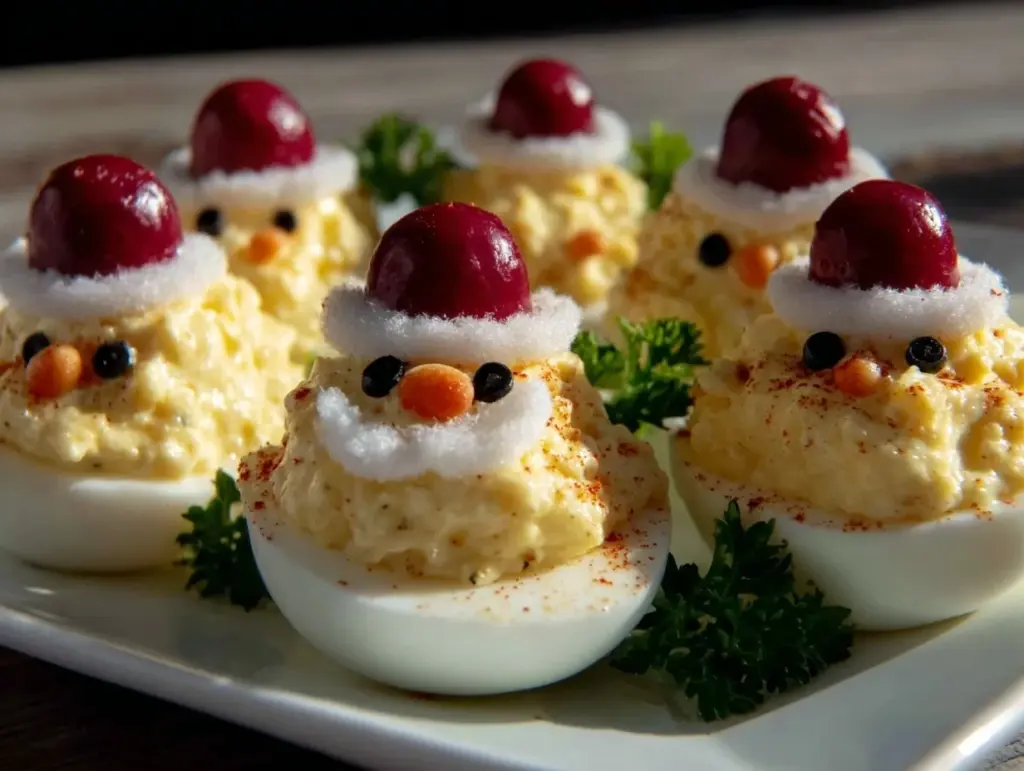
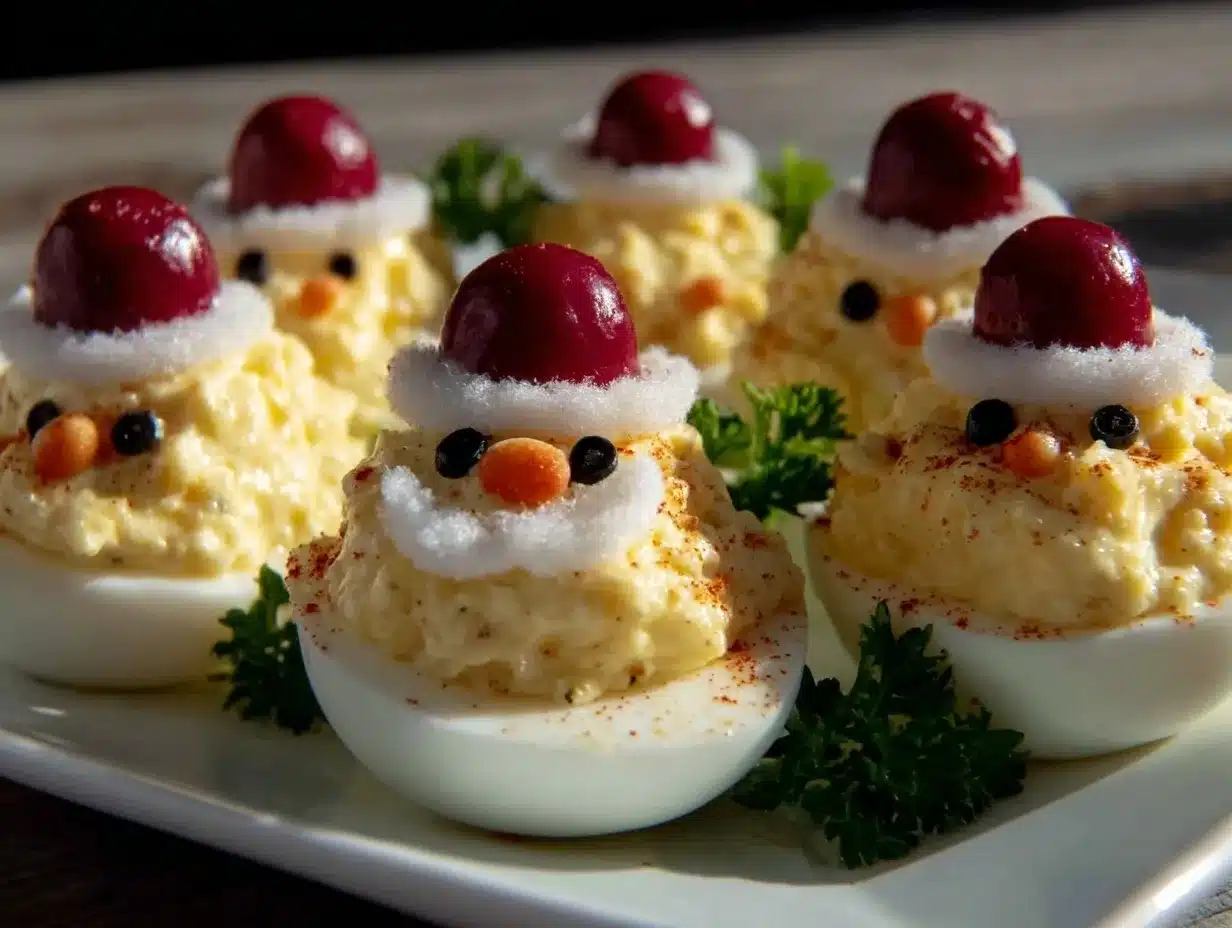
Just imagine this: the aroma of hard-boiled eggs mingling with a hint of smoky paprika, the creamy yolk filling whipped to fluffy perfection, and a platter so cheery it practically begs for a spot on your holiday table. The first time I crafted these Santa Deviled Eggs, the kitchen felt alive—eggshells cracked, laughter bubbled up, and the whole scene was dusted in a little Christmas magic. I’m telling you, the sight of those little “Santa hats” made of juicy red bell pepper and perky parsley beards is enough to make even the Grinch crack a grin.
I stumbled upon the idea years ago, knee-high to a grasshopper and totally enchanted by my grandma’s devotion to festive finger foods. She’d always say, “Food tastes better when it’s cute, honey.” One snowy December, I set out to bring her words to life and, let’s face it, these Santa Deviled Eggs were born out of pure, nostalgic comfort (and a splash of whimsy). That first bite—silky yolk, tangy mustard, and a playful crunch from the veggies—was a moment I paused, fork in hand, and just relished. You know, the kind of moment you want to bottle up for every holiday season after.
Honestly, if you haven’t made these yet, you’re missing out. My family can’t keep their hands off the platter. Cousins sneak them before dinner, kids giggle at their “egg Santas,” and even the pickiest eaters come back for seconds (or thirds). They’re dangerously easy, ridiculously adorable, and so much fun to make with friends or little ones. Perfect for potlucks, cheerful brunches, or when you want your Pinterest board to look extra merry. I’ve tested these more times than I can count (in the name of research, of course), and now they’re a staple for our holiday gatherings, my go-to edible gift, and a surefire way to spread a little joy. Save this Santa Deviled Eggs recipe—you’re going to want to make it every December!
Why You’ll Love This Santa Deviled Eggs Recipe
I’ve made more deviled eggs in my life than I can count—plain old picnic-style, spicy Sriracha, even avocado-laced ones. But these Santa Deviled Eggs? They’re in a festive league all their own. Here’s why you’ll find yourself making them year after year (and probably sneaking a few off the tray before your guests arrive):
- Quick & Easy: You can whip up a whole tray in under 40 minutes—seriously, they’re a holiday lifesaver when you’re short on time or need a last-minute crowd-pleaser.
- Simple Ingredients: No hunting down fancy stuff at specialty shops; everything is likely hanging out in your fridge or pantry already.
- Perfect for Parties: They’re the ultimate finger food—bite-sized, mess-free, and designed to add a pop of cheer to your potluck or family dinner spread.
- Crowd-Pleaser: Kids love the Santa look, grown-ups rave about the creamy filling, and even your “I don’t like eggs” friend can’t resist trying at least one.
- Unbelievably Delicious: The filling is rich but not heavy, tangy from the mustard, and perfectly balanced with just a hint of sweet pickle relish. The fresh veggie toppers add crunch and brightness, making every bite interesting.
What really sets this Santa Deviled Eggs recipe apart is the playful assembly. It’s not just another deviled egg—it’s a hands-on creative project that doubles as a snack (and, trust me, that’s the best kind of cooking). The attention to detail makes each one special, from the pimento nose to the parsley “beard.” My chef brain loves the texture contrast, while my “let’s keep it simple” side loves that you don’t need piping bags or any fancy tools. The end result? A platter that’s as fun to look at as it is to eat.
If you want to make the holidays feel a little more magical, this Santa Deviled Eggs recipe is your secret weapon. It’s comfort food with a twist—festive, fast, and absolutely packed with joy. I promise, these little Santas have a way of making even a regular Tuesday feel like Christmas morning. They’re the kind of treat that makes your guests pause, smile, and say, “How cute are these?!”—all before devouring them two at a time. Give them a go, and you’ll see what I mean.
What Ingredients You Will Need
Making Santa Deviled Eggs doesn’t require a long shopping list or fancy gourmet ingredients. Everything you need is easy to find, and you probably have most of it in your kitchen already. Here’s what goes into making these holiday showstoppers:
- For the Eggs:
- 12 large eggs (use the freshest you can find for easy peeling)
- For the Filling:
- 1/3 cup (75g) mayonnaise (I like Hellmann’s or Duke’s for a smooth, classic base)
- 1 tablespoon (15g) Dijon mustard (or classic yellow for a sweeter touch)
- 1 tablespoon (10g) sweet pickle relish (optional but adds a zingy, sweet crunch)
- 1/4 teaspoon salt (adjust to taste)
- 1/8 teaspoon ground black pepper
- 1/8 teaspoon smoked paprika (adds a subtle smokiness, but regular paprika works too)
- For the Santa Decorations:
- 1 small red bell pepper (for hats and noses—choose a bright, firm one)
- 1-2 tablespoons fresh flat-leaf parsley, finely chopped (for Santa’s beard and hat trim)
- 12 small black olive slices (for eyes—use pitted canned olives for easy slicing)
- 4 tablespoons cream cheese, softened (for “hat trim” detail—full-fat or light both work)
- Optional: 12 tiny pimento pieces (for extra-bright noses, if you like a pop of color)
Ingredient Tips:
- For best results, use eggs that are a few days old—they peel much easier than super-fresh eggs.
- If you want a lighter filling, swap half the mayo with plain Greek yogurt (it adds a little tang and protein, too).
- For dairy-free, use vegan mayo and skip the cream cheese—just use extra parsley for “fluff.”
- You can use chives or dill instead of parsley if you want a different flavor for Santa’s beard.
- If allergic to bell peppers, use grape tomato halves for the hats (they’ll be a little juicier, but still festive!).
Ingredient Sourcing: I like to grab my eggs and veggies from the local farmers’ market when I can—everything feels fresher, and the colors just pop. For the olives and relish, basic grocery store brands work perfectly fine. Don’t get too hung up on the details—it’s the overall effect (and taste!) that counts.
Equipment Needed
You don’t need a whole arsenal of gadgets to make Santa Deviled Eggs, which is part of their charm! Here’s what I use every time:
- Large saucepan or pot (big enough to boil a dozen eggs in a single layer)
- Large bowl (for the ice bath—stops the cooking and makes peeling easier)
- Sharp knife (essential for cleanly halving eggs and dicing veggies)
- Small spoon or teaspoon (for scooping out yolks and filling whites)
- Fork or small bowl whisk (for mashing yolks super-smooth)
- Piping bag or zip-top bag (optional) (if you want ultra-neat filling, but honestly, a spoon works fine)
- Small cutting board (for prepping your bell pepper, parsley, and olives)
- Paper towels (for blotting moisture off eggs and veggies—nobody likes soggy hats!)
- Toothpicks (optional) (helpful for placing tiny details like pimento noses)
Personal tips: I’ve used everything from a ziplock bag with the corner snipped off to a proper piping tip. Both get the job done. If you’re assembling with kids, just use spoons—less mess, more fun. My favorite knife is a small paring knife—it’s nimble for the “Santa hat” details. And don’t stress if you don’t have a fancy deviled egg tray; a pretty holiday plate lined with lettuce works just fine! (Just keep everything dry for best presentation.)
How to Make Santa Deviled Eggs
-
Boil the Eggs (15 minutes):
Place the 12 eggs in a single layer in a large saucepan. Cover with cold water (about 1 inch/2.5cm above the eggs). Bring to a rolling boil over medium-high heat. Once boiling, cover, turn off the heat, and let sit for 10-12 minutes. (Older eggs peel easier, trust me!)
Tip: If you’re at high altitude, add an extra minute or two.
-
Chill & Peel (5 minutes):
Carefully drain the hot water and immediately transfer the eggs to a bowl of ice water. Let them cool at least 5 minutes. Gently tap each egg on the counter and peel under running water.
Note: Don’t rush this step—cold eggs = easier peeling and less frustration.
-
Prep Fillings and Decorations (while eggs cool):
- Finely dice the red bell pepper into 12 small triangles for hats and 12 tiny dots for noses.
- Slice 12 small rounds from your olives for eyes.
- Chop parsley for beards and hat trim.
- Soften cream cheese—let it sit at room temperature for easy spreading.
Warning: Don’t make the decorations too big or they’ll topple off the eggs.
-
Halve & Scoop (5 minutes):
Slice each egg in half lengthwise. Gently pop the yolks into a bowl. Place the whites cut-side up on a serving tray.
Sensory cue: Yolks should be golden and not crumbly.
-
Mix the Filling (5 minutes):
Mash yolks with a fork until smooth. Add 1/3 cup (75g) mayonnaise, 1 tablespoon (15g) Dijon mustard, 1 tablespoon (10g) sweet pickle relish, 1/4 teaspoon salt, 1/8 teaspoon pepper, and 1/8 teaspoon paprika. Mix until creamy.
If you want extra-fluffy filling, use a hand mixer for 30 seconds.
-
Fill the Egg Whites (5 minutes):
Spoon or pipe filling into each egg white, mounding slightly.
Personal tip: A piping bag makes that bakery-style swirl, but a spoon works just as well (and is faster when you’ve got hungry helpers!).
-
Decorate Your Santas (10 minutes):
- Place a red pepper triangle “hat” on each egg, angled for a jaunty look.
- Use a bit of cream cheese (dabbed on with a toothpick or small spoon) to create the hat’s “pom-pom” and trim.
- Stick a black olive round for each eye and a tiny red pepper (or pimento) piece for the nose.
- Sprinkle or press chopped parsley below the filling for Santa’s beard and around the hat rim for extra fluff.
Warning: Handle gently—egg whites can tear if you get too enthusiastic with the decorations!
-
Chill & Serve:
Let the decorated eggs chill in the fridge for at least 30 minutes before serving. This helps the flavors meld and keeps the “hats” in place.
And there you have it—your very own Santa Deviled Eggs, ready to make your holiday party platter the talk of the season!
Cooking Tips & Techniques
After making dozens (sometimes hundreds) of deviled eggs for parties, here’s what I’ve learned the hard way—and what makes this Santa Deviled Eggs recipe foolproof:
- Don’t Overcook the Eggs: Chalky yolks are nobody’s friend. If you’re unsure, pull one egg at 10 minutes and check for a solid, bright yellow yolk. Overcooking leads to greenish edges and a sulfur smell—nobody wants “Grinch” eggs at Christmas!
- Peeling Tricks: Use eggs that are at least 5 days old and cool them quickly in an ice bath. If you have trouble peeling, roll the egg gently on the counter to crack the shell all over, then peel under running water. Sometimes, a stubborn one sneaks in—don’t stress, just use extra parsley to cover any dings.
- Mix That Filling: For super-smooth filling, mash yolks thoroughly. A fork does the trick, but a small whisk or even a hand mixer makes the filling fluffy and lump-free (like a cloud!).
- Piping Bag Hack: Don’t have a piping bag? Snip the corner off a sandwich bag. For rustic charm, just spoon the filling—no one complains when they’re this tasty.
- Keep Decorations Small: Big veggie pieces tend to fall off. Tiny triangles, dots, and slivers work best for the Santa effect. Trust me, I’ve had “Santa hats” go sliding across the platter more times than I care to admit.
- Chill Before Serving: Not only does this set the filling, but it also keeps the decorations crisp. If you’re prepping ahead, store undressed eggs and assemble right before serving for best results.
- Batch Assembly: Get the whole family involved—one person fills, one decorates, one “quality controls” (aka sneaks a taste). It turns into a holiday memory, not just a kitchen task.
Bottom line? Don’t sweat perfection. The joy is in the process—and the smiles when you finally set out a tray of little Santa faces! If something goes sideways, just call it “rustic holiday charm.”
Variations & Adaptations
Santa Deviled Eggs are endlessly adaptable, so you can tweak the recipe to suit your needs, taste buds, or dietary preferences. Here are some of my favorite twists:
- Low-Carb & Keto-Friendly: Sub the sweet pickle relish with diced dill pickles (no sugar, more crunch). Use avocado mayo if you’re skipping dairy.
- Vegetarian & Dairy-Free: Use vegan mayo and skip the cream cheese. For the “hat trim,” just use extra parsley or a strip of vegan cheese.
- Spicy Santa: Add a dash of hot sauce or a pinch of cayenne to the yolk filling for a little kick. You can also use chopped jalapeño instead of bell pepper for the hats—just warn your guests!
- Herb Swap: Try chopped dill or chives instead of parsley for a different “beard” flavor profile. It’s fresh and pairs beautifully with eggs.
- Allergen-Friendly: For those avoiding eggs, stuff mini bell pepper halves with the deviled egg filling and decorate them Santa-style—no eggs required!
Personally, I’ve tried a smoked salmon version: just add a tablespoon of finely chopped smoked salmon to the yolk filling and decorate as usual. It’s a little fancier, and the salty, smokey flavor is a hit with grown-ups. Play around, make them your own, and don’t be afraid to improvise with what’s in your fridge. After all, Santa’s magic is all about making do with what you have!
Serving & Storage Suggestions
Santa Deviled Eggs shine brightest when served cold, arranged neatly on a festive platter. I like to nestle them on a bed of fresh parsley or lettuce leaves—practical and pretty! If you want to be extra, sprinkle a few pomegranate arils or cranberries around for holiday color. Pair them with sparkling cider, hot chocolate, or a crisp white wine to keep the party vibe going strong.
For storage, keep the eggs in a single layer in an airtight container in the fridge. Add a sheet of wax paper or parchment between layers if you’re stacking. They’ll stay fresh for up to 2 days, but best enjoyed within the first 24 hours for peak flavor and texture (and perky Santa hats!).
To reheat, well, you don’t really want to—deviled eggs are meant to be cold. If you have leftovers, mash them up into an egg salad and serve on toast the next day. Pro tip: The flavors deepen as they chill, so making them a few hours ahead is never a bad idea. If the parsley or hats look wilted, just add fresh right before serving.
Nutritional Information & Benefits
Each Santa Deviled Egg half (decorations included) has roughly 60-70 calories, 4g fat, 2g protein, and 1g carbohydrate. Eggs bring a solid dose of protein and choline (good for brain health), while the veggies add a dash of vitamin C and fiber. If you use Greek yogurt in the filling, you’ll sneak in a bit more protein and calcium, too.
This Santa Deviled Eggs recipe is naturally gluten-free and can easily be made low-carb or dairy-free with simple swaps. Allergens to watch for include eggs and dairy (in the cream cheese). For those watching sodium, use a low-salt mayo and skip extra salt in the filling.
From a wellness perspective, I love that these offer holiday fun without loads of sugar or processed flour. They’re satisfying, festive, and easy to fit into just about any eating plan—so everyone at your holiday table can join in the snacky joy.
Conclusion
Santa Deviled Eggs aren’t just a treat—they’re a celebration on a plate. They’re playful, practical, and pack a punch of holiday happiness in every bite. Whether you’re making them for a family brunch, a classroom party, or just to add a little cheer to your own kitchen, this recipe is a winner.
Customize the hats, play with the filling, or let the kids take charge of decorating—whatever you do, you’ll be making more than just food. You’ll be making memories. Personally, these eggs remind me of my grandma’s kitchen—warm, bustling, and full of laughter. And that’s why they’ll always have a spot at my table.
So, what are you waiting for? Give this Santa Deviled Eggs recipe a try, leave a comment with your own twist, or share your holiday platter pics. I’d love to see how you make these Santas your own! Wishing you a season full of good food, giggles, and—of course—a platter of eggy, festive fun.
FAQs About Santa Deviled Eggs Recipe
How far in advance can I make Santa Deviled Eggs?
You can prep the filling and the egg whites a day ahead, store them separately in the fridge, and assemble the Santas a few hours before serving. This keeps everything fresh and the decorations crisp.
Can I use store-bought hard-boiled eggs?
Absolutely! Pre-cooked eggs save time—just check that they’re not rubbery, as super-fresh is always tastier. Slice and fill as usual for a speedy platter.
What’s a good substitute for mayonnaise in the filling?
You can use plain Greek yogurt or a dairy-free mayo for a lighter or allergy-friendly option. The flavor will be a bit tangier but still delicious.
How do I keep the decorations from falling off?
Keep the “hats” and eyes small, and chill the eggs for at least 30 minutes before serving—this helps everything stick. If needed, use a dab of cream cheese as “glue.”
Can I make these for other holidays?
Definitely! Swap the red pepper hats for carrot triangles and parsley for chives, and you’ve got Easter bunnies or even spooky Halloween monsters. The base deviled eggs are a blank canvas for holiday fun.
Pin This Recipe!

Santa Deviled Eggs Recipe: Easy Holiday Party Platter Idea

Santa Deviled Eggs are a festive twist on classic deviled eggs, decorated to look like Santa faces with red pepper hats, parsley beards, and olive eyes. They’re quick, adorable, and perfect for holiday parties or family gatherings.
- Prep Time: 20 minutes
- Cook Time: 15 minutes
- Total Time: 40 minutes
- Yield: 24 deviled egg halves 1x
- Category: Appetizer
- Cuisine: American
Ingredients
- 12 large eggs
- 1/3 cup mayonnaise
- 1 tablespoon Dijon mustard (or yellow mustard)
- 1 tablespoon sweet pickle relish (optional)
- 1/4 teaspoon salt
- 1/8 teaspoon ground black pepper
- 1/8 teaspoon smoked paprika (or regular paprika)
- 1 small red bell pepper
- 1–2 tablespoons fresh flat-leaf parsley, finely chopped
- 12 small black olive slices
- 4 tablespoons cream cheese, softened
- Optional: 12 tiny pimento pieces
Instructions
- Place eggs in a single layer in a large saucepan and cover with cold water (about 1 inch above eggs). Bring to a rolling boil over medium-high heat. Once boiling, cover, turn off heat, and let sit for 10-12 minutes.
- Drain hot water and transfer eggs to a bowl of ice water. Cool for at least 5 minutes, then peel under running water.
- While eggs cool, finely dice red bell pepper into 12 triangles for hats and 12 dots for noses. Slice olives into 12 rounds for eyes. Chop parsley for beards and hat trim. Soften cream cheese.
- Slice each egg in half lengthwise. Remove yolks and place whites cut-side up on a serving tray.
- Mash yolks with a fork until smooth. Add mayonnaise, mustard, relish, salt, pepper, and paprika. Mix until creamy.
- Spoon or pipe filling into each egg white, mounding slightly.
- Decorate each egg: place a red pepper triangle hat, dab cream cheese for hat trim and pom-pom, add olive rounds for eyes, red pepper or pimento for nose, and parsley for beard and hat trim.
- Chill decorated eggs in the fridge for at least 30 minutes before serving.
Notes
Use eggs that are a few days old for easier peeling. Decorations work best when kept small. For dairy-free, use vegan mayo and skip cream cheese. Chill eggs before serving to help decorations stick. Get kids involved for a fun holiday activity.
Nutrition
- Serving Size: 1 deviled egg half
- Calories: 65
- Sugar: 0.7
- Sodium: 110
- Fat: 4
- Saturated Fat: 1.5
- Carbohydrates: 1
- Fiber: 0.2
- Protein: 2
Keywords: Santa deviled eggs, holiday appetizer, Christmas party food, festive deviled eggs, kid-friendly, party platter, finger food, Christmas recipe


