“Hey, did you ever think a tiny tart could turn your whole afternoon around?” That was me, muttering under my breath while fumbling with store-bought pastry shells one rainy Saturday. Honestly, I was skeptical about trying to make mini fruit tart cups from scratch. I figured it’d be a lot of fuss for something so small. But as I whipped up the creamy vanilla filling and carefully arranged fresh berries on top, something clicked. The sweet aroma of vanilla mingled with buttery crust filled the kitchen, and suddenly, it felt like a little celebration was happening just for me.
These Perfect Mini Fruit Tart Cups with Creamy Vanilla Filling became my go-to when I needed a quick pick-me-up or a charming treat for unexpected guests. What’s funny is that I didn’t set out to make them at all; I was aiming for a simple dessert but ended up creating something that had everyone asking for seconds. The balance of crisp, tender crust with that luscious, dreamy vanilla cream and vibrant fruit? It’s a small slice of joy, honestly.
It’s that kind of recipe that sticks with you—not because it’s fancy or complicated, but because it’s honest and delightful. If you want a sweet bite that’s as pretty as it is satisfying, this one’s worth keeping close. After all, sometimes the simplest things bring the most comfort, and these tart cups are exactly that.
Why You’ll Love This Recipe
Trust me, after making these mini fruit tart cups a handful of times (yes, I may have made them three times in a single week), you’re going to appreciate how this recipe checks nearly every box:
- Quick & Easy: From crust to cream, it comes together in under an hour, making it perfect for last-minute cravings or surprise visitors.
- Simple Ingredients: No need for fancy or hard-to-find items. Most come right from your pantry and fridge.
- Perfect for Any Occasion: Whether it’s a brunch, a casual tea party, or a light dessert after dinner, these tart cups fit right in.
- Crowd-Pleaser: Kids, adults, picky eaters—everyone seems to love the creamy vanilla paired with fresh fruit.
- Unbelievably Delicious: The creamy vanilla filling is silky smooth, and the crust offers a buttery crunch that perfectly complements the fruit’s freshness.
This isn’t just another fruit tart recipe. The secret lies in the creamy vanilla filling—it’s richer and silkier than your usual custard, thanks to a touch of cream cheese folded in. Plus, the crust is lovingly baked to a golden crisp but stays tender enough to melt in your mouth. Honestly, it’s a little better than what you’ll find at most bakeries. Plus, if you enjoy making elegant yet easy appetizers, you might appreciate how these tart cups pair beautifully with the festive cranberry cream cheese spread I shared recently—a sweet and savory combo that never fails.
What I love most is how this recipe invites you to get creative with fruit choices and toppings, making it a perfect canvas for seasonal flavors or personal favorites. It’s comfort food with a fresh twist, and honestly, once you try it, you’ll understand why I keep going back to this recipe.
What Ingredients You Will Need
This recipe uses simple, wholesome ingredients to deliver bold flavor and satisfying texture without the fuss. Most ingredients are pantry staples or easy to swap, so you won’t need a special trip to the store.
- For the Tart Crust:
- All-purpose flour – 1 1/4 cups (150g)
- Unsalted butter, cold and cubed – 1/2 cup (113g) (I prefer Plugrá for a rich flavor)
- Powdered sugar – 1/4 cup (30g) (adds a subtle sweetness)
- Salt – 1/4 teaspoon
- Ice water – 2-3 tablespoons (to bring dough together)
- For the Creamy Vanilla Filling:
- Cream cheese, softened – 4 ounces (115g) (use full-fat for best creaminess)
- Heavy cream – 1/2 cup (120ml)
- Powdered sugar – 1/3 cup (40g)
- Pure vanilla extract – 1 teaspoon (real vanilla is a game changer)
- Optional: a pinch of salt to balance sweetness
- For the Topping:
- Fresh mixed fruit – about 1 1/2 cups total (think blueberries, sliced strawberries, kiwi, raspberries)
- Apricot jam or honey – 2 tablespoons (warmed, for a shiny glaze)
- Fresh mint leaves for garnish (optional)
Feel free to swap the all-purpose flour with almond flour if you’re looking for a gluten-free crust option. For dairy-free needs, coconut cream can replace the heavy cream, and vegan cream cheese works well too. In summer, I love switching up the fruit to include fresh peaches or nectarines. It keeps things seasonal and bright.
Equipment Needed
To make these mini fruit tart cups, you don’t need fancy gear, but a few tools will make life easier:
- Mini tart pans or a muffin tin: I usually use a standard 12-cup muffin tin lined with paper liners or silicone molds if you don’t have tart pans.
- Mixing bowls: For the crust dough and separate bowl for the vanilla filling.
- Electric mixer or hand mixer: Whipping the cream cheese and heavy cream is way simpler with a mixer, but a sturdy whisk can work if you’re patient.
- Rolling pin: For rolling out the crust dough thinly and evenly.
- Small brush: To apply warm apricot jam glaze on the fruit.
If you don’t have a rolling pin, a clean wine bottle works in a pinch (trust me, I’ve used that trick plenty of times). Also, silicone tart pans clean up nicely and don’t require greasing, which is a nice bonus. When using a muffin tin, just make sure to press the dough firmly into the cups for a crisp edge. I’ve found this recipe works well even with minimal equipment, so don’t let that stop you.
Preparation Method
- Make the Tart Crust: In a large bowl, whisk together 1 1/4 cups (150g) flour, 1/4 cup (30g) powdered sugar, and 1/4 teaspoon salt. Add the cold, cubed butter (1/2 cup/113g) and use a pastry cutter or your fingers to work it into the dry ingredients until the mixture resembles coarse crumbs (this takes about 3-5 minutes). Slowly add 2 tablespoons of ice water, mixing gently until the dough just comes together. Avoid overworking it to keep the crust tender.
Wrap the dough in plastic wrap and chill for at least 30 minutes. - Prepare the Vanilla Filling: While the dough chills, beat 4 ounces (115g) softened cream cheese with 1/3 cup (40g) powdered sugar until smooth using an electric mixer. In a separate bowl, whip 1/2 cup (120ml) heavy cream until soft peaks form. Gently fold the whipped cream into the cream cheese mixture along with 1 teaspoon vanilla extract and a pinch of salt. Set aside in the fridge.
- Roll and Shape the Crust: Preheat the oven to 350°F (175°C). On a lightly floured surface, roll the chilled dough to about 1/8-inch (3 mm) thickness. Using a round cutter slightly larger than your tart pans or muffin cups, cut out circles. Press each circle into the tart pan or muffin tin cup, trimming excess dough. Poke the bottom a few times with a fork to prevent puffing.
- Bake the Tart Shells: Bake for 12-15 minutes until lightly golden. Keep an eye on edges to avoid burning. Remove from oven and let cool completely before filling. If you see any puffing, gently press down with a spatula as soon as it comes out of the oven.
- Assemble the Tart Cups: Spoon or pipe the creamy vanilla filling into each cooled crust, filling just shy of the top. Arrange fresh mixed fruit on top—think blueberries, sliced strawberries, kiwi, and raspberries for color and texture.
- Glaze the Fruit: Warm 2 tablespoons apricot jam or honey until runny. Using a small brush, gently glaze the fruit to give it a shiny finish and to keep it fresh longer.
- Chill and Serve: Refrigerate the tart cups for at least 30 minutes before serving to allow the filling to set. Garnish with fresh mint leaves if you like.
Tip: If your dough feels too sticky while rolling, pop it back in the fridge for 10 minutes. Also, don’t skip chilling the tart shells after baking—it helps the filling stay put. If you want to speed things up, you can prepare the filling the night before and keep it covered in the fridge.
Cooking Tips & Techniques
Making mini fruit tart cups can seem fiddly, but with a few tricks, you’ll get a flawless batch every time. First off, cold butter is key for that perfect crumbly crust. If your butter gets too warm, the dough turns greasy and tough. I learned this the hard way when I tried rushing the process.
When mixing the filling, don’t overmix once you fold in the whipped cream—it can deflate the fluffiness you worked for. Use a gentle folding motion with a spatula, like you’re coaxing the mixture into lightness.
One common mistake is baking the tart shells too long, resulting in dried-out crusts. Keep an eye on them, and pull them out as soon as the edges turn golden. If you want to prevent sogginess once filled, consider brushing the shells with a thin layer of melted white chocolate or egg wash before baking.
Multitasking tip: While the crust chills, whip your filling and prep fruit. This keeps the process smooth and saves time. Also, if you’re short on fresh fruit, frozen berries (thawed and drained) can work in a pinch.
Finally, for a stunning presentation, pipe the vanilla filling instead of spooning—it just looks more polished when guests arrive. Speaking of guests, these tart cups always make a great impression alongside other party favorites like the creamy salmon dip.
Variations & Adaptations
Want to switch things up? These mini fruit tart cups are super versatile:
- Dietary Twist: Use a gluten-free flour blend and coconut cream to make it dairy-free without losing that creamy texture.
- Seasonal Flavors: Swap out fruit for autumnal options like spiced poached pears and figs or tropical mango and passion fruit in the summer.
- Flavor Boost: Add a teaspoon of lemon zest to the vanilla filling for a fresh zing or a splash of almond extract for a nutty undertone.
- Cooking Method: Try baking the crusts in a mini muffin tin lined with parchment cups if tart pans aren’t handy. It works surprisingly well.
- Personal Favorite: I once layered a thin spread of homemade strawberry jam in the crust before filling it with vanilla cream. It added a lovely fruity surprise inside.
Feel free to customize these tart cups based on what’s in your kitchen or your mood. They’re forgiving and eager to please.
Serving & Storage Suggestions
These tart cups are best served chilled or at room temperature. I find they’re perfect straight from the fridge on a sunny afternoon or as a light dessert after dinner. For presentation, arrange them on a pretty platter with a few sprigs of fresh mint to brighten the look.
They pair wonderfully with a cup of herbal tea or a glass of sparkling wine for a little indulgence. If you’re hosting a party, they complement savory bites like the zesty garlic marinated mushrooms beautifully.
To store, keep the tart cups refrigerated in an airtight container for up to 3 days. If you want to prepare crusts ahead, bake and cool them, then store in a sealed bag at room temperature for up to 2 days before filling. Avoid filling too far in advance to prevent sogginess.
When reheating, these tarts are best enjoyed cold, but if you prefer, let them sit at room temperature for 15 minutes for softer filling. The flavors actually deepen a bit after a day, so leftovers are pretty delightful.
Nutritional Information & Benefits
These mini fruit tart cups offer a modest treat with roughly 180-220 calories per tart, depending on fruit choice and portion size. The filling’s cream cheese and heavy cream provide calcium and healthy fats, while the fresh fruit adds a boost of vitamins, antioxidants, and fiber.
While they contain gluten and dairy, substitutions like almond flour and coconut cream can make them accessible for many dietary needs. The recipe balances indulgence with fresh, wholesome ingredients, making it a nicer alternative to overly processed sweets.
From a wellness perspective, I appreciate that these tarts satisfy sweet cravings without feeling heavy or artificial. They’re the kind of dessert you enjoy slowly, savoring each bite, which makes them more fulfilling.
Conclusion
Perfect Mini Fruit Tart Cups with Creamy Vanilla Filling are one of those recipes you’ll find yourself making again and again—not because they’re complicated, but because they hit that sweet spot between simple and special. They’re easy to customize, quick to put together, and always impress with their fresh, creamy, and buttery goodness.
Whether you’re baking for a casual family treat or a small gathering, these tart cups offer a delicate balance of texture and flavor that’s hard to beat. I love how they allow me to showcase fresh fruit in a fun, elegant way without the stress.
Give this recipe a try, tweak it to your taste, and let me know how yours turn out. I’m always curious to hear about your favorite fruit combos or any twists you add to make it your own. Happy baking!
Frequently Asked Questions
Can I make the tart crust ahead of time?
Absolutely! You can prepare and bake the tart shells up to two days ahead. Store them in an airtight container at room temperature to keep them crisp before filling.
What fruits work best for topping these mini tarts?
Fresh berries like strawberries, blueberries, raspberries, and kiwi slices are classic choices. You can also use peaches, mangoes, or figs depending on the season and your preference.
Is there a dairy-free option for the creamy filling?
Yes. Swap the cream cheese with a vegan alternative and use coconut cream instead of heavy cream. The texture will be slightly different but still delicious.
How do I prevent the crust from getting soggy?
Make sure to fully bake and cool the tart shells before adding the filling. You can also brush a thin layer of melted white chocolate or an egg wash on the crust before baking for an extra barrier.
Can I freeze these mini fruit tart cups?
It’s best to freeze the tart shells before filling. Once filled with the creamy vanilla and topped with fruit, freezing can affect the texture. If you do freeze filled tarts, thaw in the fridge and expect a softer crust.
Pin This Recipe!

Perfect Mini Fruit Tart Cups Recipe Easy Homemade Vanilla Filling

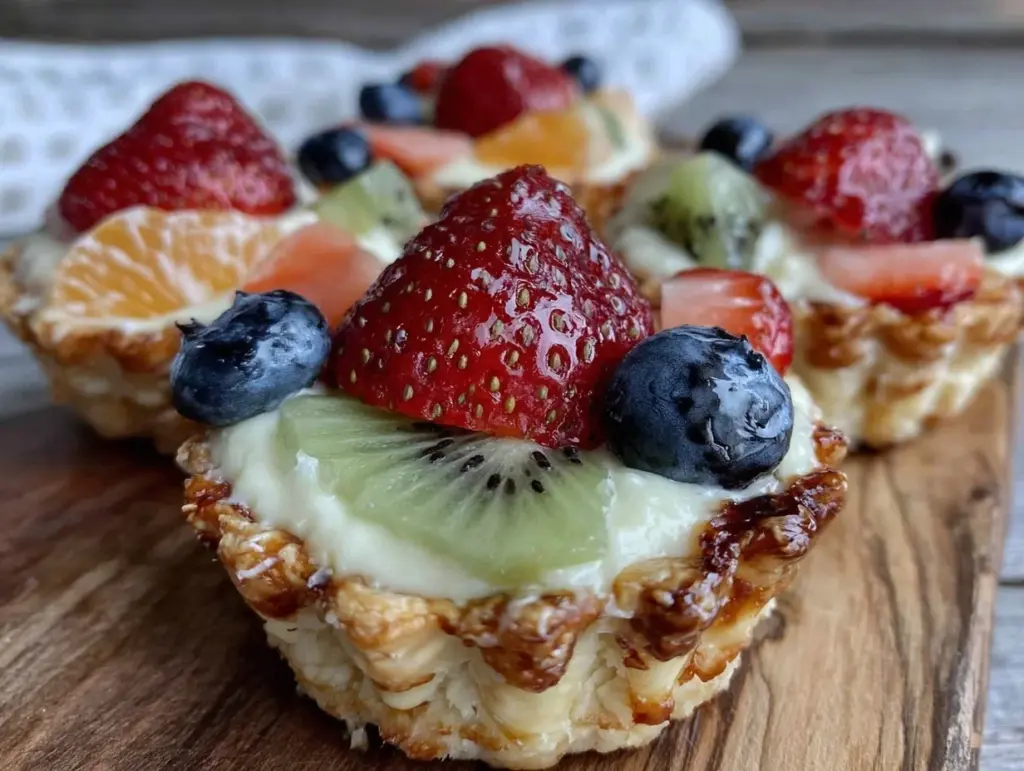
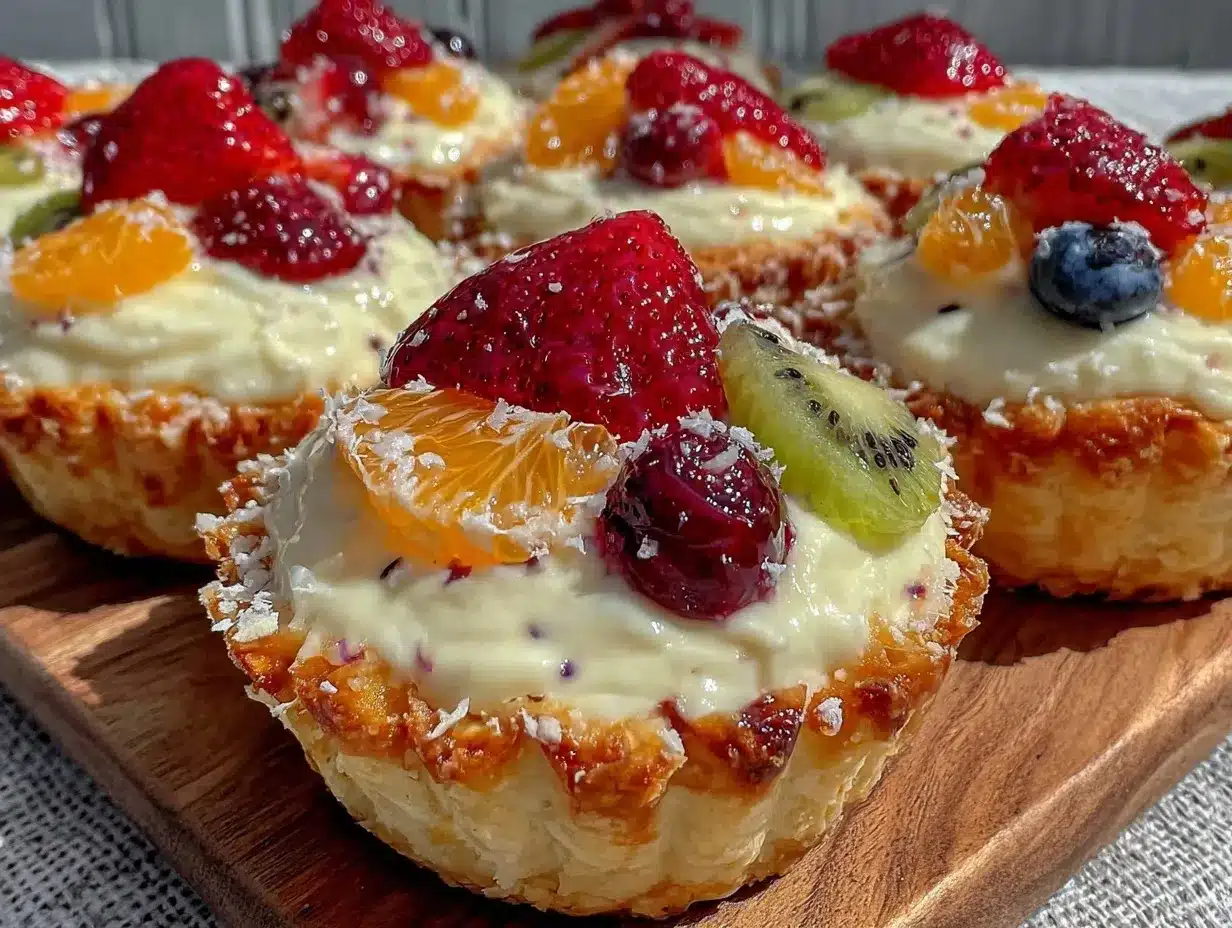
These mini fruit tart cups feature a buttery, tender crust filled with a silky creamy vanilla filling and topped with fresh mixed fruit. Quick and easy to make, they are perfect for any occasion and customizable with seasonal fruits.
- Prep Time: 15 minutes
- Cook Time: 15 minutes
- Total Time: 1 hour
- Yield: 12 servings
- Category: Dessert
- Cuisine: American
Ingredients
- All-purpose flour – 1 1/4 cups (150g)
- Unsalted butter, cold and cubed – 1/2 cup (113g)
- Powdered sugar – 1/4 cup (30g)
- Salt – 1/4 teaspoon
- Ice water – 2-3 tablespoons
- Cream cheese, softened – 4 ounces (115g)
- Heavy cream – 1/2 cup (120ml)
- Powdered sugar – 1/3 cup (40g)
- Pure vanilla extract – 1 teaspoon
- Optional: a pinch of salt
- Fresh mixed fruit – about 1 1/2 cups (blueberries, sliced strawberries, kiwi, raspberries)
- Apricot jam or honey – 2 tablespoons (warmed)
- Fresh mint leaves for garnish (optional)
Instructions
- Make the Tart Crust: In a large bowl, whisk together flour, powdered sugar, and salt. Add cold, cubed butter and work into dry ingredients until mixture resembles coarse crumbs. Slowly add ice water, mixing gently until dough just comes together. Wrap dough in plastic wrap and chill for at least 30 minutes.
- Prepare the Vanilla Filling: Beat softened cream cheese with powdered sugar until smooth. In a separate bowl, whip heavy cream until soft peaks form. Gently fold whipped cream into cream cheese mixture along with vanilla extract and a pinch of salt. Refrigerate until ready to use.
- Roll and Shape the Crust: Preheat oven to 350°F (175°C). Roll chilled dough to about 1/8-inch thickness. Cut circles slightly larger than tart pans or muffin cups. Press circles into pans, trim excess dough, and poke bottoms with a fork.
- Bake the Tart Shells: Bake for 12-15 minutes until lightly golden. Remove from oven and cool completely before filling. Press down any puffed areas gently with a spatula.
- Assemble the Tart Cups: Spoon or pipe vanilla filling into cooled crusts, filling just shy of the top. Arrange fresh mixed fruit on top.
- Glaze the Fruit: Warm apricot jam or honey until runny. Using a small brush, gently glaze the fruit for shine and freshness.
- Chill and Serve: Refrigerate tart cups for at least 30 minutes before serving. Garnish with fresh mint leaves if desired.
Notes
Use cold butter for a tender crust. Avoid overworking dough to keep crust tender. Chill dough before rolling. Do not overbake tart shells to prevent dryness. Brush shells with melted white chocolate or egg wash before baking to prevent sogginess. Prepare filling ahead to save time. Frozen berries can be used if fresh are unavailable.
Nutrition
- Serving Size: 1 mini tart cup
- Calories: 200
- Sugar: 12
- Sodium: 90
- Fat: 13
- Saturated Fat: 8
- Carbohydrates: 20
- Fiber: 2
- Protein: 3
Keywords: mini fruit tart cups, vanilla filling, easy dessert, homemade tart, fresh fruit dessert, creamy vanilla, buttery crust