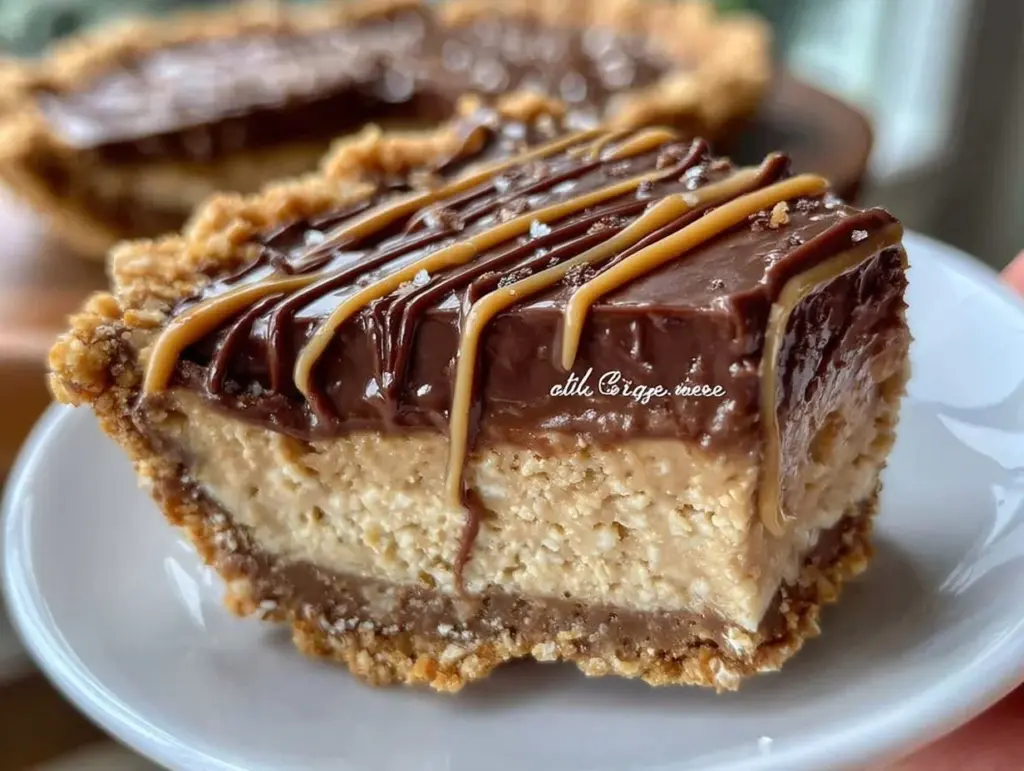
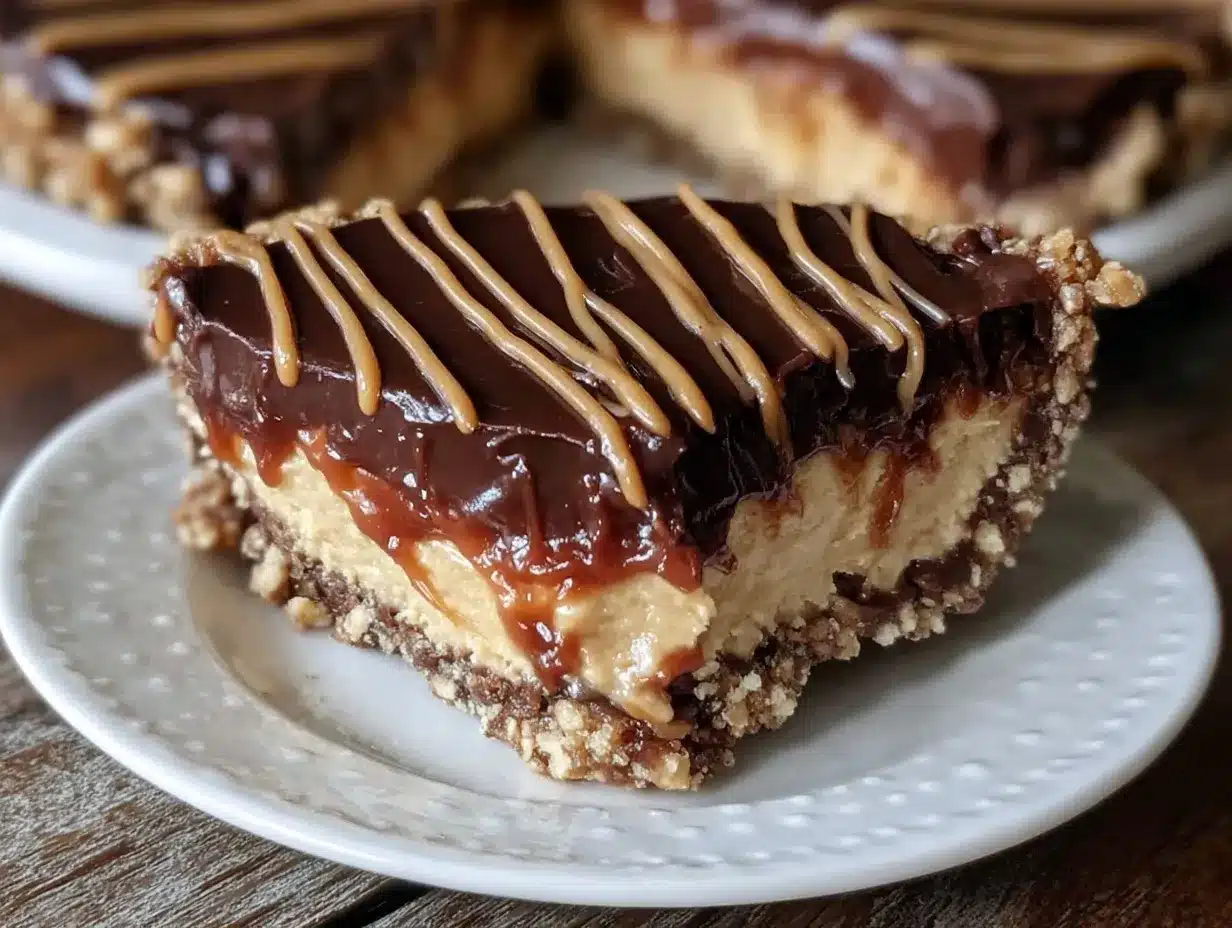
“You seriously have to try that peanut butter pie I made last night.” — and that was it. My roommate’s text came through late on a Friday when I was half-watching a cooking show but mostly scrolling through my phone. Honestly, I was skeptical at first — a no-bake pie that’s actually creamy and rich? But curiosity got the better of me. The next day, I gave it a shot, and now I can’t quite stop thinking about this creamy no-bake peanut butter cup pie. It’s that kind of dessert that sneaks up on you with its buttery crust and luscious filling, and suddenly, the world feels a bit sweeter.
What’s funny is that this recipe doesn’t come from some fancy kitchen or complicated process. It’s more like a happy accident, born from a lazy afternoon when I didn’t want to turn on the oven (because, honestly, who wants to heat up the kitchen in summer?). The peanut butter flavor is seriously comforting, and the chunks of peanut butter cups scattered throughout add just the right touch of nostalgia and indulgence. You know that feeling when you take a bite and close your eyes because it just hits the spot? That’s exactly what this pie does.
There’s something quietly satisfying about a dessert that’s both simple to put together and impressively creamy. It’s not one of those over-the-top recipes where you need a dozen gadgets or weird ingredients. No, this one feels like a cozy hug in pie form—perfect for when you want to treat yourself or surprise friends without a ton of fuss. I remember sharing this pie at a casual get-together, and it vanished faster than I expected. It’s just that good.
So, if you’re looking for a creamy, dreamy dessert that doesn’t need baking and delivers on peanut butter goodness, this no-bake peanut butter cup pie might just become your new favorite. It’s got personality, it’s got charm, and honestly, it’s the kind of recipe that makes you wonder why you didn’t make it sooner.
Why You’ll Love This Recipe
Let me tell you why this creamy no-bake peanut butter cup pie has been on heavy rotation in my kitchen:
- Quick & Easy: You can whip this up in under 20 minutes, making it perfect for those last-minute dessert emergencies or casual weekend treats.
- Simple Ingredients: No obscure items here—just pantry staples and a few peanut butter cups (because, well, why not?).
- Perfect for Gatherings: Whether it’s a birthday, a barbecue, or a chill movie night, this pie fits right in.
- Crowd-Pleaser: Every time I’ve brought this to friends, it’s been the first dish to disappear—kids and adults alike can’t resist it.
- Unbelievably Delicious: The silky peanut butter filling with the crunch of chocolate cups creates a texture and flavor combo that’s pure comfort food magic.
What really makes this recipe stand apart is how effortlessly it balances richness without feeling heavy. I’ve tried a bunch of peanut butter pies before, and sometimes they’re too sweet or too dense. This one has a lightness to it thanks to a whipped cream base and just the right amount of peanut butter, plus a buttery, crunchy crust that’s not soggy or bland. Also, folding in chopped peanut butter cups is a little trick I stole from a friend’s twist on classic desserts—it adds a playful texture that makes every bite exciting.
Honestly, this pie isn’t just a dessert; it’s a little celebration on a plate. It’s the kind of recipe that feels both indulgent and approachable, so you get that cozy satisfaction without the stress. I tend to make it when I want to surprise guests but don’t want to disappear in the kitchen all day. And since it’s no-bake, it’s a perfect partner to some of my favorite savory dishes, like the fresh shrimp salad with creamy herb dressing—a light combo that balances sweet and savory beautifully.
What Ingredients You Will Need
This recipe uses simple, wholesome ingredients to deliver bold flavor and satisfying texture without the fuss. Most of these are probably hanging out in your pantry or fridge already, so no surprise grocery runs needed!
- For the crust:
- 1 ½ cups (150g) graham cracker crumbs (or crushed digestive biscuits)
- 6 tablespoons (85g) unsalted butter, melted (adds richness and holds the crust together)
- 3 tablespoons (40g) granulated sugar (balances the buttery flavor)
- For the filling:
- 1 cup (250g) creamy peanut butter (smooth style works best for that silky texture)
- 8 ounces (225g) cream cheese, softened (room temperature to avoid lumps)
- 1 cup (120g) powdered sugar, sifted (for smooth sweetness)
- 1 ½ cups (360ml) heavy whipping cream, cold (helps create that light, airy creaminess)
- 1 teaspoon pure vanilla extract (just a touch to round out the flavors)
- Add-ins:
- 1 cup (150g) chopped peanut butter cups (feel free to use your favorite brand; I like Reese’s for the perfect combo of chocolate and peanut butter)
You can swap out the graham cracker crumbs for crushed pretzels or even gluten-free cookies if needed. For a dairy-free version, try using coconut cream instead of heavy cream and a plant-based cream cheese alternative—though the texture will shift a bit. If you’re feeling adventurous, adding a pinch of sea salt to the crust or the filling can really pop the flavors.
Equipment Needed
- 9-inch (23cm) pie dish — glass or ceramic works great, but I’ve used metal pans too (just watch chilling times).
- Mixing bowls — one large for whipping cream and another for combining peanut butter and cream cheese.
- Electric mixer or stand mixer — highly recommended for whipping the cream and smoothing the filling. Hand-whisking is possible but a bit of an arm workout.
- Rubber spatula — for folding ingredients gently without losing air.
- Measuring cups and spoons — precise measurements make a difference, especially with baking powder and sugar.
If you don’t have a pie dish, a springform pan works well for easy removal. For budget-friendly options, I’ve seen great results with simple glass pie plates from discount stores. Keeping your mixing bowls chilled beforehand helps the cream whip up faster, which is a neat trick I learned after a few failed attempts. Also, if you don’t own a mixer, a chilled metal whisk and some patience will do the job, just expect it to take a little longer.
Preparation Method
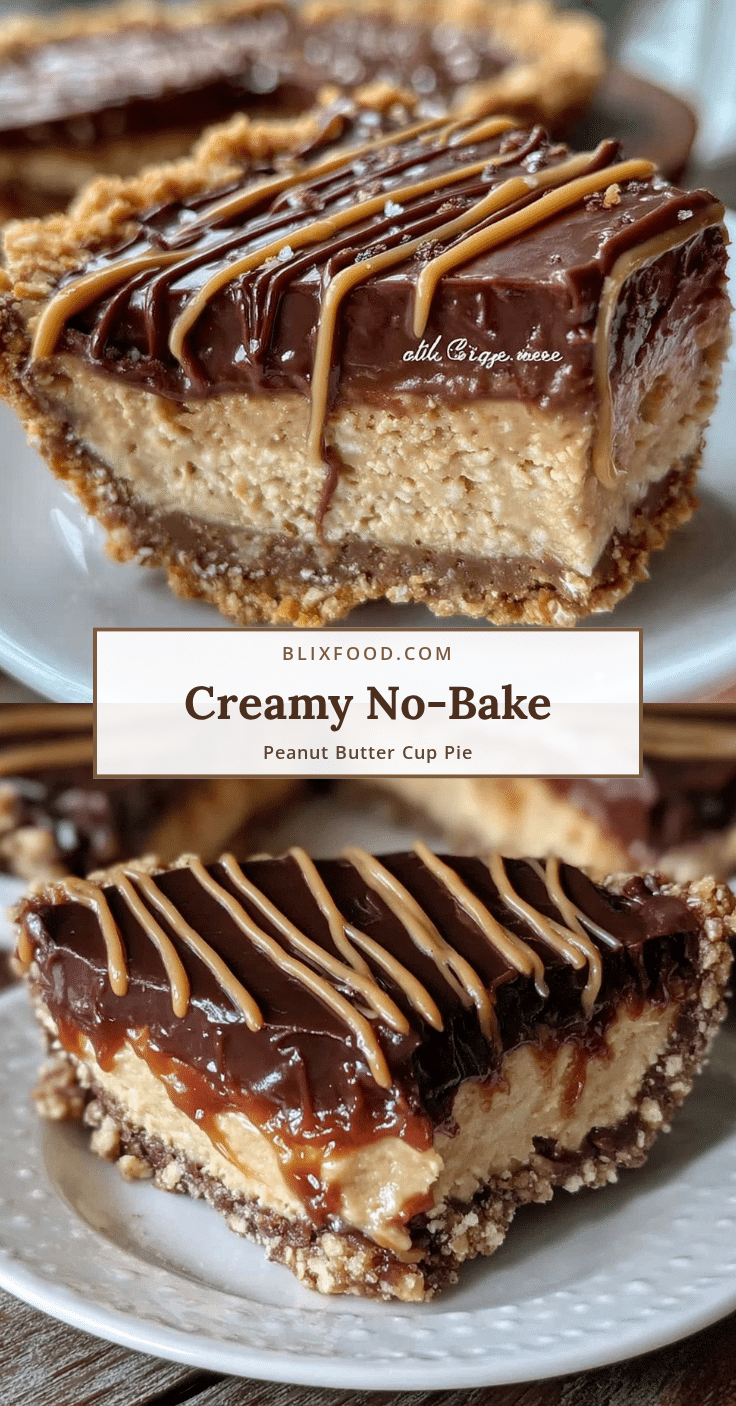
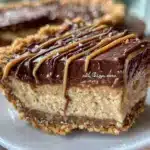
- Make the crust (10 minutes): In a medium bowl, combine 1 ½ cups graham cracker crumbs, 6 tablespoons melted unsalted butter, and 3 tablespoons granulated sugar. Stir until crumbs are evenly coated and the mixture holds together when pressed. Press the crumb mixture firmly into the bottom and up the sides of your 9-inch pie dish. Use the bottom of a glass or measuring cup to pack it down tightly. Pop it in the fridge to chill while you prepare the filling.
- Prepare the filling base (10 minutes): In a large bowl, beat 8 ounces softened cream cheese until smooth and creamy. Add 1 cup creamy peanut butter and 1 cup sifted powdered sugar. Mix until fully combined and silky. This is the heart of your pie—smooth and rich but not too heavy.
- Whip the cream (5 minutes): In a separate chilled bowl, whip 1 ½ cups cold heavy cream with 1 teaspoon vanilla extract until soft peaks form. Keep a close eye—if you whip too much, it turns grainy and separates. You want it light and fluffy, not stiff.
- Fold cream into peanut butter mixture (5 minutes): Gently fold the whipped cream into the peanut butter mixture, using a rubber spatula. Do this slowly to keep the airy texture intact. The filling should be light, creamy, and spreadable, with no streaks.
- Add chopped peanut butter cups (1 minute): Fold in 1 cup chopped peanut butter cups, saving a few pieces for garnish if you like. These add that irresistible little bit of crunch and chocolate bite.
- Assemble and chill (at least 4 hours): Spoon the filling into the chilled crust and smooth the top with your spatula. Cover with plastic wrap and refrigerate for at least 4 hours, preferably overnight. This helps the pie set perfectly and lets the flavors meld.
- Serve: When ready, garnish with the reserved peanut butter cup pieces or a light dusting of cocoa powder if you’re feeling fancy. Slice with a sharp knife dipped in hot water for clean cuts.
Tip: If your peanut butter is super thick, microwave it for 15 seconds before mixing to make folding easier. Also, keep the pie refrigerated until serving to avoid any meltdown disasters. I learned that the hard way at a summer picnic once!
Cooking Tips & Techniques
Getting this creamy no-bake peanut butter cup pie just right is mostly about technique rather than complex cooking. Here are some tips I swear by:
- Softened cream cheese is key: If it’s too cold, you get lumps in your filling. Let it sit out for at least 30 minutes or microwave in 10-second bursts if you’re in a rush.
- Whip the cream just right: Stop whipping as soon as soft peaks form. Overwhipping creates butter, which ruins the texture.
- Folding gently: When you fold the whipped cream into the peanut butter mixture, think of it like folding in egg whites for a souffle. Use a light hand to keep the air trapped inside for fluffiness.
- Chill time matters: Don’t skip the refrigeration step! The filling firms up and flavors deepen. I’ve tried eating it too soon, and it’s tasty but way messier.
- Crust pressing: Press the crust firmly to prevent crumbling later. I use a flat-bottomed glass, which gives a smooth, even base.
I once accidentally doubled the powdered sugar because I wasn’t paying attention, and the pie turned out way too sweet—lesson learned. Also, prepping the crust while your cream cheese softens is a great way to save time. Multitasking in the kitchen keeps things moving smoothly.
Variations & Adaptations
This no-bake peanut butter cup pie is super versatile. Here are some ways I’ve tweaked it to suit different tastes and occasions:
- Chocolate Lover’s Edition: Add a layer of melted chocolate ganache on the crust before pouring in the filling. Let it harden for a snappy chocolate base.
- Low-Sugar Version: Use powdered erythritol or another sugar substitute instead of powdered sugar. Just adjust sweetness to taste.
- Nut-Free: Substitute sunflower seed butter for peanut butter and use allergy-friendly chocolate cups.
- Seasonal Twist: Stir in a handful of crushed pretzels or toasted nuts for a salty crunch—perfect for fall gatherings.
- Vegan Adaptation: Use coconut cream instead of heavy cream, vegan cream cheese, and a plant-based peanut butter cup alternative (or homemade chocolate chunks).
Personally, I’ve made a version where I swapped the peanut butter cups for chopped dark chocolate and sea salt—a little less sweet but just as addictive. If you like combining sweet and savory, this pie pairs nicely with some light appetizers like the creamy cheese-stuffed cherry tomatoes, which offer a fresh contrast.
Serving & Storage Suggestions
This pie tastes best served chilled but not ice-cold—take it out of the fridge about 10 minutes before slicing for the perfect creamy texture. Use a sharp knife dipped in hot water to get clean, beautiful slices that hold their shape.
For presentation, sprinkle with extra chopped peanut butter cups or a dusting of cocoa powder. It pairs wonderfully with a cup of strong coffee or a cold glass of milk—classic combos that never fail.
Store leftovers tightly wrapped in the fridge for up to 4 days. The flavors actually deepen overnight, making the pie taste even better the next day. If you want to freeze it, cover it well and freeze for up to 1 month. Thaw in the fridge overnight before serving; just note the texture might be slightly softer after freezing.
Nutritional Information & Benefits
One slice of this creamy no-bake peanut butter cup pie (1/8th of the pie) roughly contains:
| Nutrient | Amount |
|---|---|
| Calories | 360 kcal |
| Fat | 25g (mostly from peanut butter and cream) |
| Carbohydrates | 28g |
| Protein | 7g |
| Sugar | 18g |
While this dessert is definitely a treat, peanut butter provides some protein and healthy fats, and the inclusion of cream cheese adds calcium and a bit of creaminess without excess sugar. If you’re mindful of sugar intake, adjusting powdered sugar as mentioned can help. It’s gluten-friendly if you use gluten-free crackers for the crust.
From a wellness perspective, I appreciate that it’s made with real ingredients—no weird additives or preservatives. Sometimes, treating yourself to a homemade dessert like this feels better than grabbing something processed. Plus, sharing it with friends or family adds a little joy that’s hard to quantify.
Conclusion
This creamy no-bake peanut butter cup pie is absolutely worth trying if you want a dessert that’s fuss-free but full of flavor and texture. It’s flexible enough to make your own, whether that means adding a salty twist or going fully vegan. For me, it’s become a go-to when I want to impress without slaving away in the kitchen.
I love how it brings out the best in simple ingredients, and how the peanut butter cups scattered inside feel like a surprise treat in every bite. Plus, the no-bake factor means you can enjoy it any time of the year without heating up your house.
If you give this pie a try, I’d love to hear how you make it your own! Leave a comment sharing your favorite variations or stories about your first bite. Because, honestly, desserts this good deserve to be talked about and shared widely.
FAQs about Creamy No-Bake Peanut Butter Cup Pie
Can I make this pie ahead of time?
Absolutely! It actually tastes better after chilling overnight. Just cover it tightly and keep refrigerated until ready to serve.
What if I don’t have cream cheese?
You can try substituting with mascarpone or ricotta for a slightly different texture, but cream cheese gives the best balance of creaminess and tang.
Can I use crunchy peanut butter instead of creamy?
You can, but creamy peanut butter blends more smoothly, giving you that signature silky filling. Crunchy will add texture but might be a bit grainy.
Is this pie freezer-friendly?
Yes, you can freeze it for up to a month. Thaw in the fridge overnight before serving. The texture might soften a little but it’s still delicious.
What’s the best way to serve this pie?
Serve chilled with a sprinkle of chopped peanut butter cups or cocoa powder. It goes great with coffee or a cold glass of milk.
Pin This Recipe!
Creamy No-Bake Peanut Butter Cup Pie
A rich and creamy no-bake peanut butter cup pie with a buttery graham cracker crust and luscious peanut butter filling, perfect for easy desserts and gatherings.
- Prep Time: 20 minutes
- Cook Time: 0 minutes
- Total Time: 4 hours 20 minutes
- Yield: 8 servings 1x
- Category: Dessert
- Cuisine: American
Ingredients
- 1 ½ cups (150g) graham cracker crumbs (or crushed digestive biscuits)
- 6 tablespoons (85g) unsalted butter, melted
- 3 tablespoons (40g) granulated sugar
- 1 cup (250g) creamy peanut butter (smooth style)
- 8 ounces (225g) cream cheese, softened
- 1 cup (120g) powdered sugar, sifted
- 1 ½ cups (360ml) heavy whipping cream, cold
- 1 teaspoon pure vanilla extract
- 1 cup (150g) chopped peanut butter cups
Instructions
- Make the crust (10 minutes): In a medium bowl, combine graham cracker crumbs, melted unsalted butter, and granulated sugar. Stir until crumbs are evenly coated and the mixture holds together when pressed. Press the crumb mixture firmly into the bottom and up the sides of a 9-inch pie dish. Use the bottom of a glass or measuring cup to pack it down tightly. Refrigerate while preparing the filling.
- Prepare the filling base (10 minutes): In a large bowl, beat softened cream cheese until smooth and creamy. Add creamy peanut butter and sifted powdered sugar. Mix until fully combined and silky.
- Whip the cream (5 minutes): In a separate chilled bowl, whip cold heavy cream with vanilla extract until soft peaks form.
- Fold cream into peanut butter mixture (5 minutes): Gently fold the whipped cream into the peanut butter mixture using a rubber spatula to keep the airy texture intact.
- Add chopped peanut butter cups (1 minute): Fold in chopped peanut butter cups, reserving a few pieces for garnish if desired.
- Assemble and chill (at least 4 hours): Spoon the filling into the chilled crust and smooth the top. Cover with plastic wrap and refrigerate for at least 4 hours or overnight to set.
- Serve: Garnish with reserved peanut butter cup pieces or a dusting of cocoa powder. Slice with a sharp knife dipped in hot water for clean cuts.
Notes
Softened cream cheese is key to avoid lumps. Whip cream until soft peaks form to prevent graininess. Fold whipped cream gently to keep airiness. Chill pie for at least 4 hours or overnight for best texture. Microwave peanut butter for 15 seconds if too thick. Use a sharp knife dipped in hot water for clean slices.
Nutrition
- Serving Size: 1 slice (1/8th of th
- Calories: 360
- Sugar: 18
- Fat: 25
- Carbohydrates: 28
- Protein: 7
Keywords: no-bake pie, peanut butter pie, peanut butter cup pie, easy dessert, creamy pie, no-bake dessert, peanut butter dessert