Introduction
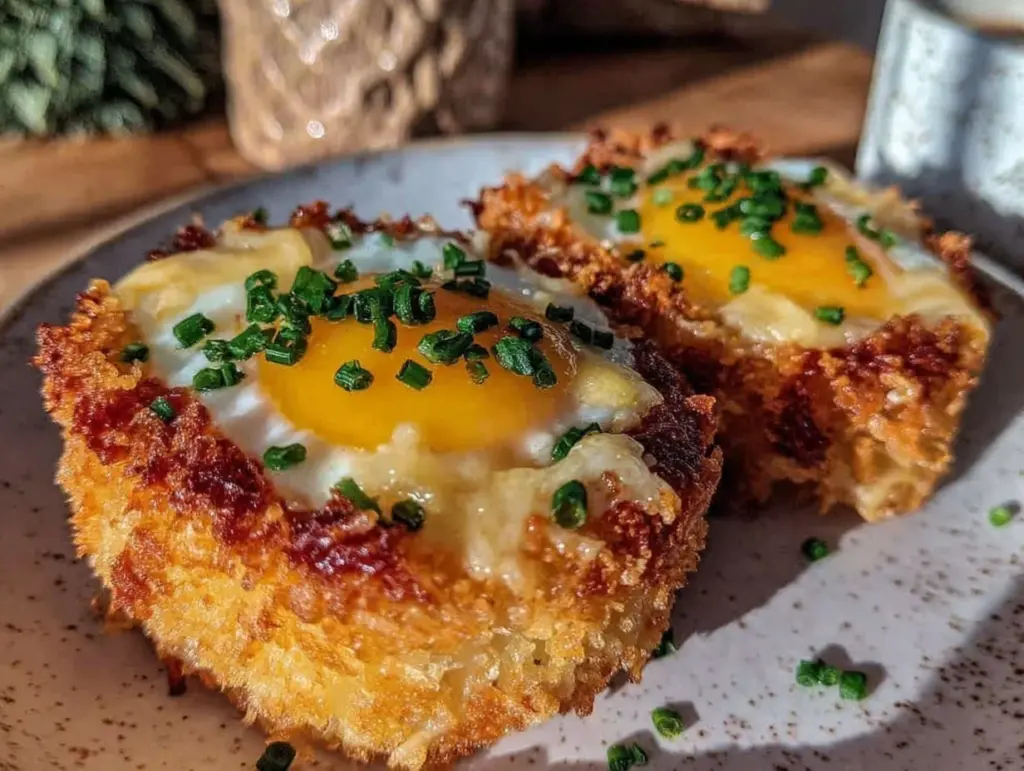
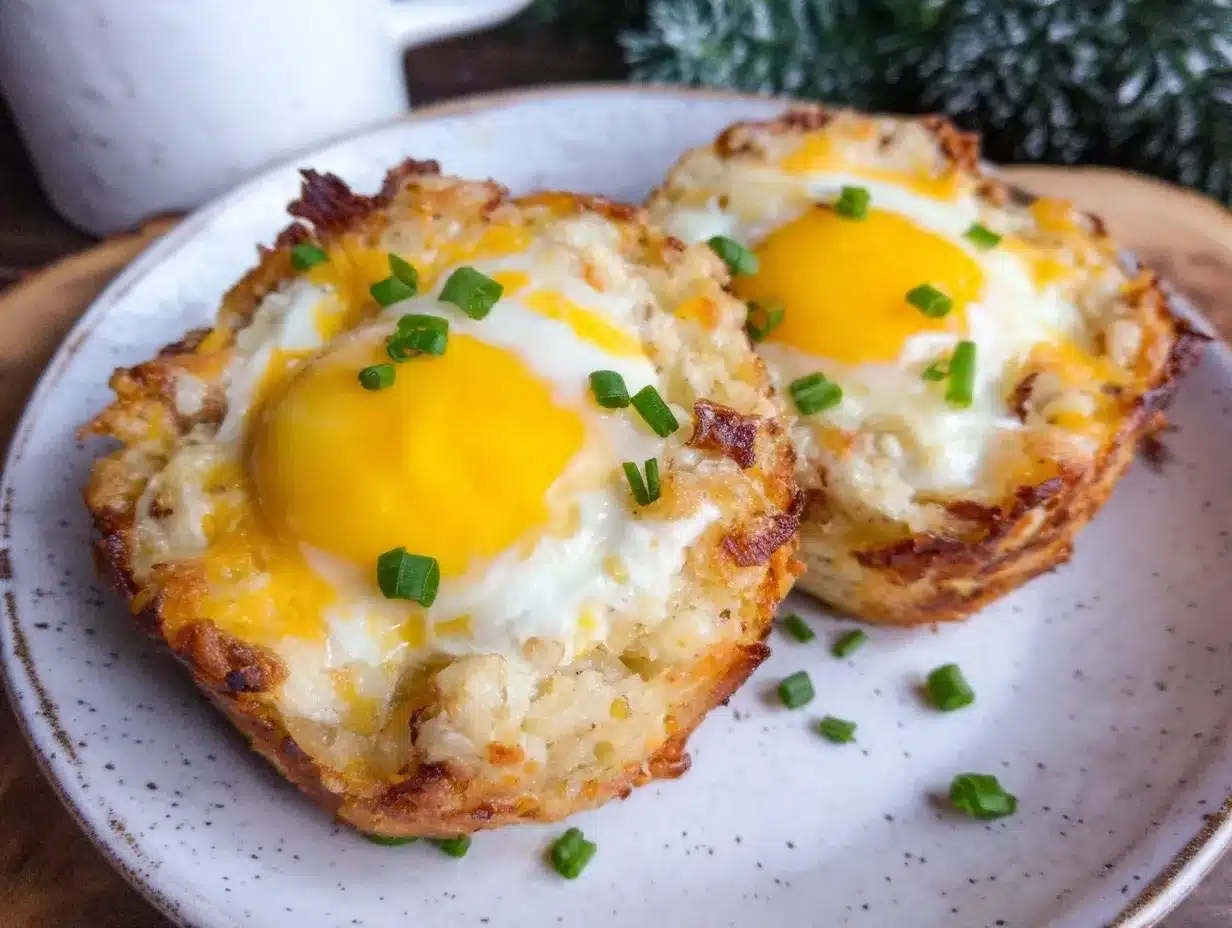
“You’re not seriously going to make those egg nests again, are you?” my roommate joked as I pulled the sizzling muffin tin out of the oven. Honestly, I hadn’t planned on becoming obsessed with crispy hash brown egg nests, but after the chaos of a rushed morning and a near-empty fridge, these little beauties saved the day. It all started on a bleary-eyed Saturday when I just wanted breakfast that felt special but didn’t require a whole lot of brainpower or dishes.
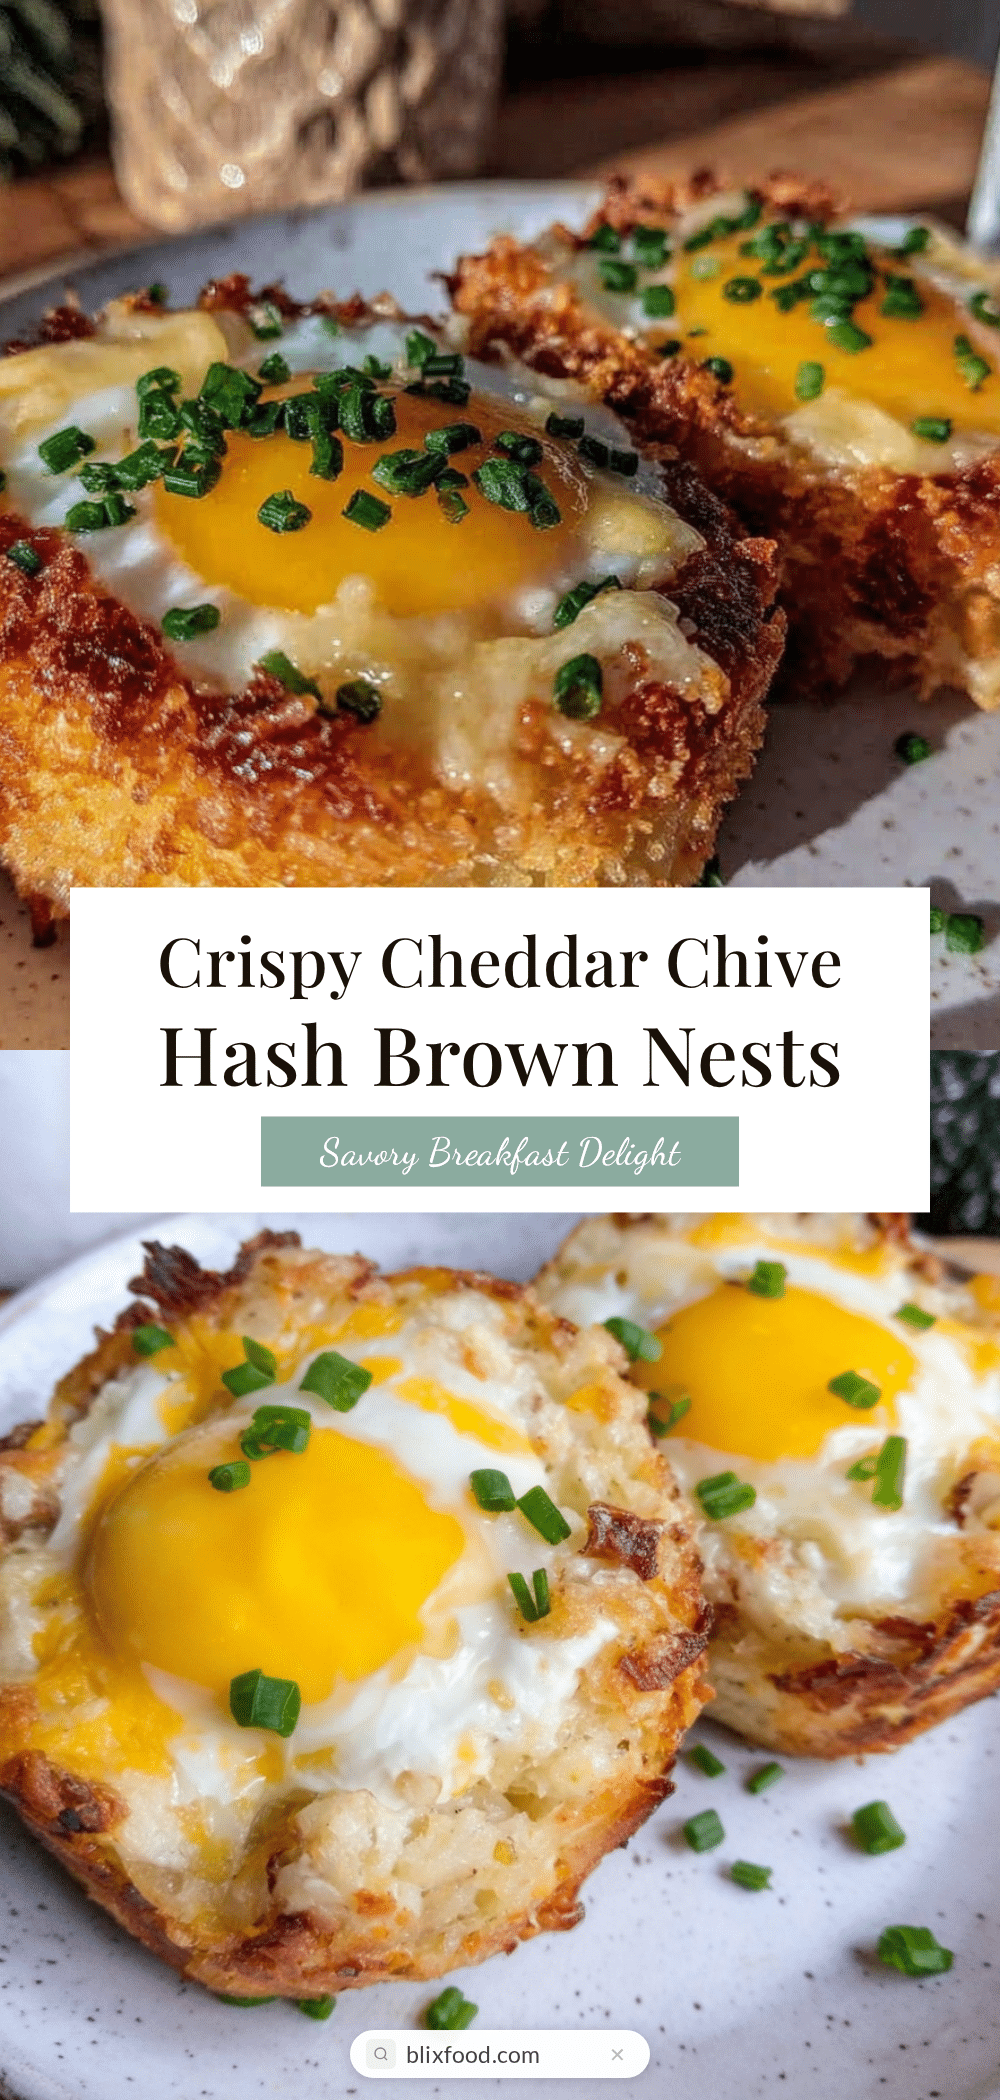
I tossed some frozen hash browns, a handful of sharp cheddar, and fresh chives into muffin cups, cracked an egg on top, and hoped for the best. The result? Crunchy, cheesy nests that held their shape perfectly, with the egg nestled inside like a golden treasure. The whole kitchen smelled like breakfast dreams, and suddenly, my skepticism about using frozen potatoes for anything more than a side vanished.
These crispy hash brown egg nests are now my go-to for weekends when I want to impress without stress. They’re just the right mix of crunchy and creamy, with a zing from the chives that feels fresh yet comforting. And the best part? They’re surprisingly easy to whip up, making them perfect for those mornings when you want something homemade but don’t want to fuss forever.
It’s funny how a simple, almost accidental idea can become a favorite. I keep thinking about how these would pair with a tangy cream cheese spread or a bright herb dip, like the kind you’d find in my creamy cheese stuffed cherry tomatoes. There’s something quietly satisfying about a dish that’s both nostalgic and new, and these nests fit the bill perfectly.
Why You’ll Love This Recipe
I’ve made these crispy hash brown egg nests over and over (more than I care to admit), and here’s why they’ve stuck around in my breakfast rotation:
- Quick & Easy: From frozen potatoes to the table in about 30 minutes, ideal for busy mornings or last-minute brunch plans.
- Simple Ingredients: No need for specialty items—just staples like eggs, cheddar, chives, and hash browns you probably already have.
- Perfect for Weekends or Brunch: Whether it’s a lazy Saturday or a casual get-together, these nests bring a touch of homemade charm.
- Crowd-Pleaser: Kids and adults both love the crispy edges and gooey yolk—trust me, they’ll ask for seconds.
- Unbelievably Delicious: The combination of crispy potatoes, sharp cheddar, and fresh chives creates a flavor punch that feels indulgent but not heavy.
This recipe isn’t just your typical hash brown and egg combo. The trick is pressing the potatoes firmly so they hold that “nest” shape, and mixing in just enough cheddar to melt into golden pockets without making things soggy. Plus, the chives add a mild oniony freshness that cuts through the richness in the best way.
This is comfort food with a little twist—something that makes you smile and feel a bit fancy without any of the fuss. Honestly, I love how these nests have become a secret weapon when I want to impress friends or just treat myself on a quiet morning. You might even find yourself thinking about them while flipping through the recipe for crispy garlic butter shrimp bites for a savory snack later that day.
What Ingredients You Will Need
This recipe uses simple, wholesome ingredients to deliver bold flavor and satisfying texture without the fuss. Most of these are pantry or freezer staples, so you can quickly pull them together anytime.
- Frozen Shredded Hash Browns (about 3 cups / 450 g) – I pick the plain, unseasoned kind for the best crispy texture.
- Sharp Cheddar Cheese, shredded (1 cup / 100 g) – adds richness and melts beautifully; Cabot brand works great if you want a trusted option.
- Fresh Chives, finely chopped (2 tbsp) – gives a subtle onion flavor that brightens the dish.
- Large Eggs (6) – for the nests; room temperature eggs work best for even cooking.
- Salt (1 tsp) and Black Pepper (½ tsp) – essential for seasoning the potatoes and eggs.
- Unsalted Butter or Olive Oil (2 tbsp) – to grease the muffin tin and add a little extra crispiness.
Optional Ingredients & Substitutions:
- Use almond flour or gluten-free breadcrumbs if you want to add a little extra crunch and keep things gluten-free.
- Swap cheddar for gouda or pepper jack for a different flavor profile.
- Try green onions instead of chives if that’s what you have on hand.
- Dairy-free cheese and plant-based butter work well to make this recipe vegan-friendly, just mind the egg substitute you choose.
Equipment Needed
- Muffin Tin: A standard 12-cup muffin tin is best for shaping the nests. If you don’t have one, mini loaf pans or even small oven-safe ramekins can work in a pinch.
- Mixing Bowls: At least one medium bowl to mix the potatoes and cheese, and another for whisking eggs if you prefer.
- Spatula or Spoon: To press the hash brown mixture into the muffin cups evenly.
- Non-stick Cooking Spray or Butter: For greasing the muffin tin, which helps with easy release and crisp edges.
- Oven Mitts: Because hot muffin tins are no joke!
Personally, I’ve tried silicone muffin molds before, but they don’t crisp up the nests as nicely as metal pans. A well-seasoned metal tin will give you that satisfying crunch. Also, if you want to keep your muffin tin in tip-top shape, wipe it down gently after each use to avoid any baked-on cheese sticking around.
Preparation Method
- Preheat your oven to 400°F (200°C). Grease your muffin tin generously with butter or non-stick spray. This step is crucial for getting crispy edges and easy removal.
- In a large bowl, combine the frozen hash browns, shredded cheddar, chopped chives, salt, and black pepper. If the hash browns have large ice crystals, pat them dry with a paper towel to avoid sogginess.
- Press about ¼ cup (60 ml) of the hash brown mixture firmly into each muffin cup, making sure to press some up the sides to form a nest shape. The key here is firm pressure so the nests hold together after baking.
- Bake the nests for 15 minutes. This gives the potatoes a head start to crisp and set before adding the egg.
- Carefully crack one egg into each nest
- Return the muffin tin to the oven and bake for another 12-15 minutes, or until the egg whites are set but yolks still slightly runny (or longer if you want fully cooked yolks).
- Remove from oven and let cool for 3-5 minutes. This resting time helps the nests firm up further and makes them easier to remove.
- Gently run a butter knife around the edges to loosen the nests, then carefully lift them out with a small spatula or fork.
If you find the egg whites are cooking unevenly, try rotating the muffin tin halfway through baking. Also, if your nests aren’t holding together well, a little extra cheddar or pressing more firmly usually does the trick. You’ll know they’re done when the edges are golden brown and crisp, and the egg whites are opaque and set.
Cooking Tips & Techniques
Getting those nests perfectly crispy and holding their shape can be a bit of a balancing act, but here are some tips I learned the hard way:
- Don’t skip pressing the potatoes firmly. I used to gently spoon them in, but nests fell apart until I really pressed down hard.
- Pat the frozen hash browns dry. Excess moisture is a sneaky culprit for sogginess. A quick towel blot helps crispness.
- Use sharp cheddar. It melts better and adds a richer flavor than mild cheeses.
- Watch your oven temperature. Too low and the nests won’t crisp; too high and the eggs might overcook before the potatoes are done.
- Try baking the nests first before adding eggs. This two-step baking ensures crispy bases and perfectly cooked eggs without watery bottoms.
Multitasking tip: While the nests bake the first 15 minutes, you can prep a quick side salad or toast some bread to round out your meal. It’s the little efficiency hacks that make breakfast feel less like a chore.
Variations & Adaptations
Once you’ve nailed the basic crispy hash brown egg nests, it’s fun to personalize the flavors:
- Vegetarian Delight: Add sautéed mushrooms, spinach, or bell peppers mixed in with the potatoes for extra veggies and flavor.
- Spicy Kick: Sprinkle a little smoked paprika or cayenne into the potato mixture to give your nests a subtle heat.
- Low-Carb Version: Swap hash browns for grated cauliflower to keep it lighter but still maintain that nest shape.
- Dairy-Free: Use a vegan cheese alternative and olive oil instead of butter; add nutritional yeast for a cheesy flavor boost.
- Herb Swap: Use fresh thyme or parsley instead of chives for a different herbaceous note.
One of my favorite tweaks was mixing in a little crispy bacon before baking the nests, inspired by the savory flavors in the savory bourbon bacon jam I love making for weekend brunches. That smoky crunch took these nests from simple to seriously crave-worthy.
Serving & Storage Suggestions
These egg nests are best enjoyed warm, straight from the oven when the edges are crisp and the yolk is luxuriously runny. Serve them on their own for a light breakfast or pair with fresh fruit and a cup of coffee for a balanced start.
They also make a great brunch centerpiece alongside dishes like a fresh tomato basil bruschetta or a crisp green salad. For entertaining, try plating with small dollops of creamy herb dips, like the ones in my fresh shrimp salad appetizers, to add a touch of elegance.
To store, let the nests cool completely, then place them in an airtight container in the refrigerator for up to 3 days. Reheat in a toaster oven or conventional oven at 350°F (175°C) for about 10 minutes to bring back the crispness. Microwaving is quicker but tends to make the nests a bit soggy.
If you want to freeze them, flash freeze on a baking sheet first, then transfer to freezer bags for up to a month. Reheat straight from frozen, adding a few extra minutes to the oven time.
Flavors actually deepen after a day or two, making these nests a surprisingly great make-ahead option for busy mornings or casual brunches.
Nutritional Information & Benefits
This recipe balances indulgence with wholesome ingredients. Each crispy hash brown egg nest contains roughly:
| Nutrient | Per Nest (1/6 recipe) |
|---|---|
| Calories | 220 kcal |
| Protein | 12 g |
| Carbohydrates | 18 g |
| Fat | 12 g |
| Fiber | 2 g |
Eggs provide high-quality protein and essential vitamins, while potatoes offer potassium and fiber. Cheddar adds calcium and a satisfying richness. The fresh chives contribute antioxidants and a pop of flavor without calories.
This recipe is naturally gluten-free if you use gluten-free hash browns and keep added ingredients clean. It’s a great option for those seeking a balanced breakfast with protein and carbs to fuel the day. For a low-carb twist, swapping potatoes for cauliflower works well, as mentioned earlier.
Conclusion
Crispy hash brown egg nests with cheddar and chive are one of those recipes that feel like a small celebration on a plate. They’re approachable, forgiving, and pack a punch of flavor that’s both comforting and fresh. Whether you’re feeding a hungry family or treating yourself to a quiet breakfast, these nests offer a cozy, crunchy bite that sticks with you.
What I love most is how easy it is to make them your own—switch up the cheese, toss in some veggies, or add a little heat. No matter the variation, they never fail to deliver that satisfying crunch and melty egg goodness that mornings deserve.
Give this recipe a try and let it become your new weekend staple. And if you’re curious about other dishes that bring simple ingredients to life with impressive results, you might enjoy the bright, herbaceous flavors in the zesty garlic marinated mushrooms or the indulgent bite of mini cheese balls with herbs and bacon.
FAQs
Can I use fresh potatoes instead of frozen hash browns?
Yes, but you’ll need to grate them finely and squeeze out as much moisture as possible to avoid soggy nests. Frozen hash browns are convenient and help with consistent crispiness.
How do I make sure the egg yolk stays runny?
Bake the nests with eggs for about 12-15 minutes at 400°F (200°C). Keep an eye on them and remove when whites are set but yolks still jiggle slightly.
Can I prepare these nests ahead of time?
Absolutely! Bake the nests without eggs, cool, and refrigerate or freeze. Add eggs and bake fresh when ready to serve.
What’s the best way to reheat leftover nests?
Use a toaster oven or conventional oven at 350°F (175°C) for 8-10 minutes to keep them crispy. Microwaving is faster but may soften the texture.
Are these nests suitable for gluten-free diets?
Yes, as long as you use gluten-free hash browns and avoid any added gluten-containing ingredients, this recipe is naturally gluten-free.
Pin This Recipe!
Crispy Hash Brown Egg Nests Recipe Easy Homemade Cheddar Chive Breakfast

Crunchy, cheesy hash brown nests with eggs baked inside, flavored with sharp cheddar and fresh chives. Perfect for an easy, impressive breakfast or brunch.
- Prep Time: 10 minutes
- Cook Time: 30 minutes
- Total Time: 40 minutes
- Yield: 6 servings 1x
- Category: Breakfast
- Cuisine: American
Ingredients
- 3 cups (about 10.5 oz / 300 g) frozen shredded hash browns, plain and unseasoned
- 1 cup (about 3.5 oz / 100 g) sharp cheddar cheese, shredded
- 2 tablespoons fresh chives, finely chopped
- 6 large eggs, room temperature
- 1 teaspoon salt
- 1/2 teaspoon black pepper
- 2 tablespoons unsalted butter or olive oil, for greasing muffin tin
Instructions
- Preheat your oven to 400°F (200°C). Grease your muffin tin generously with butter or non-stick spray.
- In a large bowl, combine the frozen hash browns, shredded cheddar, chopped chives, salt, and black pepper. Pat dry any large ice crystals from hash browns with a paper towel.
- Press about 1/4 cup (60 ml) of the hash brown mixture firmly into each muffin cup, pressing some up the sides to form a nest shape.
- Bake the nests for 15 minutes to crisp and set the potatoes.
- Carefully crack one egg into each nest, trying not to break the yolk. Alternatively, whisk eggs lightly and pour for a uniform texture.
- Return the muffin tin to the oven and bake for another 12-15 minutes, or until egg whites are set but yolks are still slightly runny (or longer for fully cooked yolks).
- Remove from oven and let cool for 3-5 minutes to firm up the nests.
- Run a butter knife around the edges to loosen nests, then carefully lift them out with a spatula or fork.
Notes
Press the hash browns firmly into the muffin tin to ensure nests hold their shape. Pat frozen hash browns dry to avoid sogginess. Bake nests first before adding eggs for crispiness. Rotate muffin tin halfway through baking if eggs cook unevenly. Reheat in toaster or conventional oven to maintain crispness; microwaving may soften nests.
Nutrition
- Serving Size: 1 nest
- Calories: 220
- Fat: 12
- Carbohydrates: 18
- Fiber: 2
- Protein: 12
Keywords: hash brown egg nests, crispy hash browns, breakfast recipe, cheddar chive breakfast, easy brunch, homemade egg nests