“Are you sure you want to add all that lemon zest?” my friend asked, eyeing my cluttered kitchen counter filled with bowls of fresh berries and a bubbling pot of lemon curd. Honestly, I wasn’t sure either. But that zesty tang was exactly what turned these mini berry tarts from ordinary to memorable. This recipe actually came about during one of those rare quiet evenings when I was craving something sweet but didn’t want to fuss for hours.
The first time I whipped up these Perfect Mini Berry Tarts with Zesty Lemon Curd, it was almost by accident. I had leftover pie crust dough and a handful of berries begging for attention. Instead of the usual jam or plain custard, I improvised a quick lemon curd with a bit more zest than usual. The result? Bright, fresh, and just the right balance of tart and sweet that made me close my eyes after the first bite.
Since then, these tarts have quietly become my go-to for everything from casual weekend treats to last-minute entertaining. They’re small, elegant, and perfectly handheld—ideal for parties or just stealing a moment of simple joy with a cup of tea. And I have to say, that little extra zing from the lemon curd really makes a difference.
So if you’ve been searching for a dessert that’s quick but still feels special, this recipe might just be your next kitchen win. The way the crisp crust cradles the smooth, zesty lemon curd topped with fresh berries is honestly just the kind of comfort food that doesn’t shout but whispers “made with care.”
Why You’ll Love This Recipe
Having tested and tweaked these mini berry tarts over many weekends, I can confidently say they hit the sweet spot for both flavor and ease. Here’s why they might become a staple in your baking rotation:
- Quick & Easy: From start to finish, you’re looking at around 45 minutes. The lemon curd comes together in less than 15 minutes, making it perfect for busy days or spontaneous dessert cravings.
- Simple Ingredients: No fancy imports here—just pantry basics like flour, butter, eggs, sugar, and fresh berries. I often use organic lemons and fresh local berries when they’re in season for the best flavor.
- Perfect for Entertaining: These bite-sized delights are perfect for brunches, potlucks, or as a light after-dinner treat that feels impressive without the fuss.
- Crowd-Pleaser: The combination of a buttery tart shell, creamy lemon curd, and juicy berries always gets compliments—even from those “not really dessert people.”
- Unbelievably Delicious: The lemon curd’s zing is balanced by the sweetness of berries and the flaky crust, creating a harmony that’s both refreshing and indulgent.
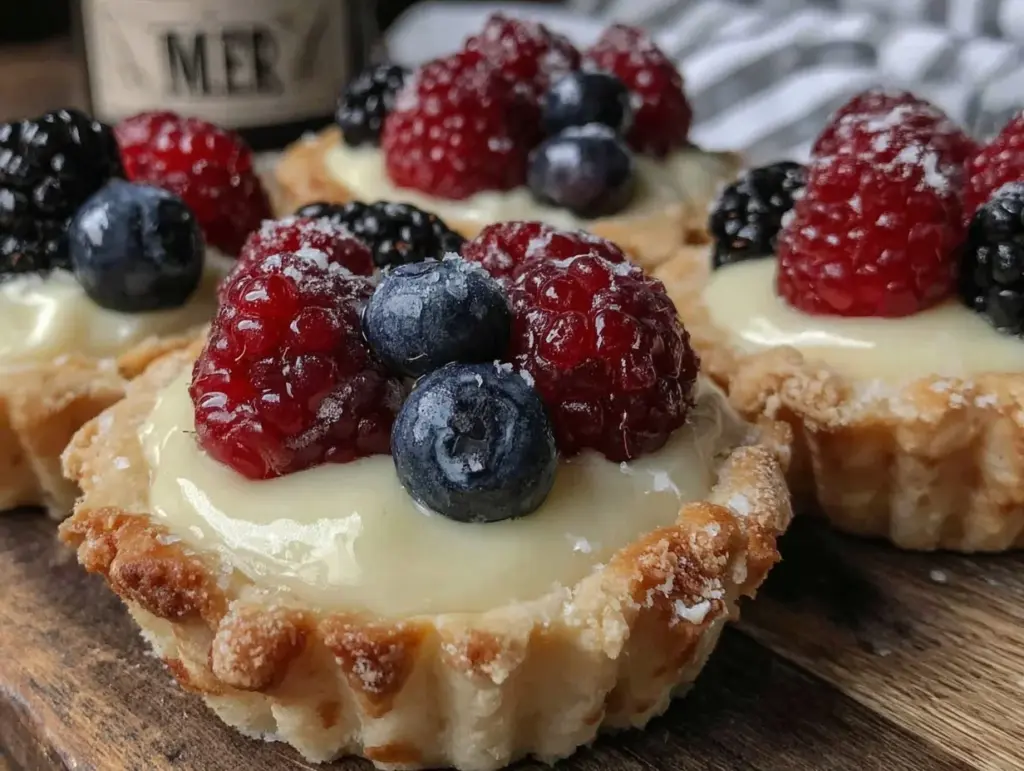
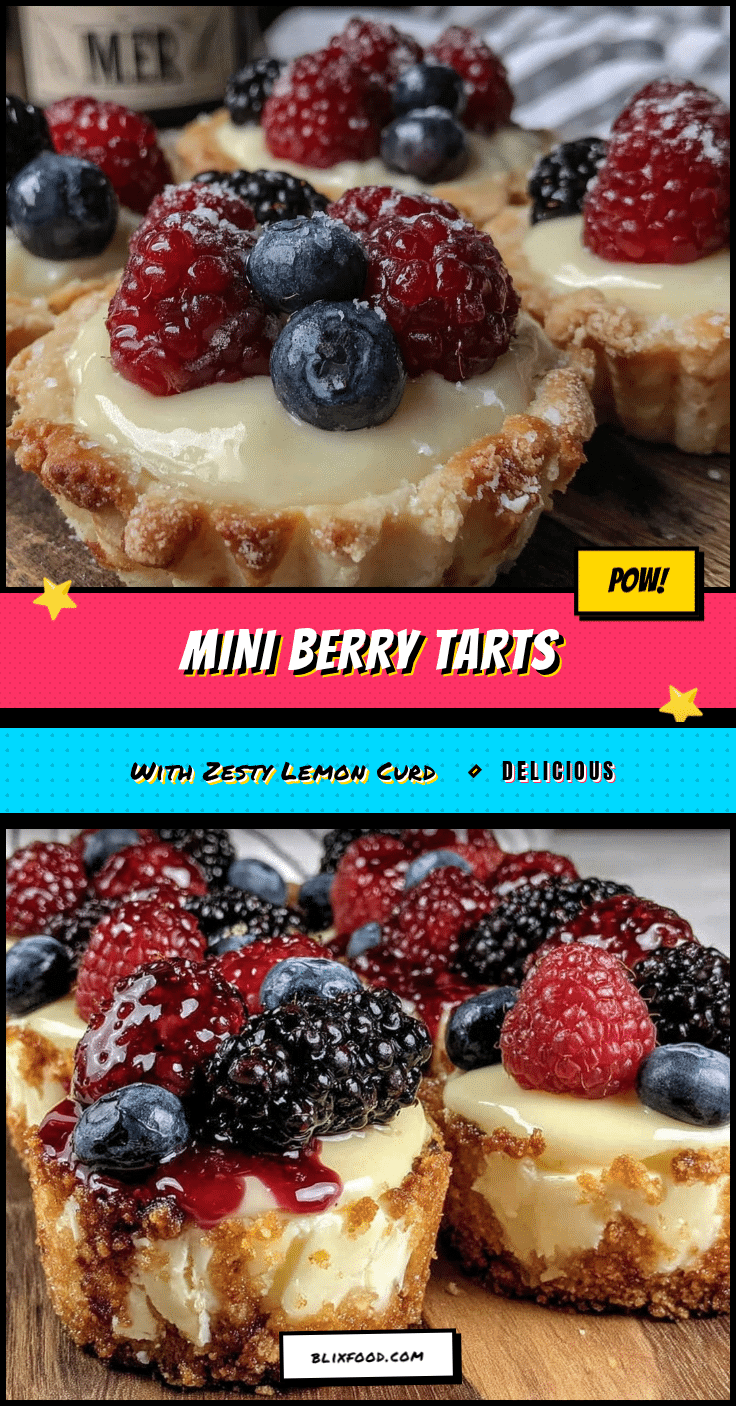
What sets this recipe apart is the little extra lemon zest in the curd and the flaky texture of the tart shells, which I perfected by chilling the dough well before baking. Plus, using a mix of berries—blueberries, raspberries, and blackberries—adds layers of flavor and color, making each tart a tiny work of art. I’ve served these alongside savory bites like fresh shrimp salad appetizers, and the contrast is delightful. Honestly, this recipe is proof that simple ingredients can make a dessert that’s both approachable and special.
What Ingredients You Will Need
This recipe uses simple, wholesome ingredients to deliver bold flavor and satisfying texture without the fuss. Most are pantry staples, and the fresh berries can be swapped seasonally or based on what’s available.
- For the Tart Crust:
- All-purpose flour – 1 1/4 cups (160g)
- Unsalted butter, cold and cubed – 1/2 cup (115g) (I prefer Kerrygold for its rich flavor)
- Powdered sugar – 1/4 cup (30g) (adds slight sweetness and tenderness)
- Salt – 1/4 teaspoon
- Ice-cold water – 2 to 3 tablespoons
- For the Zesty Lemon Curd:
- Fresh lemons – 2 large (zest and juice)
- Granulated sugar – 3/4 cup (150g)
- Eggs – 3 large (room temperature)
- Unsalted butter – 6 tablespoons (85g), cut into chunks
- Lemon zest – from 1 extra lemon (for that zesty punch)
- For the Topping:
- Fresh berries (blueberries, raspberries, blackberries) – 1 1/2 cups mixed (about 200g)
- Powdered sugar for dusting (optional)
- Fresh mint leaves for garnish (optional)
If you want a gluten-free option, almond flour works well for the crust, though the texture will be a bit different. And if fresh berries are scarce, frozen ones thawed gently can do the trick, just drain well to avoid sogginess. For a dairy-free lemon curd, swap butter with coconut oil—though it slightly changes the flavor, it remains delicious.
Equipment Needed
To make these mini berry tarts, you’ll want some basic baking tools:
- Mini tart pans: I use 3-inch (7.5 cm) fluted tart pans with removable bottoms for easy release. If you don’t have these, a mini muffin tin lined with parchment cups works in a pinch.
- Mixing bowls: A few sizes for dough, lemon curd, and berries.
- Whisk: For blending eggs and combining lemon curd ingredients smoothly.
- Microplane zester: For zesting lemons finely and evenly.
- Measuring cups and spoons: Accuracy is key with baking, especially with the lemon curd.
- Small saucepan: For gently cooking the lemon curd over low heat.
- Pastry cutter or food processor: To cut butter into flour quickly when making the crust. Alternatively, use your fingers but keep the butter cold.
Pro tip: Let your tart pans chill in the fridge before filling to help keep the dough firm while baking. Also, if you don’t own a zester, a fine grater works, but be careful not to grate the white pith, which tastes bitter.
Preparation Method
- Prepare the Tart Dough (15-20 minutes): In a large bowl, whisk together 1 1/4 cups (160g) all-purpose flour, 1/4 cup (30g) powdered sugar, and 1/4 teaspoon salt. Add 1/2 cup (115g) cold, cubed unsalted butter. Using a pastry cutter or your fingertips, quickly work the butter into the flour until the mixture resembles coarse crumbs, with pea-sized pieces remaining. Add 2 tablespoons ice-cold water and mix gently until the dough just comes together. Avoid overworking—crumbly is okay.
- Chill the Dough (30 minutes): Shape the dough into a disk, wrap in plastic, and refrigerate for at least 30 minutes. This helps the butter firm up, so the crust bakes flaky.
- Roll and Shape (10 minutes): On a lightly floured surface, roll the dough out to about 1/8-inch (3mm) thickness. Cut circles slightly larger than your mini tart pans (about 4 inches or 10cm). Gently press the dough into each tart pan, trimming any excess. Prick the bottoms with a fork to prevent puffing.
- Blind Bake the Shells (15 minutes): Preheat oven to 350°F (175°C). Line each tart shell with parchment and fill with pie weights or dried beans. Bake for 12 minutes, then remove weights and parchment, bake 3-5 more minutes until golden and crisp. Remove from oven and cool completely.
- Make the Zesty Lemon Curd (15 minutes): In a medium saucepan, combine juice and zest from 2 lemons plus zest from an additional lemon, 3/4 cup (150g) sugar, and 3 beaten eggs. Cook over low heat, whisking constantly, until the mixture thickens enough to coat the back of a spoon (about 8-10 minutes). Remove from heat and whisk in 6 tablespoons (85g) butter until smooth. Strain through a fine sieve to remove zest bits for a silky texture. Let cool slightly.
- Fill the Tart Shells (5 minutes): Spoon or pipe lemon curd into each cooled tart shell, filling them about three-quarters full.
- Add the Fresh Berries (5 minutes): Top each tart with a mix of fresh blueberries, raspberries, and blackberries. Press gently so berries nestle into the curd but remain whole.
- Chill and Serve (at least 1 hour): Refrigerate the tarts for at least an hour to let the curd set fully and flavors meld. Dust with powdered sugar and garnish with a mint leaf right before serving.
If your lemon curd doesn’t thicken enough, keep cooking it a little longer but watch carefully so you don’t scramble the eggs. The curd should be smooth and glossy. The tart shells must be completely cool before filling to avoid sogginess.
Cooking Tips & Techniques
One of the trickiest parts of this recipe is getting that perfectly flaky tart crust. Cold butter and minimal handling are key. I once got impatient and skipped chilling the dough, and the crust turned out tough and shrunk in the oven. Lesson learned! Always chill the dough well, and if you can, chill the formed tart shells before baking to reduce shrinkage.
When making lemon curd, constant whisking is non-negotiable to prevent lumps and curdled eggs. I find using a silicone spatula helps scrape the pan edges better than a whisk once it thickens. Also, don’t rush the curd’s cooking; it needs time to thicken gently on low heat.
Multitasking tip: While your tart shells chill and bake, zest and juice your lemons and prepare the berries. This keeps the prep smooth and minimizes waiting.
For consistent results, use room-temperature eggs for the lemon curd and cold butter for the crust—opposites but essential. Finally, fresh berries vary wildly in sweetness; taste them first and adjust the sugar in your lemon curd if you prefer it sweeter or tarter.
Variations & Adaptations
Here are some ways I’ve played around with this recipe to suit different occasions or dietary needs:
- Dairy-Free Option: Swap butter in both crust and lemon curd with coconut oil. The crust will be slightly less flaky but still tasty, and the curd gets a subtle tropical twist.
- Different Citrus Flavors: Try replacing lemon with lime or orange zest and juice for a new zingy profile. Orange pairs beautifully with raspberries.
- Seasonal Berries or Fruits: In autumn, I love topping these tarts with poached pears or spiced apples instead of berries. Fresh figs in late summer are heavenly too.
- Gluten-Free Crust: Use almond flour mixed with a little tapioca starch for structure. The texture is crumbly but nutty and delicious.
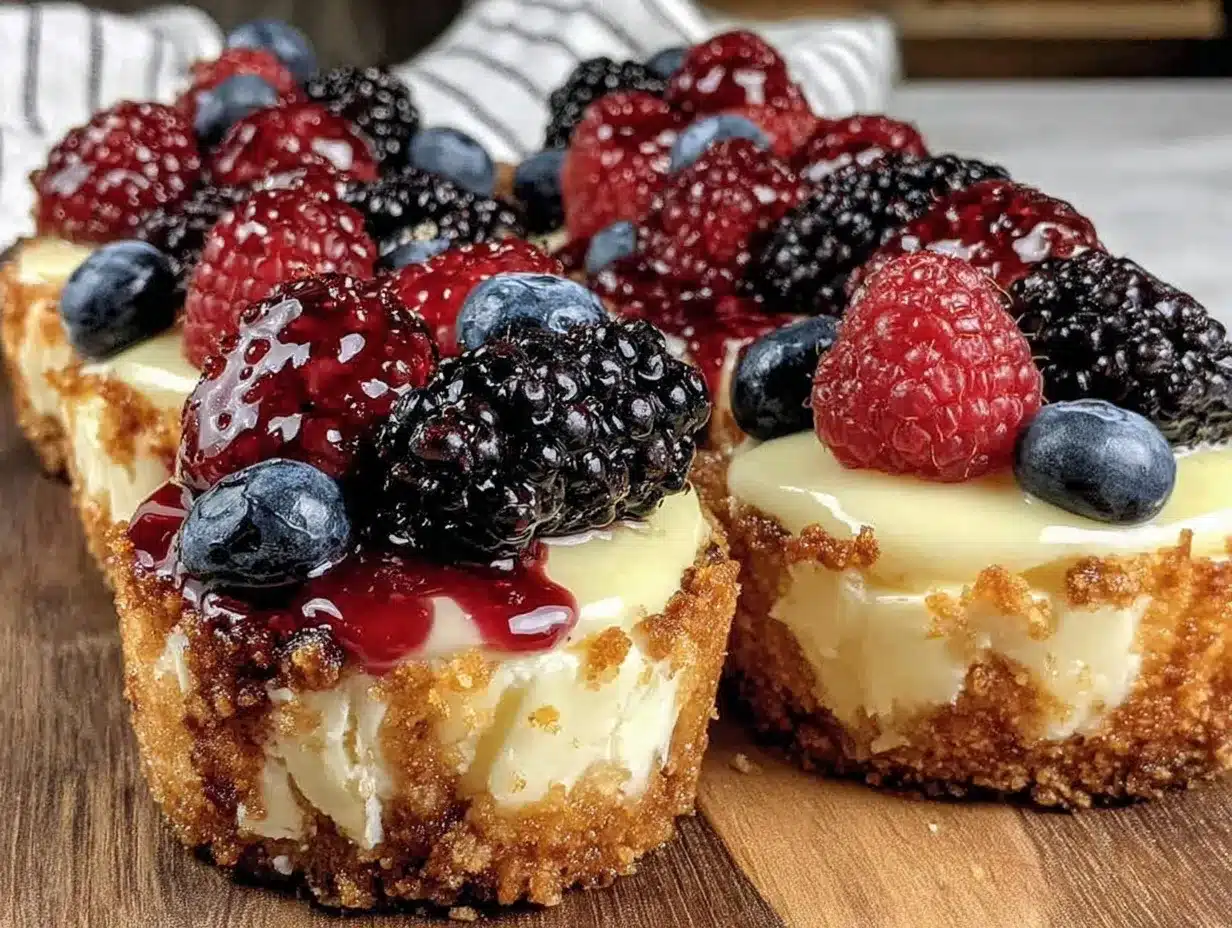
- Mini Cheesecake Twist: Add a dollop of sweetened cream cheese under the lemon curd for a creamy layer that balances the tartness.
Personally, I once tried adding a sprinkle of finely chopped pistachios on top for crunch and color contrast—highly recommend it if you want a bit of texture play.
Serving & Storage Suggestions
These mini berry tarts are best served chilled or at cool room temperature. The lemon curd stays firm but smooth, and the berries retain their fresh burst. For a simple presentation, dust with powdered sugar and garnish with fresh mint leaves—makes them look like little jewels on the platter.
If serving for a party, they pair beautifully with light beverages like sparkling water with lemon or a crisp white wine. For a cozy afternoon treat, I often enjoy them with a cup of Earl Grey or chamomile tea.
Store leftover tarts in an airtight container in the refrigerator for up to 3 days. The crust might soften slightly over time, but the lemon curd flavor deepens. If you want to keep them longer, freeze unfilled tart shells baked ahead of time, then fill and top with berries after thawing.
Reheat the shells in a 300°F (150°C) oven for 5-7 minutes before filling to refresh their crispness. Avoid reheating once filled, as the curd and berries don’t warm well.
Nutritional Information & Benefits
Each mini berry tart (about 3-inch size) contains roughly 180-220 calories, depending on the amount of curd and berries used. They offer a moderate amount of sugar balanced by the fresh fruit’s fiber and vitamin C.
Lemon curd is rich in vitamin C and antioxidants from the lemon zest and juice, which support immune health. Using fresh berries adds antioxidants, vitamins, and fiber, making these tarts a lighter dessert choice compared to heavy creams or chocolate.
For those watching gluten intake, swapping the crust to almond flour makes these suitable for a gluten-free diet. The recipe contains dairy and eggs, so not recommended for strict vegans or those with allergies unless adapted.
From a wellness perspective, I appreciate that this dessert feels indulgent yet relies on fresh, simple ingredients without artificial additives. It’s the kind of treat that doesn’t leave me feeling weighed down afterward.
Conclusion
The Perfect Mini Berry Tarts with Zesty Lemon Curd have quietly made their way into my baking favorites for their effortless charm and bright flavors. What started as a casual experiment turned into a recipe I come back to time and again, whether for a quick treat or a festive get-together.
Feel free to make this recipe your own—swap berries, try new zest combos, or even experiment with the crust. It’s forgiving and fun, and that’s part of why I love it. If you’ve enjoyed classic treats like the flaky butternut thyme tartlets, these berry tarts will fit right into your repertoire.
Give them a try and let me know how your version turns out—sharing your twists or tips always makes me smile. Here’s to many sweet, zesty moments ahead!
FAQs About Perfect Mini Berry Tarts with Zesty Lemon Curd
Can I make the lemon curd ahead of time?
Yes! Lemon curd can be made up to 3 days ahead and stored in an airtight container in the fridge. Just bring it to room temperature before filling the tarts.
What if I don’t have mini tart pans?
You can use a mini muffin tin lined with parchment or silicone cups. The shape won’t be as classic, but the taste is just as good.
How do I prevent the tart crust from getting soggy?
Blind baking the tart shells fully and letting them cool completely before filling helps avoid sogginess. Also, don’t overfill with lemon curd—it should be thick and set.
Can I use frozen berries for the topping?
Frozen berries work if thawed completely and drained well, but fresh berries are best for texture and flavor.
Is it possible to make these tarts vegan?
With some swaps—like coconut oil for butter and a vegan egg replacer for the lemon curd—these can be adapted, but it will change the texture and flavor somewhat.
Pin This Recipe!
Perfect Mini Berry Tarts with Zesty Lemon Curd
These mini berry tarts feature a flaky crust filled with bright, zesty lemon curd and topped with fresh mixed berries. Quick and easy to make, they are perfect for entertaining or a simple sweet treat.
- Prep Time: 25 minutes
- Cook Time: 30 minutes
- Total Time: 1 hour 55 minutes
- Yield: 12 mini tarts 1x
- Category: Dessert
- Cuisine: American
Ingredients
- 1 1/4 cups (160g) all-purpose flour
- 1/2 cup (115g) unsalted butter, cold and cubed
- 1/4 cup (30g) powdered sugar
- 1/4 teaspoon salt
- 2 to 3 tablespoons ice-cold water
- 2 large fresh lemons (zest and juice)
- 3/4 cup (150g) granulated sugar
- 3 large eggs, room temperature
- 6 tablespoons (85g) unsalted butter, cut into chunks
- Lemon zest from 1 extra lemon
- 1 1/2 cups (about 200g) mixed fresh berries (blueberries, raspberries, blackberries)
- Powdered sugar for dusting (optional)
- Fresh mint leaves for garnish (optional)
Instructions
- Prepare the tart dough: In a large bowl, whisk together flour, powdered sugar, and salt. Add cold cubed butter and work into flour until mixture resembles coarse crumbs with pea-sized pieces. Add 2 tablespoons ice-cold water and mix gently until dough just comes together. Avoid overworking.
- Chill the dough: Shape dough into a disk, wrap in plastic, and refrigerate for at least 30 minutes.
- Roll and shape: On a lightly floured surface, roll dough to about 1/8-inch thickness. Cut circles slightly larger than mini tart pans (about 4 inches). Press dough into tart pans and prick bottoms with a fork.
- Blind bake shells: Preheat oven to 350°F (175°C). Line tart shells with parchment and fill with pie weights or dried beans. Bake 12 minutes, remove weights and parchment, then bake 3-5 more minutes until golden and crisp. Cool completely.
- Make lemon curd: In a medium saucepan, combine juice and zest from 2 lemons plus zest from an extra lemon, sugar, and beaten eggs. Cook over low heat, whisking constantly, until thick enough to coat the back of a spoon (8-10 minutes). Remove from heat and whisk in butter until smooth. Strain through fine sieve. Let cool slightly.
- Fill tart shells: Spoon or pipe lemon curd into cooled tart shells, filling about three-quarters full.
- Add berries: Top each tart with mixed fresh berries, pressing gently so they nestle into the curd but remain whole.
- Chill and serve: Refrigerate tarts for at least 1 hour to set curd and meld flavors. Dust with powdered sugar and garnish with mint leaves before serving.
Notes
Chill dough well before baking to ensure flaky crust. Blind bake tart shells fully and cool completely before filling to prevent sogginess. Constant whisking during lemon curd cooking prevents lumps and curdled eggs. Use room-temperature eggs for lemon curd and cold butter for crust. Fresh berries are preferred over frozen for best texture. Lemon curd can be made up to 3 days ahead and stored refrigerated.
Nutrition
- Serving Size: 1 mini tart (about 3
- Calories: 200
- Sugar: 16
- Sodium: 90
- Fat: 12
- Saturated Fat: 7
- Carbohydrates: 24
- Fiber: 2
- Protein: 3
Keywords: mini berry tarts, lemon curd, lemon tart, easy dessert, berry dessert, handheld tarts, quick dessert, zesty lemon curd