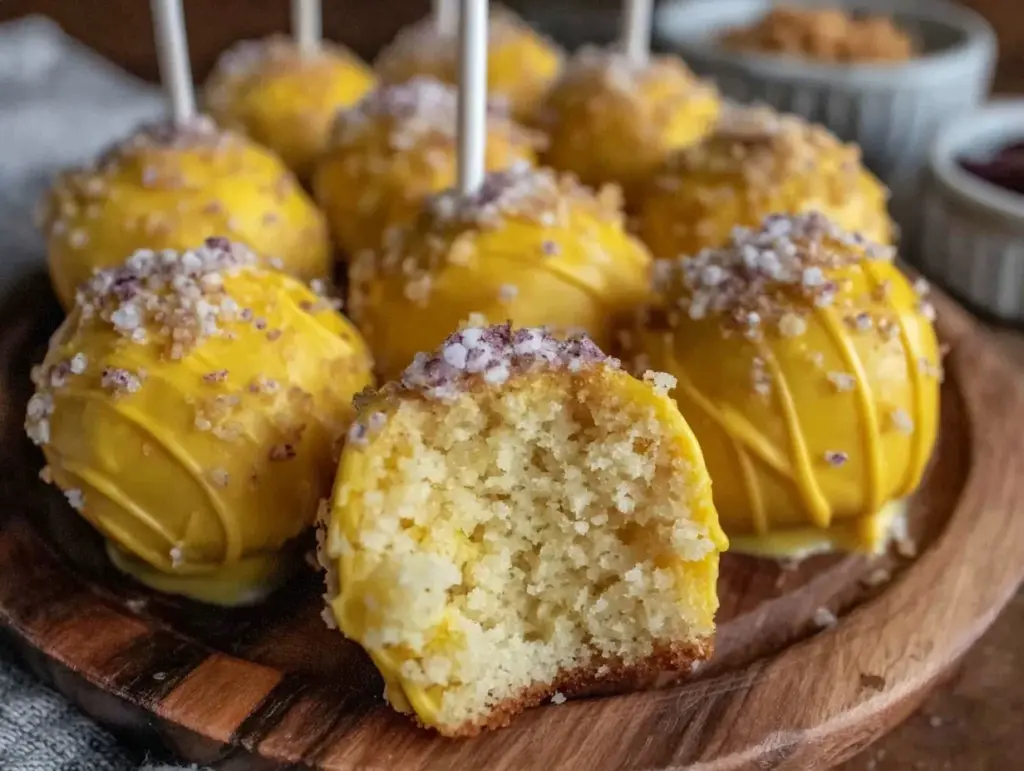
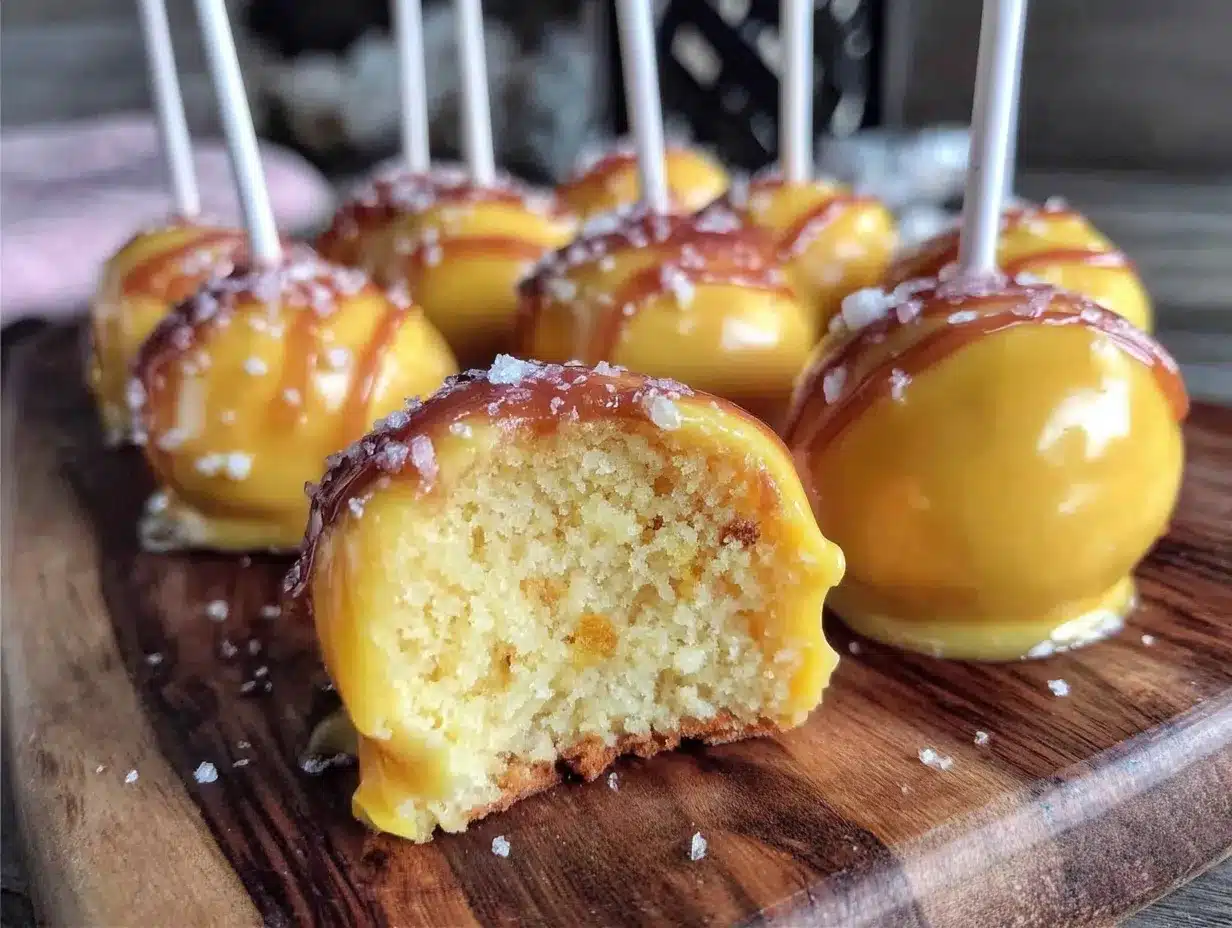
School bus yellow. That’s the exact shade I’m craving right now, and oddly enough, it’s not a paint or crayon shade I want—I want it on a vanilla cake pop. Somehow, the idea of those tiny, perfectly round cake bites coated in a bright, cheerful yellow frosting has lodged itself in my brain. I have everything but the perfect recipe to pull off that iconic color and taste just right without the fuss. I’m thinking of that moment when the kids come home from their first day back at school, tired but buzzing, and these pops could be that sweet little celebration waiting on the counter. The kind of treat that makes the day feel special, you know? Honestly, it’s not just about the color or the cute school bus vibes. It’s about capturing that simple joy of vanilla cake with that creamy coating and a hint of nostalgia. I want to make cake pops that look as fun as they taste—bright, happy, and packed with vanilla goodness.
There’s something quietly satisfying about biting into a cake pop that’s just right: moist cake, smooth coating, and a shape that’s impossible to resist. This recipe is exactly that for me, and it sticks because it’s easy enough to whip up on a busy school morning or the night before without feeling like a production. Plus, the yellow coating isn’t overwhelming or artificial—it’s just the right shade to make you smile. I guess that’s why these school bus yellow vanilla cake pops have become my go-to treat for back to school season. They’re a tiny delight that says, “You made it through the day,” without overdoing it. And honestly, isn’t that the kind of treat everyone deserves?
Why You’ll Love This Recipe
- Quick & Easy: Comes together in under 45 minutes, making it perfect for last-minute school treats or spontaneous celebrations.
- Simple Ingredients: No need for fancy or hard-to-find items—just pantry staples like vanilla cake mix, cream cheese, and basic candy melts.
- Perfect for Back to School: These cake pops make a fun, festive snack that kids love, ideal for classrooms, after-school snacks, or lunchbox surprises.
- Crowd-Pleaser: Both kids and adults rave about these—moist, creamy, and just sweet enough without being cloying.
- Unbelievably Delicious: The vanilla flavor is rich but light, with a smooth, buttery coating that delivers a perfect bite every time.
- Unique Touch: The school bus yellow color is achieved with just a tiny bit of natural yellow food coloring, so it’s bright but not artificial or overpowering.
- Emotional Connection: These cake pops aren’t just treats—they’re a small moment of joy for kids starting a new school year, a way to make those first-day jitters a little sweeter.
What Ingredients You Will Need
This recipe uses simple, wholesome ingredients to deliver bold flavor and satisfying texture without the fuss. Most are pantry staples, and substitutions are easy if you need them.
- For the Cake:
- 1 box vanilla cake mix (about 15.25 oz / 432 g) – I recommend Betty Crocker for consistent texture
- Water, oil, and eggs as called for on the cake mix box (usually about 1 cup water, 1/3 cup oil, and 3 large eggs)
- For the Cake Pop Mixture:
- 8 oz (225 g) cream cheese, softened – provides moisture and binds the crumbs
- For the Coating:
- 12 oz (340 g) yellow candy melts or white chocolate melting wafers
- Yellow gel food coloring (optional, just a drop for that bright school bus shade)
- Sprinkles or edible markers for decorating (optional)
- Extras:
- Cake pop sticks or sturdy lollipop sticks
- Styrofoam block or cake pop stand for drying
If you want a dairy-free option, swap cream cheese for coconut cream or a vegan cream cheese alternative. For gluten-free, you can use a gluten-free vanilla cake mix. In summer, I sometimes swap in fresh lemon zest to brighten the vanilla flavor. It’s a nice twist if you want to try something different.
Equipment Needed
- Standard mixing bowls – I like glass or stainless steel for easy cleanup
- Electric hand mixer or stand mixer – makes mixing cream cheese and cake crumbs a breeze
- Baking pan (9×13 inch / 23×33 cm) – for baking the vanilla cake from scratch
- Cooling rack – to cool the cake completely before crumbling
- Baking sheet lined with parchment paper – for placing cake pops before chilling
- Microwave-safe bowl – to melt candy melts or chocolate
- Cake pop sticks – sturdy and food-safe, available at most baking supply stores
- Styrofoam block or cake pop stand – to hold pops upright while coating sets
I’ve tried using chopsticks or straws instead of cake pop sticks in a pinch, but they don’t hold as well and can get soggy. If you don’t have a cake pop stand, a clean block of styrofoam works perfectly and is super budget-friendly. When melting candy melts, use short bursts in the microwave and stir often to avoid overheating and seizing. This little tip saved me from wasting a whole batch once!
Preparation Method
- Bake the Vanilla Cake: Preheat your oven to 350°F (175°C). Prepare the vanilla cake mix according to package instructions, using water, oil, and eggs. Pour batter into a greased 9×13 inch (23×33 cm) pan and bake for 28-32 minutes or until a toothpick inserted comes out clean. Let cool completely on a wire rack (about 1 hour).
- Crumble the Cake: Once cooled, crumble the cake into a large mixing bowl using your hands or a fork. You want fine crumbs but not powdery.
- Mix with Cream Cheese: Add 8 oz (225 g) softened cream cheese to the cake crumbs. Use an electric mixer or your hands to combine until the mixture is moist and sticks together when pressed. If too dry, add a little more cream cheese; if too wet, add a bit more cake crumbs.
- Shape the Cake Pops: Roll the mixture into 1-inch (2.5 cm) balls and place on a parchment-lined baking sheet. Chill in the refrigerator for at least 30 minutes or in the freezer for 15 minutes. Chilling helps the pops hold their shape while dipping.
- Melt the Candy Coating: In a microwave-safe bowl, melt 12 oz (340 g) yellow candy melts in 30-second intervals, stirring in between until smooth. If you want a deeper yellow, stir in a drop of yellow gel food coloring.
- Assemble the Pops: Dip the tip of each cake pop stick into the melted candy and insert halfway into each cake ball. This “glue” step helps the ball stay on the stick.
- Coat the Cake Pops: Holding the stick, dip each cake pop into the candy melts, tapping off excess coating gently. Rotate to coat evenly. Place the dipped pops upright into a styrofoam block or cake pop stand to dry. Let set at room temperature for 15-20 minutes.
- Decorate: If desired, add edible markers to draw school bus details or add sprinkles before the coating fully hardens.
- Serve or Store: Enjoy immediately or store them in an airtight container in the fridge for up to 3 days.
One time, I underestimated chilling time and the cake pops started to fall off their sticks during dipping. Lesson learned: chilling is key. Also, tapping off excess coating rather than shaking works better to avoid cracking or uneven coating. The smell of vanilla and sweet coating filling the kitchen is a reliable sign you’re close to the finish line—and trust me, it’s worth the wait.
Cooking Tips & Techniques
Making perfect cake pops takes a little finesse, but nothing too complicated. First, the key is in the cake texture. If the cake is too dry, the pops will crumble and won’t hold shape well. Overly moist cake makes the mixture too sticky. This is why I always use cream cheese to bind—the fat and moisture help everything stick without sogginess.
When rolling the pops, keep your hands cool and powdered with a little powdered sugar if needed to prevent sticking. Chill the shaped balls well before dipping; cold pops absorb less coating and hold on to the sticks better.
For melting the candy melts, use a microwave in short bursts (20-30 seconds) and stir thoroughly. Overheating causes the candy to seize or get grainy. If it starts to thicken, add a teaspoon of vegetable oil or shortening to smooth it out.
Tapping off excess coating gently on the edge of the bowl is better than shaking, which can cause cracks or uneven coating. If you get air bubbles, lightly tap the coated pop on the bowl’s edge to release them before setting upright.
Drawing designs with edible markers after the coating sets is a fun way to add personality without extra mess. I’ve also learned that working in small batches keeps the coating fresh and glossy.
Variations & Adaptations
- Flavor Variations: Swap vanilla cake mix for chocolate or funfetti for a playful twist. Adding a teaspoon of lemon zest to the cake mix brightens the flavor for a spring-ready pop.
- Dietary Alternatives: Use gluten-free cake mix for gluten sensitivities. Dairy-free cream cheese alternatives and coconut-based candy melts make the recipe vegan-friendly.
- Coating Colors: Instead of school bus yellow, try pastel pink or mint green candy melts for different seasons or themes.
- Decorative Twists: Add crushed cookies or sprinkles right after dipping for texture and color contrast. I once tried mini edible flowers pressed gently onto the wet coating—super cute and unexpected.
- Cooking Method: For a sturdier coating, let the dipped pops set briefly in the fridge before decorating. If in a hurry, a quick chill in the freezer (5 minutes) helps but don’t leave too long or condensation can form.
Serving & Storage Suggestions
Serve these school bus yellow vanilla cake pops at room temperature for the best texture and flavor. They look adorable arranged standing up in a decorated styrofoam block or in a clear jar tied with a ribbon for an easy back-to-school gift. They pair nicely with a simple fruit salad or a glass of cold milk for a classic sweet snack.
Store leftovers in an airtight container in the refrigerator for up to 3 days. To keep the coating crisp, separate layers with parchment paper. When ready to eat, let them sit at room temperature for 10-15 minutes to soften slightly.
If you want to freeze them, place the cake pops on a lined tray, freeze until firm, then transfer to a freezer-safe container. Thaw in the fridge overnight before serving. The flavor holds up well, though the coating might soften a bit.
Flavors actually deepen a little after resting, so making these a day ahead can be a good call if you want a more melded vanilla taste. Just don’t skip chilling before dipping!
Nutritional Information & Benefits
One school bus yellow vanilla cake pop (approximately 1.5 ounces / 43 grams) contains roughly 160-180 calories, with 3-5 grams of protein and 15-20 grams of carbohydrates, mainly from sugar and flour. The cream cheese adds a bit of fat and moisture, making each bite rich but balanced.
Vanilla, while mainly a flavor enhancer, has antioxidant properties, and cream cheese provides calcium and vitamin A. Since this is a treat, moderation is key, but it’s a fun way to celebrate without going overboard.
For those watching dietary restrictions, this recipe can be adapted gluten-free and dairy-free, making it accessible for many. It’s a sweet moment of comfort food reimagined for busy family life, and that’s a small wellness win in my book.
Conclusion
The perfect school bus yellow vanilla cake pops are exactly what you want when you need a quick, cheerful treat that feels special without the fuss. They’re kid-friendly, visually fun, and hit that sweet vanilla spot every time. I love how versatile this recipe is—you can tweak it for dietary needs or decorate it to fit any theme, but it always comes out tasting like a little piece of happiness on a stick.
Give this recipe a try and see how a simple vanilla cake pop turns into a memorable back-to-school moment. I’m pretty sure these will become a staple for your family’s snack time, just like they are in mine. If you end up trying some creative decorations or flavor swaps, I’d love to hear how it goes!
FAQs About Perfect School Bus Yellow Vanilla Cake Pops
How long do cake pops stay fresh?
Stored in an airtight container in the fridge, cake pops stay fresh for up to 3 days. For longer storage, freeze them and thaw in the fridge before serving.
Can I make cake pops without cream cheese?
Yes, you can use frosting or a cream cheese substitute, but cream cheese adds the best moisture and texture. Buttercream or store-bought frosting can work in a pinch.
What if my candy melts are too thick?
Add a small teaspoon of vegetable oil or shortening to thin them out. Heat in short bursts and stir well to avoid overheating.
How do I prevent cake pops from falling off the sticks?
Chill the cake balls well before inserting sticks, and dip the stick tip in melted candy before inserting as a glue. Avoid dipping warm cake balls.
Can I decorate cake pops without sprinkles?
Absolutely! You can use edible markers, drizzle with contrasting candy melts, or leave them plain for a classic look.
For a fun twist on party appetizers, you might enjoy the mini cheese balls recipe—perfect for savory snacks alongside your sweet cake pops. And if you’re interested in easy party spreads, the creamy salmon dip is a smooth, flavorful match for any gathering where finger foods shine.
Pin This Recipe!

Perfect School Bus Yellow Vanilla Cake Pops

These bright and cheerful vanilla cake pops are a quick and easy back-to-school treat, featuring moist cake, creamy coating, and a nostalgic vanilla flavor with a fun school bus yellow color.
- Prep Time: 15 minutes
- Cook Time: 30 minutes
- Total Time: 45 minutes
- Yield: 24 cake pops 1x
- Category: Dessert
- Cuisine: American
Ingredients
- 1 box vanilla cake mix (about 15.25 oz / 432 g)
- Water, oil, and eggs as called for on the cake mix box (usually about 1 cup water, 1/3 cup oil, and 3 large eggs)
- 8 oz (225 g) cream cheese, softened
- 12 oz (340 g) yellow candy melts or white chocolate melting wafers
- Yellow gel food coloring (optional, just a drop)
- Sprinkles or edible markers for decorating (optional)
- Cake pop sticks or sturdy lollipop sticks
- Styrofoam block or cake pop stand for drying
Instructions
- Preheat oven to 350°F (175°C). Prepare the vanilla cake mix according to package instructions using water, oil, and eggs. Pour batter into a greased 9×13 inch (23×33 cm) pan and bake for 28-32 minutes or until a toothpick inserted comes out clean. Let cool completely on a wire rack (about 1 hour).
- Once cooled, crumble the cake into a large mixing bowl using your hands or a fork until fine crumbs form but not powdery.
- Add 8 oz (225 g) softened cream cheese to the cake crumbs. Mix with an electric mixer or hands until the mixture is moist and sticks together when pressed. Adjust cream cheese or crumbs if too dry or wet.
- Roll the mixture into 1-inch (2.5 cm) balls and place on a parchment-lined baking sheet. Chill in the refrigerator for at least 30 minutes or freezer for 15 minutes to help hold shape.
- Melt 12 oz (340 g) yellow candy melts in a microwave-safe bowl in 30-second intervals, stirring until smooth. Add a drop of yellow gel food coloring for a deeper yellow if desired.
- Dip the tip of each cake pop stick into the melted candy and insert halfway into each cake ball to secure the ball on the stick.
- Hold the stick and dip each cake pop into the candy melts, tapping off excess coating gently. Rotate to coat evenly. Place dipped pops upright in a styrofoam block or cake pop stand to dry. Let set at room temperature for 15-20 minutes.
- Decorate with edible markers or sprinkles before the coating fully hardens if desired.
- Serve immediately or store in an airtight container in the refrigerator for up to 3 days.
Notes
Chill cake balls well before dipping to prevent falling off sticks. Use short microwave bursts and stir candy melts often to avoid overheating. Tap off excess coating gently instead of shaking to prevent cracks. Powder hands with sugar to prevent sticking when rolling. For dairy-free, substitute cream cheese with coconut cream or vegan cream cheese. For gluten-free, use gluten-free cake mix.
Nutrition
- Serving Size: 1 cake pop (approxim
- Calories: 170
- Sugar: 14
- Sodium: 150
- Fat: 8
- Saturated Fat: 4
- Carbohydrates: 18
- Fiber: 0.5
- Protein: 4
Keywords: cake pops, vanilla cake pops, school bus yellow, back to school treats, easy cake pops, kid-friendly dessert, candy melts, cream cheese cake pops