Spilling a whole box of red gelatin on the counter and realizing the blueberries were nowhere to be found was not how I pictured starting this dessert. But with the clock ticking and hungry kids circling like sharks, I had to think fast — and honestly, that’s how this Festive Red White and Blue Layered Jello Poke Cake was born. It wasn’t some carefully planned star-spangled masterpiece but a last-minute save during a chaotic afternoon when the usual Fourth of July desserts just wouldn’t cut it.
The smell of sweet strawberry jello mixing with the soft vanilla cake filled the kitchen, a hint of blueberry peeking through (thank goodness for frozen berries in the freezer). The poke technique—pricking the cake to soak in the jello—turned what could’ve been a dry mess into layers of colorful, wobbly delight. At that moment, I realized this wasn’t just a quick fix; it was a festive treat that could easily become a tradition. It’s light, fun, and honestly, pretty hard to mess up once you get the hang of poking.
Making this cake felt like sneaking in a little celebration amid the chaos—like a quiet promise that no matter how busy things are, there’s always room for something sweet and joyful on the table. That’s why this recipe stuck with me. It’s simple enough to whip up on a hectic day but special enough to bring a smile to anyone’s face.
Why You’ll Love This Recipe
After testing dozens of layered poke cakes, this Festive Red White and Blue Layered Jello Poke Cake stands out for a few solid reasons. Honestly, it’s become my go-to for summer parties and casual family dinners where I want something that looks impressive but doesn’t require hours in the kitchen.
- Quick & Easy: Comes together in under 45 minutes, with most of the time spent just letting the cake chill and set. Perfect for those last-minute celebrations or when you’re juggling a million things.
- Simple Ingredients: You don’t need specialty items or a trip to a specialty store. Most of these ingredients are pantry staples or standard grocery finds, like boxed cake mix and flavored gelatin.
- Perfect for Summer and Holidays: Whether it’s Independence Day, Memorial Day, or a festive picnic, this cake’s colors make it a natural centerpiece.
- Crowd-Pleaser: Kids love the bright colors and juicy bursts of jello, while adults appreciate the nostalgic, light texture.
- Unbelievably Delicious: The moist cake soaked with jello layers creates a fun, slightly tangy sweetness balanced by creamy whipped topping.
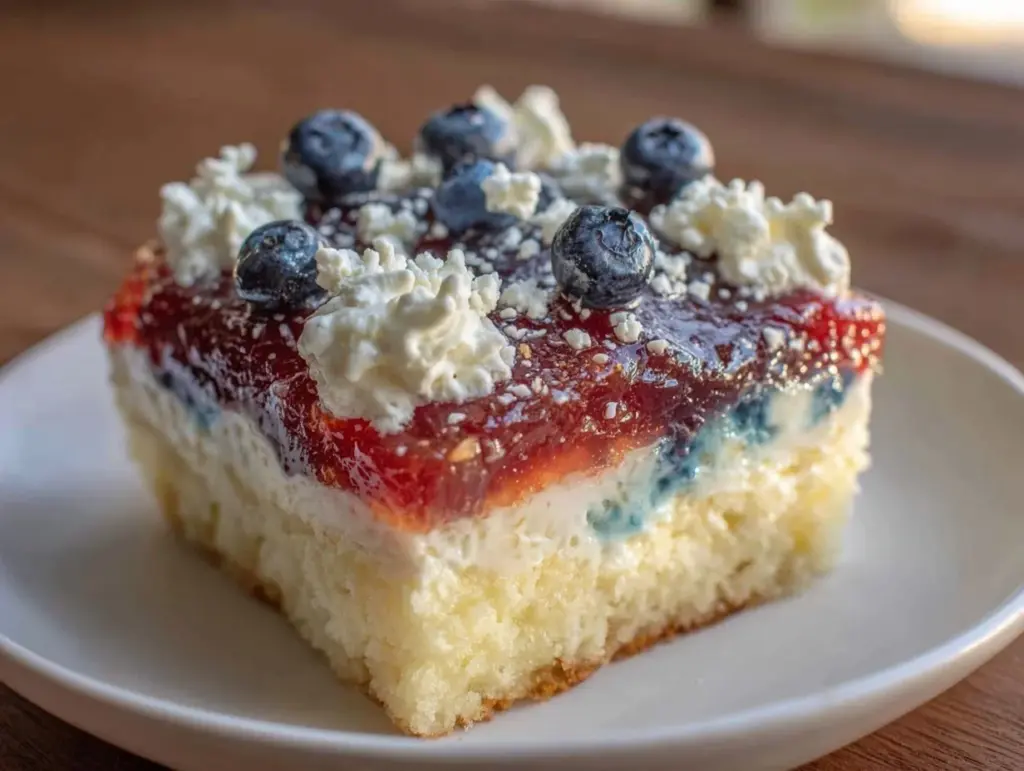
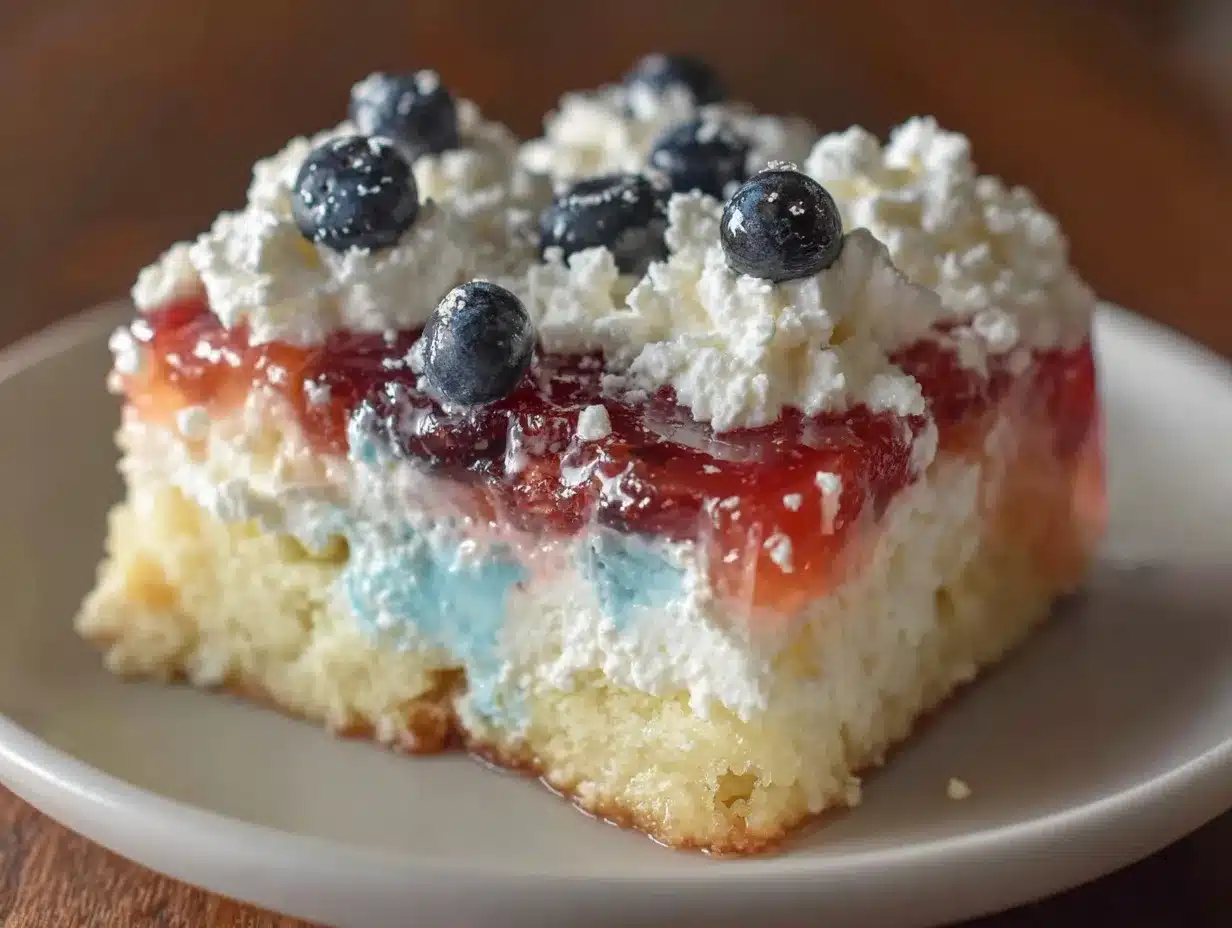
What really makes this poke cake different is the layering technique. Instead of just one jello flavor, you create distinct red and blue layers that peek through the white whipped cream, giving a festive stripe effect that’s both pretty and delicious. Plus, I like to use a mix of fresh and frozen berries to add texture without overpowering the delicate cake. It’s not your typical Jello dessert — it’s a playful twist that feels homemade and inviting.
This recipe isn’t just about looks, though. It’s about capturing that lighthearted spirit of summer gatherings, the kind that makes you slow down and savor a sweet moment together.
What Ingredients You Will Need
This recipe uses simple, wholesome ingredients to deliver bold flavor and satisfying texture without the fuss. Most of the ingredients are common pantry staples, making this cake easy to throw together even when you’re short on time. Here’s what you’ll need:
- For the Cake:
- 1 box white cake mix (about 15.25 oz) – I recommend Duncan Hines for a moist crumb
- Ingredients required on cake mix box (usually eggs, oil, and water)
- For the Jello Layers:
- 1 package (3 oz) red gelatin (strawberry or raspberry) – pick your favorite brand for flavor punch
- 1 package (3 oz) blue gelatin (blueberry or blue raspberry) – blue raspberry tends to be more vibrant
- 2 cups boiling water (divided)
- 1 ½ cups cold water (divided)
- For the Topping:
- 2 cups heavy whipping cream, chilled
- ¼ cup powdered sugar
- 1 teaspoon vanilla extract
- Fresh blueberries and strawberries for garnish (optional but highly recommended)
Ingredient Tips: If you prefer a lighter topping, feel free to swap heavy cream for a whipped topping like Cool Whip. For a slightly healthier spin, you can try Greek yogurt mixed with a bit of honey instead of the whipped cream (though it changes the texture). Frozen berries work great if fresh aren’t in season — just be sure to thaw and drain them well.
Equipment Needed
- 9×13-inch baking pan – A glass or metal pan works, but glass helps you see the beautiful layers better.
- Large mixing bowls – For cake batter and whipping cream.
- Electric mixer or stand mixer – Whipping cream to stiff peaks is much easier this way.
- Measuring cups and spoons – Precision matters for gelatin and sugar amounts.
- Toothpick or fork – For poking holes in the cake to absorb the jello.
- Spatula – For folding and smoothing the topping.
If you don’t have an electric mixer, a good old-fashioned whisk and some elbow grease can do the trick, but it’ll take longer. I once tried a handheld mixer for this recipe and found that the stand mixer gave me more consistent, fluffy peaks in less time. For budget-friendly options, you can use disposable aluminum pans for baking, but be mindful they conduct heat differently, so watch your baking time.
Preparation Method
- Prepare the Cake Batter: Preheat your oven to 350°F (175°C). Follow the instructions on the white cake mix box, usually combining the mix with eggs, oil, and water. Beat until smooth. Pour the batter evenly into the 9×13-inch pan. Bake for 28-32 minutes or until a toothpick inserted in the center comes out clean. Let it cool completely on a wire rack (about 30-40 minutes).
- Poke the Cake: Using a fork or a wooden skewer, poke holes all over the surface of the cooled cake about 1 inch apart. Don’t skimp here — the more holes, the better the jello soaks in, making it moist and flavorful.
- Prepare the Red Jello: In a heat-safe bowl, dissolve the red gelatin powder in 1 cup boiling water. Stir until completely dissolved (about 2 minutes). Add ¾ cup cold water and mix. Let it cool to room temperature but don’t let it set.
- Pour the Red Jello: Slowly pour the cooled red jello evenly over half the cake (one side). Tilt the pan slightly if needed to help it soak in. Refrigerate for about 15 minutes to let it start setting but still be a bit liquid.
- Prepare the Blue Jello: Repeat the process with the blue gelatin: dissolve in 1 cup boiling water, stir well, add ¾ cup cold water, and cool to room temperature.
- Pour the Blue Jello: Pour the blue jello over the other half of the cake, gently tilting the pan to avoid mixing with the red jello side. Refrigerate for at least 2 hours until fully set.
- Make the Whipped Cream Topping: In a chilled bowl, beat the heavy whipping cream with powdered sugar and vanilla extract on medium-high speed until stiff peaks form (about 3-5 minutes). Be careful not to overbeat or you’ll get butter.
- Top the Cake: Spread the whipped cream evenly over the jello layers. Garnish with fresh blueberries and sliced strawberries for that extra festive touch.
- Final Chill: Refrigerate the cake for at least another hour before serving to let all the flavors meld together.
Pro Tip: If you notice the jello is setting too fast before pouring, just warm the pan slightly or stir the gelatin gently to keep it pourable. And if you want to avoid any jello mixing at the edges, use a spatula to clean the border between the colors before chilling.
Cooking Tips & Techniques
Getting that perfect poke cake texture can be tricky the first time, but here are some lessons I picked up along the way:
- Cool the Cake Fully: If the cake is even a little warm, the jello melts and won’t set properly. Patience here pays off.
- Don’t Skimp on Poking: The holes allow the jello to seep in, so make a consistent pattern and poke deep enough without breaking the cake apart.
- Pour Jello Slowly: Pour the gelatin gently and evenly to avoid mixing colors or washing away the cake crumbs.
- Chill in Stages: Let each jello layer set a bit before adding the next to keep those crisp red and blue layers.
- Whip the Cream Just Right: Stiff peaks hold their shape and give a light texture that balances the jello’s sweetness.
One time, I rushed through the jello pouring and ended up with a purple mess instead of distinct red and blue layers. Lesson learned: slow and steady wins the layering game! Also, letting the cake chill overnight really helps the flavors blend and texture firm up for cleaner slices.
Multitasking tip: While the cake cools, whip your cream and prep the jello mixtures. Keeping your workspace tidy helps avoid spills like the first time I made this (trust me, gelatin on countertops is no fun!).
Variations & Adaptations
This layered jello poke cake is pretty flexible. Here are some ways you can switch it up:
- Dietary Adjustments: Use a gluten-free white cake mix to make this dessert gluten-free. For a dairy-free version, swap heavy cream for coconut whipped topping.
- Seasonal Flavors: Swap red and blue jellies for other seasonal colors and flavors, like lime and orange for a tropical twist.
- Flavor Boost: Add a layer of cream cheese frosting under the whipped cream for a tangy contrast. I sometimes mix a bit of lemon zest into the whipped cream for a fresh note.
- Alternative Fruits: Use raspberries and blackberries instead of strawberries and blueberries for a richer berry profile.
- Cooking Methods: For a no-bake option, skip the cake entirely and layer jello and whipped cream over store-bought pound cake slices in a trifle dish.
Personally, I’ve tried this with a homemade vanilla cake instead of box mix, and while it’s delicious, the boxed cake is foolproof and quicker—perfect when time is tight. I also experimented with a festive holiday pinwheel appetizer alongside this cake, and the combo was a hit for summer get-togethers.
Serving & Storage Suggestions
This cake is best served chilled, right out of the fridge. The layers hold up beautifully when sliced with a sharp serrated knife dipped in hot water (wipe between cuts for clean edges). It pairs wonderfully with light beverages like iced tea or sparkling lemonade to keep the meal refreshing.
For storage, cover the cake tightly with plastic wrap or a cake dome and refrigerate. It keeps well for up to 3 days, though it’s honestly so good people usually finish it in one sitting. You can freeze slices individually wrapped in plastic wrap and foil for up to a month—just thaw overnight in the fridge.
Flavors tend to meld and soften overnight, making the cake even more luscious the next day. If you want to refresh the whipped cream topping, you can lightly whip a bit more cream and spread a thin layer before serving leftovers.
Serving this alongside some light, savory bites like a fresh shrimp salad appetizer or a simple cheese plate balances the sweetness and rounds out your festive spread.
Nutritional Information & Benefits
This Festive Red White and Blue Layered Jello Poke Cake offers a moderate treat option compared to richer desserts like fudge or cheesecake. A typical slice (about 1/12th of the cake) contains approximately:
| Calories | 280-320 kcal |
|---|---|
| Fat | 10-12 g |
| Carbohydrates | 45-50 g |
| Protein | 3-4 g |
| Sugar | 30-35 g |
The key ingredients bring some benefits, too: gelatin contains collagen which is good for skin and joints, and the fresh berries add vitamin C and antioxidants. The cake is gluten-containing unless you swap in a gluten-free mix, and it contains dairy in the whipped cream topping (easily swapped for coconut cream if needed).
From my wellness perspective, this dessert hits the sweet spot—fun, festive, and indulgent without being overly heavy or dense. It’s a wonderful way to enjoy summer flavors while keeping things light.
Conclusion
This Festive Red White and Blue Layered Jello Poke Cake is a simple, cheerful dessert that brings a little sparkle to any celebration. It’s the kind of recipe that’s as forgiving as it is fun, perfect for busy cooks who want a standout dish without fuss. I love how it balances nostalgia with a fresh twist, and the way those red and blue layers peek through the fluffy white topping just makes me smile every time.
Feel free to play with the flavors or swap out fruits to suit your taste — this cake welcomes creativity. If you try it, I’d love to hear how your version turned out and what fun variations you came up with. Let’s keep making the kitchen a place for joyful, no-stress treats.
FAQs
Can I use homemade cake instead of boxed cake mix?
Absolutely! Homemade vanilla cake works beautifully, but the boxed mix keeps things simple and consistent, especially when you’re short on time.
How do I prevent the jello layers from mixing?
Pour each jello layer slowly and let the first layer set slightly in the fridge before adding the second. Using a chilled cake also helps keep the layers distinct.
Can I make this cake ahead of time?
Yes, it actually tastes better after chilling overnight. Just cover it tightly and store in the fridge.
What can I use instead of heavy cream for the topping?
You can use whipped topping like Cool Whip or coconut whipped cream for a dairy-free option.
Is this cake suitable for kids?
Definitely! Kids love the bright colors and fruity flavors. Just be mindful of any allergies to gelatin or dairy in your family.
Pin This Recipe!
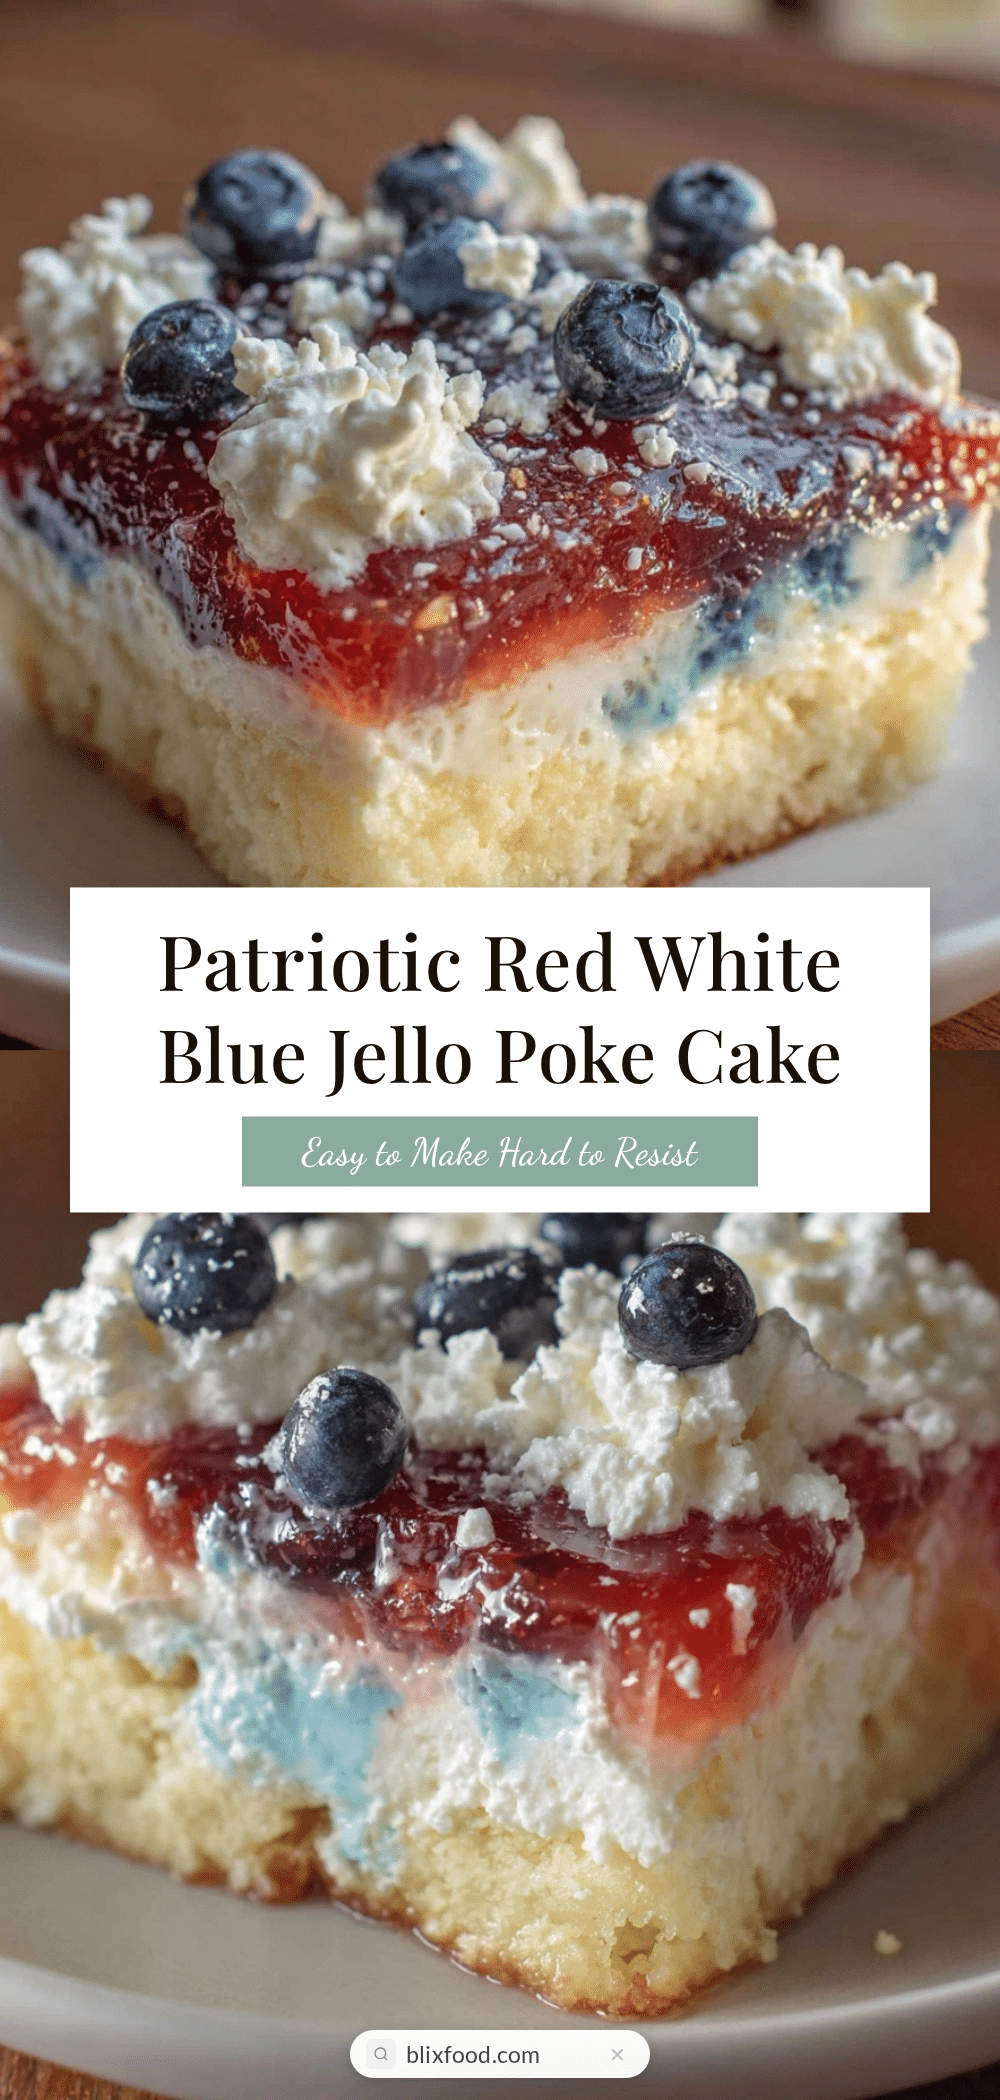
Festive Red White and Blue Layered Jello Poke Cake
A quick and easy layered jello poke cake with red and blue gelatin layers soaked into a moist white cake, topped with whipped cream and fresh berries. Perfect for summer parties and festive celebrations.
- Prep Time: 15 minutes
- Cook Time: 30 minutes
- Total Time: 3 hours 45 minutes
- Yield: 12 servings 1x
- Category: Dessert
- Cuisine: American
Ingredients
- 1 box white cake mix (about 15.25 oz) plus ingredients required on cake mix box (usually eggs, oil, and water)
- 1 package (3 oz) red gelatin (strawberry or raspberry)
- 1 package (3 oz) blue gelatin (blueberry or blue raspberry)
- 2 cups boiling water (divided)
- 1 ½ cups cold water (divided)
- 2 cups heavy whipping cream, chilled
- ¼ cup powdered sugar
- 1 teaspoon vanilla extract
- Fresh blueberries and strawberries for garnish (optional)
Instructions
- Preheat oven to 350°F (175°C). Prepare cake batter according to box instructions, combining cake mix with eggs, oil, and water. Beat until smooth.
- Pour batter evenly into a 9×13-inch baking pan. Bake for 28-32 minutes or until a toothpick inserted in the center comes out clean.
- Cool cake completely on a wire rack (about 30-40 minutes).
- Using a fork or wooden skewer, poke holes all over the surface of the cooled cake about 1 inch apart.
- Dissolve red gelatin powder in 1 cup boiling water, stir until dissolved (about 2 minutes). Add ¾ cup cold water and mix. Let cool to room temperature but do not let set.
- Slowly pour cooled red jello evenly over half the cake. Tilt pan if needed to help soak in. Refrigerate about 15 minutes to start setting but still liquid.
- Dissolve blue gelatin powder in 1 cup boiling water, stir well. Add ¾ cup cold water and cool to room temperature.
- Pour blue jello over the other half of the cake, tilting pan gently to avoid mixing with red jello. Refrigerate at least 2 hours until fully set.
- In a chilled bowl, beat heavy whipping cream with powdered sugar and vanilla extract on medium-high speed until stiff peaks form (3-5 minutes).
- Spread whipped cream evenly over jello layers. Garnish with fresh blueberries and sliced strawberries.
- Refrigerate cake for at least another hour before serving to let flavors meld.
Notes
Cool the cake completely before poking holes to prevent jello from melting. Pour jello layers slowly and chill between layers to keep colors distinct. Use a serrated knife dipped in hot water for clean slices. Cake can be made gluten-free with gluten-free cake mix and dairy-free by substituting coconut whipped topping for heavy cream.
Nutrition
- Serving Size: 1 slice (1/12th of c
- Calories: 300
- Sugar: 33
- Sodium: 250
- Fat: 11
- Saturated Fat: 7
- Carbohydrates: 48
- Fiber: 1
- Protein: 3.5
Keywords: jello poke cake, layered jello cake, red white and blue dessert, Fourth of July cake, easy summer dessert, patriotic cake, poke cake recipe