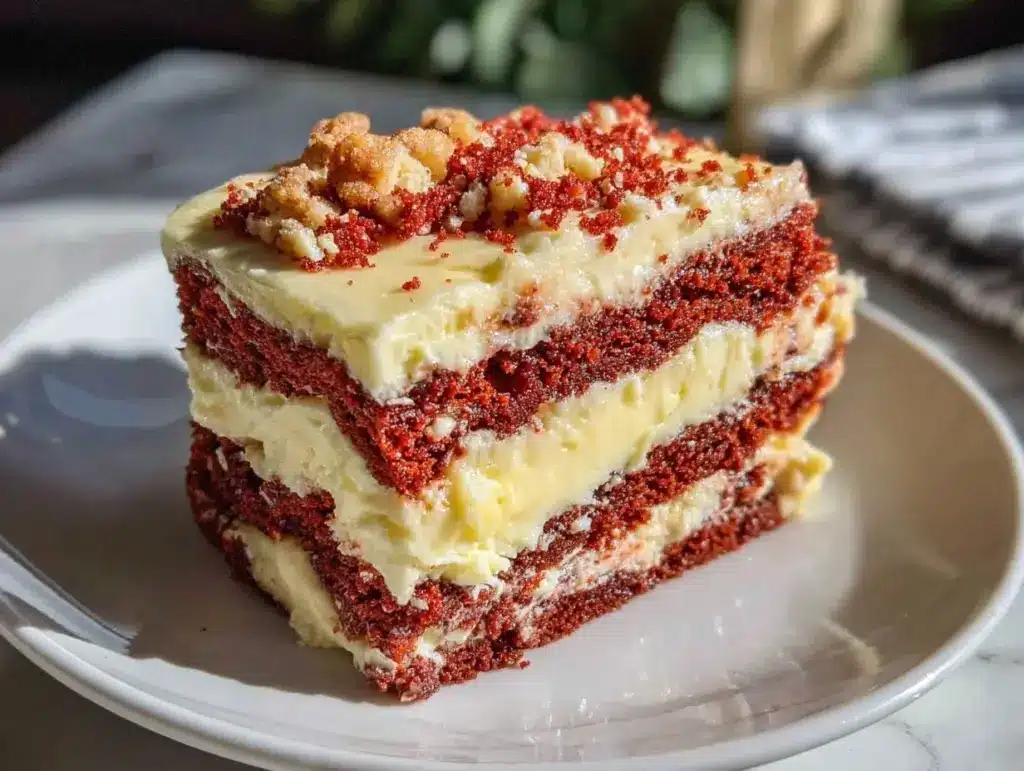
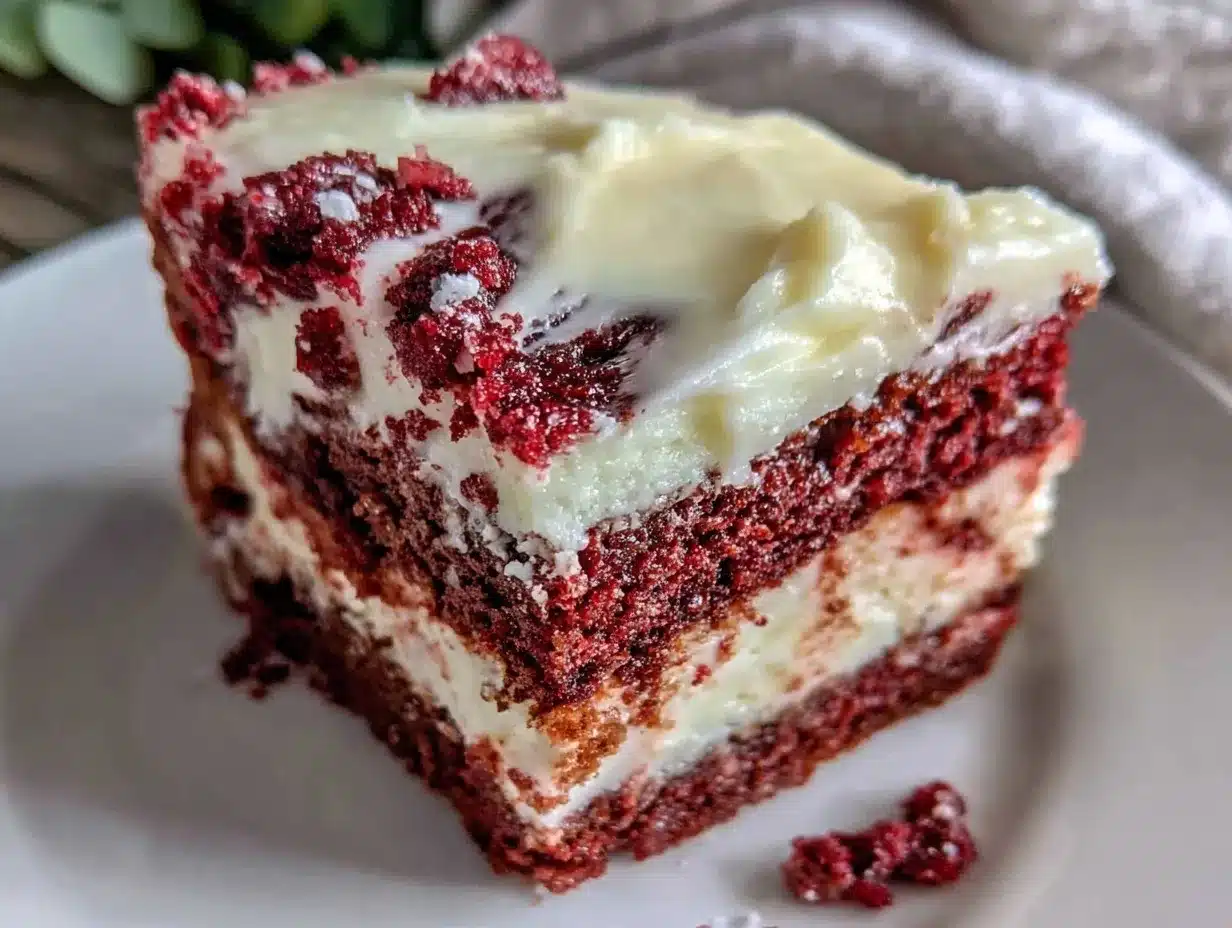
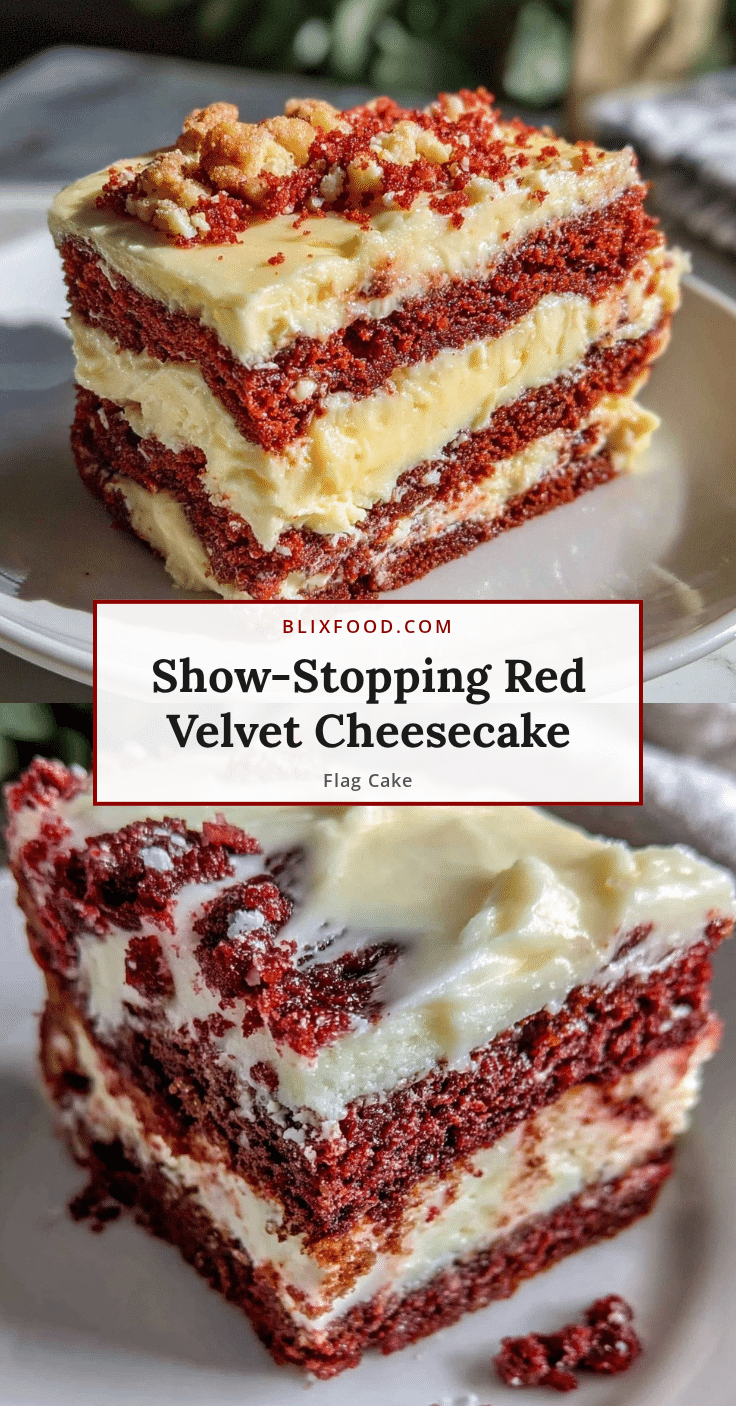
“Are you sure this is going to work?” my friend whispered from the kitchen doorway, eyeing my towering creation with a mix of skepticism and curiosity. That afternoon, I was elbow-deep in crafting what would become my show-stopping Red Velvet Cheesecake Flag Cake with Cream Cheese Frosting—a dessert born from a last-minute idea to bring something truly unforgettable to a casual backyard gathering. Honestly, I wasn’t expecting this cake to steal the show, but once it was sliced, with its vibrant layers of red velvet cake and creamy cheesecake peeking through like stripes on a flag, everyone’s doubts melted away.
The smell of warm cocoa and tangy cream cheese filling filled the air, mingling with the soft hum of summer conversations. I’d made red velvet before, sure, and cheesecake too, but putting them together in this playful, patriotic flag design was a happy accident sparked by a craving for something both celebratory and comforting. The cream cheese frosting? Oh, that was the secret weapon—rich, smooth, and just tangy enough to make each bite feel like a little party in your mouth.
What stuck with me most was how effortlessly this cake brought people around the table—neighbors who barely spoke before were suddenly swapping bites and stories. It wasn’t just a cake; it was a reason to linger a little longer, to laugh a little louder. That’s why this recipe stays close to my heart, and why I keep coming back to it when I want a dessert that’s both showy and deeply satisfying.
Why You’ll Love This Recipe
After making this Red Velvet Cheesecake Flag Cake more times than I can count, here’s why it’s become a standout in my recipe box:
- Quick & Easy: Despite its impressive look, this cake comes together in about 2 hours, making it perfect for weekend baking or holiday celebrations.
- Simple Ingredients: No need for fancy or hard-to-find items—you’ll mostly use pantry staples like cocoa powder, cream cheese, and flour.
- Perfect for Celebrations: Whether it’s Fourth of July, Memorial Day, or any festive occasion, this cake’s patriotic flag design makes it a natural centerpiece.
- Crowd-Pleaser: The combination of moist red velvet cake and creamy cheesecake filling always gets compliments from kids and adults alike.
- Unbelievably Delicious: The cream cheese frosting is silky and just tangy enough to balance the sweetness, making every bite a perfect harmony.
What sets this recipe apart is the layering technique that creates the flag effect without complicated molds or special pans. Plus, blending the cheesecake layer with a touch of vanilla and a hint of lemon zest adds a subtle brightness to the richness. Honestly, it’s the kind of dessert that makes you close your eyes after the first bite and savor the moment.
If you’ve ever dreamed of a festive cake that feels homemade yet looks like it came from a bakery, this is it. And if you want to keep your appetizers just as crowd-pleasing, you might enjoy the creamy salmon dip or the festive cranberry cream cheese spread for your next get-together.
What Ingredients You Will Need
This recipe uses simple, wholesome ingredients to deliver bold flavor and an eye-catching presentation without the fuss. Most of these you probably have on hand, and a few tips on choosing the best versions can make a big difference.
- For the Red Velvet Cake Layers:
- All-purpose flour (2 ½ cups / 310g) – sifted for a light texture
- Cocoa powder (1 ½ tbsp / 12g) – use Dutch-processed for a deeper color
- Baking soda (1 tsp / 5g)
- Salt (½ tsp / 3g)
- Granulated sugar (1 ¾ cups / 350g)
- Vegetable oil (1 cup / 240ml) – adds moistness without overpowering
- Large eggs (2) – room temperature helps the batter mix better
- Buttermilk (1 cup / 240ml) – tangy and tenderizing, but you can substitute with milk plus 1 tbsp vinegar
- Red food coloring (2 tbsp) – gel colors are best for vibrant hues without thinning the batter
- Vanilla extract (1 tsp / 5ml)
- White vinegar (1 tsp / 5ml) – reacts with baking soda for lift
- For the Cheesecake Layer:
- Cream cheese (16 oz / 450g) – softened for smooth blending (I prefer Philadelphia brand)
- Sour cream (½ cup / 120ml) – adds creaminess and slight tang
- Granulated sugar (¾ cup / 150g)
- Large eggs (3) – room temperature
- Vanilla extract (1 tsp / 5ml)
- Lemon zest (1 tsp) – optional but brightens the flavor beautifully
- For the Cream Cheese Frosting:
- Cream cheese (8 oz / 225g) – softened
- Unsalted butter (½ cup / 115g) – softened
- Powdered sugar (4 cups / 480g) – sifted to avoid lumps
- Vanilla extract (1 tsp / 5ml)
- Heavy cream (2-3 tbsp / 30-45ml) – for spreading consistency
For substitutions, you can swap all-purpose flour with a gluten-free blend if needed, and dairy-free cream cheese works well for the frosting, though it might be slightly less thick. When selecting cream cheese, softer varieties blend more smoothly, which really helps with that signature velvety cheesecake texture.
Equipment Needed
- Two 9-inch (23 cm) round cake pans – nonstick or well-greased and lined with parchment paper
- Mixing bowls – medium and large sizes for separate batters
- Electric mixer or stand mixer – for cream cheese frosting and cheesecake layer
- Measuring cups and spoons – accuracy is key for baking success
- Rubber spatula – great for folding and scraping bowls clean
- Cooling racks – allow cakes to cool evenly and prevent sogginess
- Offset spatula or butter knife – essential for smooth frosting application
- Toothpicks or cake tester – check cake doneness
If you don’t have an electric mixer, a sturdy whisk and some patience will do in a pinch, especially for the cheesecake batter. For budget-conscious bakers, lining your pans with parchment paper helps avoid greasing mishaps and cleanup. I’ve tried this recipe with both glass and metal pans—metal heats more evenly, which I prefer for consistent texture.
Preparation Method
- Preheat your oven to 350°F (175°C). Grease and line two 9-inch cake pans with parchment paper. This keeps the layers from sticking and makes removing them easier.
- Make the red velvet cake batter: In a medium bowl, sift together 2 ½ cups (310g) flour, 1 ½ tbsp (12g) cocoa powder, 1 tsp (5g) baking soda, and ½ tsp (3g) salt. Set aside.
- In a large bowl, whisk 1 ¾ cups (350g) sugar and 1 cup (240ml) vegetable oil until combined. Add 2 large eggs one at a time, beating well after each addition.
- Mix in 1 tbsp (15ml) vanilla extract, 2 tbsp red food coloring, and 1 tsp white vinegar.
- Alternately add the dry ingredients and 1 cup (240ml) buttermilk to the wet mixture, beginning and ending with dry. Mix until just combined—don’t overbeat or the cake will be dense.
- Prepare the cheesecake layer: In a separate bowl, beat 16 oz (450g) softened cream cheese with ¾ cup (150g) sugar until smooth and creamy.
- Add ½ cup (120ml) sour cream, 3 large eggs (one at a time), 1 tsp vanilla, and 1 tsp lemon zest. Beat just until combined, scraping the bowl as needed.
- Layer the cake: Pour half of the red velvet batter evenly into the two pans. Then, carefully pour the cheesecake batter on top in an even layer over the red velvet.
- Top with remaining red velvet batter, spreading gently to cover the cheesecake layer.
- Bake for 50-60 minutes. The cake is done when a toothpick inserted near the center comes out mostly clean with a few moist crumbs. The cheesecake layer may jiggle slightly but shouldn’t be liquid.
- Cool cakes in pans for 15 minutes, then turn out onto cooling racks to cool completely—this helps the layers set and prevents cracking.
- Make the cream cheese frosting: Beat 8 oz (225g) softened cream cheese and ½ cup (115g) unsalted butter until fluffy. Gradually add 4 cups (480g) powdered sugar and 1 tsp vanilla. Adjust consistency with 2-3 tbsp heavy cream until spreadable.
- Assemble the flag cake: Once cakes are fully cool, slice each cake horizontally into 3 even layers (you’ll have 6 layers total). Alternate red velvet and cheesecake layers to create the stripes of the flag.
- Frost the entire cake with cream cheese frosting, smoothing the top and sides. For a patriotic touch, add a small cluster of fresh berries or edible stars on top.
- Chill the cake for at least 2 hours before serving to let flavors meld and frosting set beautifully.
Pro tip: If slicing the layers feels tricky, chill the cakes beforehand or use a serrated knife with a gentle sawing motion. Also, watch the baking time closely, as ovens vary—start checking at 50 minutes.
Cooking Tips & Techniques
When you’re making a layered cake like this, timing and temperature matter a lot. I learned early on that letting the red velvet cake layers cool completely before slicing is a game changer. Warm cakes are fragile and crumble easily, so patience here really pays off.
Another tip? Use room temperature eggs and dairy for smoother batter and frosting. Cold ingredients can cause lumps or curdled mixtures, which is frustrating when you want silky cheesecake filling.
Don’t forget to sift your dry ingredients! It helps avoid clumps of cocoa or baking soda, which can ruin the delicate crumb of the red velvet. Also, when mixing the batter, combine ingredients just until incorporated—overmixing develops gluten and leads to dense, tough cake.
For the cream cheese frosting, beat the cream cheese and butter well first before adding powdered sugar. This ensures a fluffy texture. If frosting feels too thick, add a splash of heavy cream, one tablespoon at a time, to loosen it without losing structure.
Finally, layering the cake is where your creativity shines. I like to use a ruler or cake leveler to get even slices. A steady hand and a sharp knife help keep those cheesecake stripes distinct and clean.
Variations & Adaptations
Want to switch things up? Here are some ideas to make this Red Velvet Cheesecake Flag Cake your own.
- Dietary: Use almond or gluten-free flour blend for a gluten-free version. Swap cream cheese with a dairy-free alternative to make it vegan-friendly, though the texture will be slightly different.
- Seasonal: For summer gatherings, add fresh strawberries or blueberries between layers for an extra fruity pop. In fall or winter, a sprinkle of cinnamon or nutmeg in the cake batter adds cozy warmth.
- Flavor Twists: Mix white chocolate chips into the cheesecake layer for a sweet surprise. Or add a splash of espresso powder to the red velvet batter for a mocha twist.
- Cooking Methods: If you don’t have two cake pans, bake the batter in batches. You can also bake the cheesecake separately in a springform pan and layer with the cake layers once cooled.
- Personal Variation: Once, I swapped the traditional cream cheese frosting for a lightly whipped mascarpone cream with a hint of vanilla and honey. It was lighter but still rich, and guests loved the subtle difference.
Serving & Storage Suggestions
This cake is best served chilled or at cool room temperature to let the creamy cheesecake and frosting shine. Slice it with a sharp, warm knife (dip it in hot water and wipe dry) for neat, clean edges.
It pairs beautifully with a cup of freshly brewed coffee or a glass of cold milk. For an extra festive touch, consider serving alongside fresh fruit or a light berry compote.
Store leftovers covered in the refrigerator for up to 4 days. The flavors actually deepen after a day, making it even tastier. You can freeze slices individually wrapped in plastic wrap and foil for up to 3 months—just thaw overnight in the fridge.
When reheating, avoid microwaving as it can melt the frosting. Instead, let the cake come to room temperature naturally or enjoy it chilled for that perfect texture.
Nutritional Information & Benefits
Estimated per slice (based on 12 servings):
| Calories | 450 kcal |
|---|---|
| Fat | 28g |
| Carbohydrates | 45g |
| Protein | 6g |
| Sugar | 35g |
Key ingredients like cream cheese provide calcium and protein, while cocoa powder offers antioxidants. The buttermilk adds a gentle tang and tender crumb without too many extra calories. As with any dessert, moderation is key, but this cake can be part of a balanced celebration.
For those mindful of allergens, this recipe contains dairy, eggs, and gluten, so consider substituting with gluten-free flours and dairy alternatives when needed.
Conclusion
This Red Velvet Cheesecake Flag Cake with Cream Cheese Frosting is one of those recipes that’s as fun to make as it is to eat. It’s not just a dessert but a centerpiece that brings people together, making celebrations feel extra special without added stress.
Feel free to tweak this recipe to match your taste or dietary needs—whether that means adding a personal twist or pairing it with easy party appetizers like the zesty garlic marinated mushrooms. It’s all about creating moments you can savor.
Give this cake a try and share how it went in the comments—I’d love to hear your adaptations or tips. At the end of the day, baking should be joyful, a little messy, and totally delicious.
Frequently Asked Questions
Can I make this cake ahead of time?
Absolutely! You can bake and assemble the cake a day before serving. Just keep it refrigerated and bring it to room temperature before slicing.
What if I don’t have buttermilk?
Mix 1 cup (240ml) of milk with 1 tbsp (15ml) white vinegar or lemon juice. Let it sit for 5 minutes to curdle before using.
How do I prevent the cheesecake layer from cracking?
Make sure not to overbeat the cheesecake batter and avoid rapid temperature changes. Baking the cake gently and cooling it gradually helps keep it smooth.
Can I use a different frosting?
Yes, though cream cheese frosting complements the cake best. You can try whipped mascarpone or a light buttercream if preferred.
What’s the best way to get even layers?
Use a serrated knife or cake leveler and chill the cake layers before slicing. This reduces crumbs and helps keep shapes clean for your flag design.
Pin This Recipe!
Red Velvet Cheesecake Flag Cake Recipe Easy Homemade Cream Cheese Frosting
A show-stopping layered cake combining moist red velvet cake and creamy cheesecake with a patriotic flag design, topped with rich cream cheese frosting. Perfect for celebrations and crowd-pleasing dessert.
- Prep Time: 30 minutes
- Cook Time: 1 hour
- Total Time: 2 hours 30 minutes
- Yield: 12 servings 1x
- Category: Dessert
- Cuisine: American
Ingredients
- 2 ½ cups (310g) all-purpose flour, sifted
- 1 ½ tbsp (12g) Dutch-processed cocoa powder
- 1 tsp (5g) baking soda
- ½ tsp (3g) salt
- 1 ¾ cups (350g) granulated sugar
- 1 cup (240ml) vegetable oil
- 2 large eggs, room temperature
- 1 cup (240ml) buttermilk (or milk plus 1 tbsp vinegar)
- 2 tbsp red food coloring (gel preferred)
- 1 tsp (5ml) vanilla extract
- 1 tsp (5ml) white vinegar
- 16 oz (450g) cream cheese, softened (Philadelphia brand preferred)
- ½ cup (120ml) sour cream
- ¾ cup (150g) granulated sugar
- 3 large eggs, room temperature
- 1 tsp (5ml) vanilla extract
- 1 tsp lemon zest (optional)
- 8 oz (225g) cream cheese, softened (for frosting)
- ½ cup (115g) unsalted butter, softened
- 4 cups (480g) powdered sugar, sifted
- 1 tsp (5ml) vanilla extract (for frosting)
- 2–3 tbsp (30-45ml) heavy cream (for frosting consistency)
Instructions
- Preheat oven to 350°F (175°C). Grease and line two 9-inch round cake pans with parchment paper.
- In a medium bowl, sift together flour, cocoa powder, baking soda, and salt. Set aside.
- In a large bowl, whisk sugar and vegetable oil until combined. Add eggs one at a time, beating well after each.
- Mix in vanilla extract, red food coloring, and white vinegar.
- Alternately add dry ingredients and buttermilk to wet mixture, beginning and ending with dry. Mix until just combined.
- In a separate bowl, beat cream cheese with sugar until smooth and creamy.
- Add sour cream, eggs one at a time, vanilla extract, and lemon zest. Beat until just combined.
- Pour half of the red velvet batter evenly into the two pans.
- Carefully pour cheesecake batter evenly over the red velvet layer.
- Top with remaining red velvet batter, spreading gently to cover cheesecake layer.
- Bake for 50-60 minutes until a toothpick inserted near center comes out mostly clean with a few moist crumbs.
- Cool cakes in pans for 15 minutes, then turn out onto cooling racks to cool completely.
- Beat cream cheese and butter until fluffy. Gradually add powdered sugar and vanilla extract. Adjust consistency with heavy cream until spreadable.
- Slice each cooled cake horizontally into 3 even layers (6 layers total). Alternate red velvet and cheesecake layers to create stripes.
- Frost entire cake with cream cheese frosting, smoothing top and sides. Optionally, decorate with fresh berries or edible stars.
- Chill cake for at least 2 hours before serving to let flavors meld and frosting set.
Notes
Use room temperature eggs and dairy for smoother batter and frosting. Sift dry ingredients to avoid clumps. Do not overmix batter to prevent dense cake. Chill cakes before slicing for clean layers. Adjust frosting consistency with heavy cream. For gluten-free, substitute flour with gluten-free blend; for vegan, use dairy-free cream cheese alternatives.
Nutrition
- Serving Size: 1 slice (1/12 of cak
- Calories: 450
- Sugar: 35
- Fat: 28
- Carbohydrates: 45
- Protein: 6
Keywords: red velvet cake, cheesecake, cream cheese frosting, flag cake, patriotic dessert, layered cake, easy cake recipe, celebration cake